Intro to FreeCAD Part 1: Why Choose FreeCAD
2024-12-16 | By ShawnHymel
FreeCAD is a powerful, free, and open-source computer-aided design (CAD) software that enables you to create complex 3D models. Whether you're a hobbyist looking to design parts for 3D printing or an engineer seeking a cost-effective CAD solution, FreeCAD offers a range of tools to bring your ideas to life. In this tutorial, we'll explore the pros and cons of using FreeCAD, delve into its history, compare it with other CAD packages, and guide you through the installation process and interface tour.
Syllabus
This is the first part of our 10-part Introduction to FreeCAD series that will walk you through creating various physical objects in this open-source CAD program. In the series, we’ll cover the following topics:
- Getting started and interface overview
- Sketches, constraints, and Part Design workbench
- Shape binders, expressions, and spreadsheets
- Heat set inserts
- Patterns and Boolean operations
- Revolutions, pipes, and lofts
- Sweeps and lofts with guide curves
- Curved surfaces
- Assembly workbench
- FEM workbench
A Brief History of CAD and FreeCAD
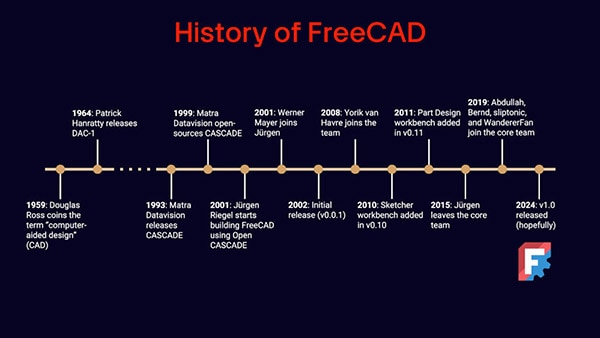
- 1950s: The term "CAD" was coined by computer scientist Douglas Ross, who envisioned the use of interactive graphical displays for design.
- 1960s: The release of DAC-1, one of the earliest commercial CAD programs, laid the groundwork for modern CAD systems.
- 1990s: Matra Datavision released Open Cascade Technology (OCCT), an open-source software development platform for 3D CAD, which became the foundation for FreeCAD.
- 2001: Jürgen Riegel began developing FreeCAD, utilizing OCCT, and released the first version in 2002.
- 2015-Present: Continuous development and contributions from a global community have enhanced FreeCAD's functionality and stability.
You can learn more about FreeCAD's history here.
Why Choose FreeCAD?
Before diving into the software, it's important to understand why FreeCAD might be the right choice for you.
Pros
- Free and Open Source: Unlike many commercial CAD packages, FreeCAD is completely free to use, even for commercial purposes. Its open-source nature means you have complete ownership of your work.
- Cross-Platform Compatibility: FreeCAD runs on Windows, macOS, and Linux, making it accessible to a wide range of users.
- Feature-Rich: It offers a comprehensive set of tools capable of handling complex designs, including parametric modeling, which allows you to modify your design parameters and have the model update automatically.
- Active Community and Development: Continuous improvements and updates are made by a dedicated community of developers, enhancing stability, and adding new features.
Cons
- Steeper Learning Curve: The interface may not be as intuitive as some commercial packages, requiring more time to learn.
- Stability Issues: Being open source, it might be prone to occasional bugs and crashes, especially when using development versions.
- Less Polished Interface: The user interface may not be as refined or user-friendly as those found in commercial software.
- Fewer Complex Workflows: Other, paid tools might offer specialized workflows out of the box, such as curved surfaces, finite element analysis, and manufacturing.
Comparing FreeCAD with Other CAD Software
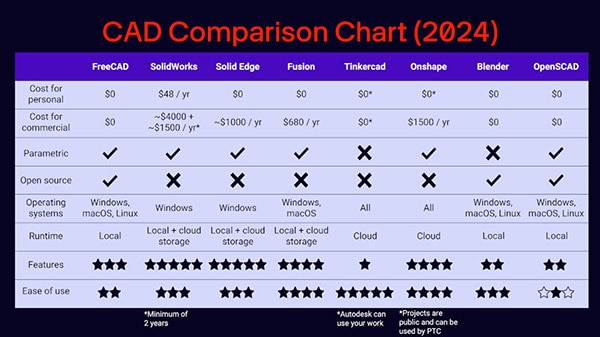
When choosing a CAD program, consider factors like cost, features, ease of use, and platform compatibility.
FreeCAD
- Cost: Free for personal and commercial use.
- Platform: Windows, macOS, Linux.
- Features: Parametric modeling, open-source, extensive community add-ons.
- Ease of Use: Moderate learning curve due to less intuitive interface.
Commercial Alternatives
- SolidWorks: Industry-standard with extensive features but costly (starting around $4,000 plus annual fees) and Windows-only.
- Autodesk Fusion 360: Offers a free version for personal use and affordable commercial licensing ($680/year) but requires cloud storage and is not open-source.
- Tinkercad: A beginner-friendly, cloud-based tool ideal for educational purposes but limited in advanced features.
Open-Source Alternatives
- Blender: Excellent for animation and organic modeling but not primarily designed for mechanical CAD.
- OpenSCAD: Uses scripting for modeling, ideal for programmers but may not suit those preferring a graphical interface.
Installing FreeCAD
Ready to try FreeCAD? Follow these steps to install the software on your computer.
Note: the videos used v0.22 or v1.0RC1, which includes a fix for the topological naming problem. I highly recommend using 1.0RC1 or later!
1. Download FreeCAD:
- Visit the official website at freecad.org.
- Click on the Download button. If the official release is not v1.0RC1 or later, download one of the weekly build images.
- Choose the installer for your operating system (Windows, macOS, or Linux).
2. Install the Software:
- Run the downloaded installer.
- Follow the on-screen instructions to complete the installation.
3. Launch FreeCAD:
- Open FreeCAD from your applications menu or desktop shortcut.
- Upon first launch, you'll be prompted to select:
- Language: Choose your preferred language.
- Unit System: Metric (default) or Imperial.
- Navigation Style: Options like CAD, Blender, Tinkercad; select what feels most comfortable. I recommend Tinkercad, as it is quite intuitive and follows the same navigation scheme as many slicer programs. If you are working on a laptop with no mouse, then I recommend the Touchpad scheme.
- Theme: Light or dark mode, based on your preference.
Exploring the Interface
Familiarizing yourself with the FreeCAD interface will make your modeling experience smoother.
Workbenches

- Definition: A workbench is a collection of tools (buttons, options, views, etc.) tailored for specific tasks.
- Accessing Workbenches:
- Located in the top toolbar, the workbench selector allows you to switch between different workbenches.
- Common Workbenches:
- Part Design: For creating solid models using sketches and features.
- Sketcher: For drawing 2D sketches that serve as the foundation of 3D models.
- Part: An older method for creating shapes using basic geometry.
The Interface Components

- Menu Bar: Contains drop-down menus for file operations, editing, viewing options, and more.
- Toolbars: Quick access to frequently used tools and commands specific to the active workbench.
- Tree View:
- Located on the left, it displays the hierarchy of objects in your project.
- Documents: The top-level container for all your work.
- Bodies: Represent individual solid models within a document when working in the Part Design workbench.
- Property Editor: Shows properties of the selected object, allowing you to modify parameters.
- Task Pane: Shows what you need to do next in the current workflow, such as attach a sketch, define a pad, etc. If your buttons are grayed out, make sure that you do not have a currently active task in the Task Pane!
- 3D Viewport:
- The main area where you interact with your model.
- Supports zooming, panning, and rotating the view.
Customizing Preferences
- Accessing Preferences:
- Go to Edit > Preferences.
- General Settings:
- Change the default unit system if needed.
- Display and Navigation:
- Adjust 3D navigation style to suit your preference.
- Click on the Mouse… button to view the currently selected navigation scheme
- Modify themes and visual settings.
Creating Your First Object
Let's create a simple 3D object to get hands-on experience.
- Create a New Document:
- Click the New Document icon or go to File > New.
- Switch to Part Design Workbench:
- Select Part Design from the workbench selector.
- Create a Body:
- Click Create Body in the toolbar.
- A new body appears in the tree view.
- Create a Sketch:
- Click Create Sketch.
- Choose a plane (e.g., the XY plane) for your sketch.

- Draw a Rectangle:
- Use the rectangle tool to draw a shape in the sketcher.
- Click to start the rectangle, move the mouse, and click again to complete.

- Close the Sketch:
- Click Close in the Task Pane to exit the sketch editing mode.
- Pad the Sketch:
- With the sketch selected, click the Pad tool to extrude it into a 3D object.
- Set the desired length and click OK.

Congratulations! You've created your first 3D model in FreeCAD.
Tips for Success
- Save Frequently: Regularly save your work to prevent data loss.
- Use Constraints Wisely: In sketches, apply geometric and dimensional constraints to define your design precisely. I advise you to primarily rely on geometric constraints (e.g., symmetry, parallel, coincident) over dimensional constraints (e.g., distance, radius) where possible, as this helps keep your designs more parametric without having to change lots of numbers should you need to make updates.
- Explore Workbenches: Don't hesitate to explore different workbenches to discover additional tools and capabilities.
Seek Community Help: The FreeCAD forums and online communities are valuable resources for troubleshooting and learning advanced techniques.
Conclusion
FreeCAD is a versatile tool that, despite its learning curve, offers a robust platform for 3D modeling without the financial barriers of commercial software. By understanding its interface and capabilities, you can begin creating intricate designs suitable for 3D printing and other applications. In the next tutorial, we'll delve deeper into designing parts using the Part Design workbench and introduce you to more advanced features.


