Create Multi-Colored 3D Prints using Free, Open-Source Software
2024-09-20 | By Aditya Mishra
I am a computer science student who happens to enjoy making cool things - unfortunately, making cool things can be hard and expensive. The goal of this project is to make making cool things less costly and less difficult for you - the maker.
Using the skills detailed in this blog, I've created a Spider-Man themed steering wheel for a go-kart, personalized graduation keychains for my friends, and a commemorative plaque for UCLA's beloved campus cat, "Powell Cat", who sadly passed away.
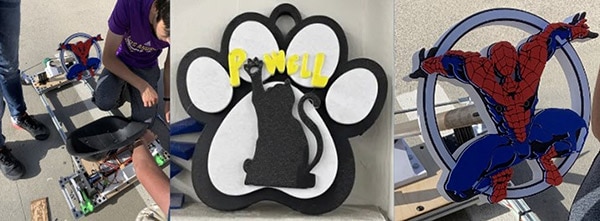
Go-Kart created by fellow classmates and myself (left), Multi-Colored Powell Cat plaque (center), Spider-Man steering wheel for aforementioned Go-Kart (right).
In this blog, we will go through the process of making the plaque for "Powell Cat", this is the most straightforward of all the designs and the skills can be used for any future designs you want to make.
1. Why is this project important? Why not buy a 3D printer that can do this for me?
Currently, it is possible to buy equipment such as the "Mosaic Palette 3 Pro" (not a 3D printer, splices together different colored filament custom for just one 3D print job - need to buy a separate 3D printer to use this tool) or a multi-material 3D printer to do multi-colored 3D prints. Unfortunately, these are often costly and are rarely found in most makerspaces.
Additionally, the way these tools perform multi-colored 3D printing generates a lot of waste in a process referred to as "purging", an example of some of these purge blocks can be seen below.
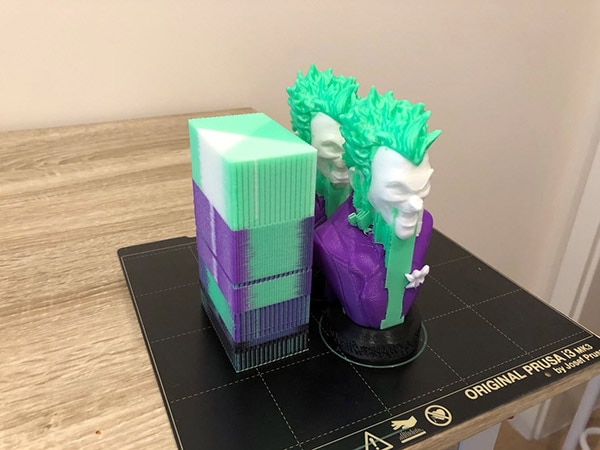 Example of a purge block that was created for a multi-colored 3D print using the Pallete 2.
The process described in this blog generates much less waste as compared to what you can see above. Filament is expensive! That waste costs a lot of money.
The equipment/tools in this project are all either free or readily available at makerspaces across the country. An additional plus of this project is that no CAD (computer aided design) software or knowledge is necessary.
2. Required Software/Websites.
All the software in thisprocess is free, lightweight (does not require a powerful computer) and open source.
InkScape - download link
- Inkscape is a free and open-source vector graphics editor (similar to Photoshop but free)
- (.png -> .svg file conversion)
TinkerCAD - website link
- This is a free 3D design software; we will use it to convert 2D images to 3D images.
- (.svg -> .stl file conversion)
PrusaSlicer - download link
- “Slices” STL filetype to Gcode, something a 3D Printer can understand
- We will also design in this software (something that most people don’t know you can do…)
- (.stl -> .gcode file conversion)
3. Picking the Design
Unfortunately, you need to use a relatively simple (i.e., closed shapes, solid colors, no/limited shading) design for this process. This is because we are doing most of our design in a 2D Design Software as opposed to a 3D Design Software - which makes the process easier/faster but unfortunately not as flexible.
The design we will use for this project was made by Linsey Montgomery for the 2023 UCLA T-Shirt Contest to honor Powell Cat.
 The inspiration we will use for the multi-color Powell Cat Plaque.
We will use the Powell Cat image to create our commemorative plaque - which means we somehow have to get from A to D... Seems Crazy right?
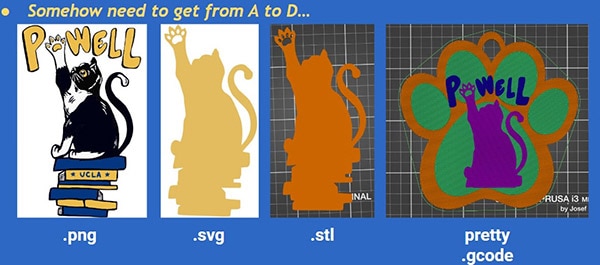
The flow shown above allows us to do most of our "design" using 2D design software, which is much easier to use, more cost-effective(free), and requires fewer system resources (i.e. system memory or a good GPU/CPU) than 3D design software.
4. Editing the Original Design.
We first need to convert the original ".png" (bitmap) image to a ".svg" (vector) image. This process will be done in Inkscape.
First, we need to select the image and click "Trace Bitmap."
 Procedure to select "Trace Bitmap" on an image in Inkscape.
- This will open a window titled “Trace Bitmap”
- The point of this is to convert your png to SVG (SUPER POWERFUL)
- Inkscape has many different ways to convert png to svg but for this demo, we will use the simplest one, the “Brightness Cutoff”
When Preview Window shows an image to your liking, click “Apply” (shown below)
 Adjust the Brightness Threshold and see the effect on the preview (right window) gradually.
- The SVG you get will still have lots of “open areas” (holes that will not 3D print easily)
- Edit the nodes!
- Double-click the svg in Inkscape, and then you can manually delete nodes to get a better shape!
 How to edit the SVG and delete empty space. You can delete nodes manually. (shown in video)
- After all the white space that you want to delete is deleted, you’ll get something like what you see on the right.
- To get the paw and “Powell”, I did the “Trace Bitmap” for “Multiple Scans” and selected “Colors” for the filter. I manually enlarged the claws.
 Edit the svg's nodes and superimpose the "Powell" text over the original SVG.
Export the svg to get ready for the next step!
5. Convert .svg to STL
We first need to convert the ".svg" to a ".stl" file. This process will be done in TinkerCAD.
Essentially, import the ".svg", set the height, and then export the shape as an ".stl".
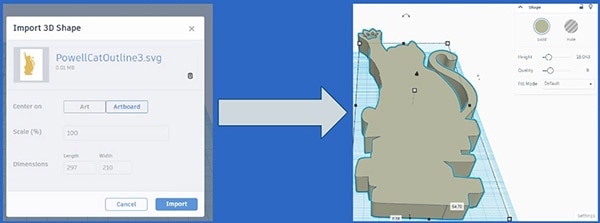 Process of importing ".svg" as a 3D shape, then changing the height using the shape's properties.
6. Design in PrusaSlicer
For the final part of this process, we need to download/create some extra components. The first component is a "Paw Keychain" stl (3D part file) designed by RedJackal from Thingiverse. You'll also need to repeat the conversion from SVG to STL (detailed above) for “Powell” text shown below:
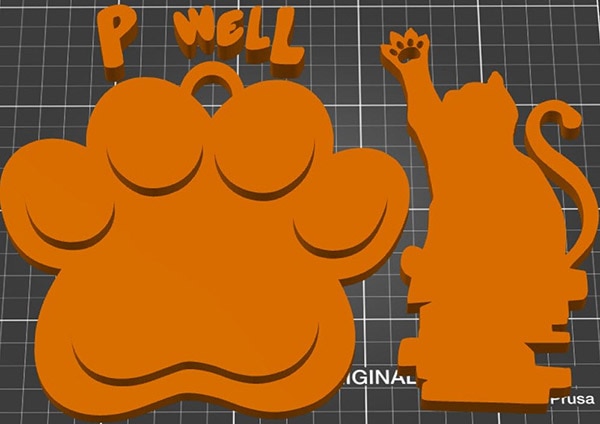 All components necessary for our final design of the commemorative plaque.
The process of putting these components together is shown in the video below (From timestamp 19:30 to 27:00) :
https://youtu.be/4Kgn6GKFSU8And that's pretty much it! These tools can be used for any ".png" to ".stl" conversion for free. I highly recommend trying out this process for a cartoon.


