How to Print Dual Colors using a Single Extruder 3D Printer
2023-10-18 | By Maker.io Staff

Another recent article explained using a dual-extruder 3D printer to achieve stunning multi-colored prints. However, the method outlined in that article required utilizing a dual-extruder printer. As those machines can be rather costly, this article dives into four techniques that allow the creation of multi-colored parts using any standard 3D printer.
Break Down the Model into Parts
The first method involves designing a part with multi-material printing in mind. In this method, you must split your model into separate components to print each part in a different color. Later, print the individual objects using distinct materials and assemble the pieces to reconstruct the whole model.
 Splitting the model into separate parts allows us to print each component in a different color. Using this technique also allows the creation of recessed details.
While this method is the most straightforward approach that works on any 3D printer without special settings, it also requires additional preparation time and increases the modeling effort. This method often also significantly increases the time needed for manual rework and refinement of the printed parts to make them fit together snugly.
In addition, the method is only suitable for some models, and using multiple parts can compromise the structural integrity and rigidity of the final part. However, you can utilize as many colors as you would like by splitting the model into subparts, and you don’t have to make any adjustments to the printer or software.
The Filament Swap Method
This method involves pausing the print process at certain times and manually swapping the filament to change the color of the subsequent layers. This method mimics the behavior of multi-extruder systems, but it’s only suited for prints having multiple colors along the vertical axis of the finished part, not along any other axes.
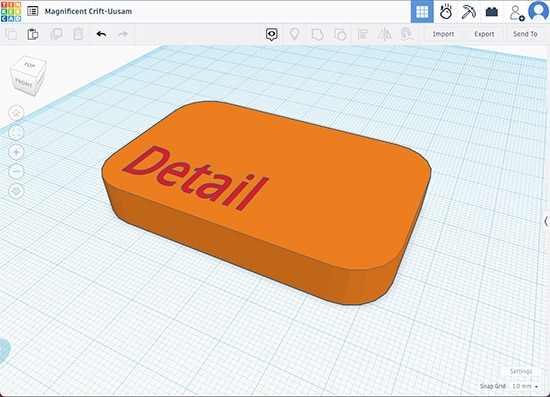
 You would have to swap filaments mid-print after the printer finishes the orange part to add the text in a different color.
You can either pause the print manually by sending a G-Code command to the printer or pressing the pause button on the device. You could also manually edit the G-Code file to insert pause commands at specific points in the process, to make the printer stop automatically. Other than choosing the pause points, this method doesn’t require much preparation or alteration of the model.
While this method may lead to less-than-ideal layer adhesion along the swap points and jarred-looking edges on not perfectly calibrated printers, it also allows for printing more than two colors without increasing the effort. However, as a downside, you must also use compatible materials to prevent layer adhesion problems and warping.
First-Layer Detail Insertion
The previous method involved swapping the filament mid-print at specific points to print the subsequent layers in a different color. However, you could also start with a single detail layer and then print the rest of the model in a second complete print cycle atop the layer already on the print bed.
This method requires splitting the 3D model to create a single layer containing the detail and the rest of the model that sits on top of the detail. Similar to the previous methods, this approach is only suitable for some models — those containing predominantly flat details. Additionally, you will need to mirror some details, such as text, to ensure that it’s correctly oriented in the finished part.
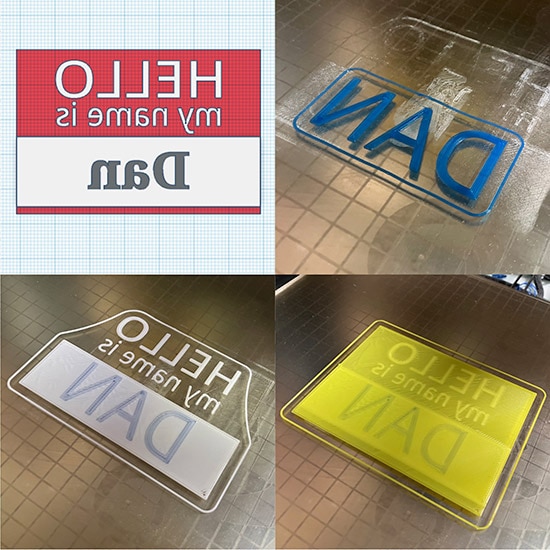
 This image shows the additive layering process when printing multiple colors using a single extruder. Note that you must mirror all text to ensure correct orientation on the finished part. This image also demonstrates that you’re not limited to using two colors.
In contrast to the previous method, this approach doesn’t require mid-print filament swapping. Instead, it breaks up the whole print into two separate print cycles. However, as there’s already a thin layer of material on the print bed when the second cycle starts, you must manually adjust the printer’s z-offset to prevent clogging the nozzle. Luckily, doing so typically only involves changing a single value in the slicer software.
Finally, there’s technically no limitation to how thick the detail layer can be or how many colors you can combine. Remember that the higher the first layer gets, the more difficult it will be to place the second print on top of the first one without causing visual defects in the finished print. In addition, large prints may warp due to poor first-layer adhesion.
The Inlay-Method
Finally, you can also create a model so that it contains a cavity for the printer to fill in during a second separate print process. During the first print, the printer builds the outside shape with the cutout. In a second run, the printer fills the cavity using a different material. In the finished part, the cavity contains the details.
This approach is suitable for prints containing details on their top surface. Further, this method requires minimal changes to the modeling process, and you could create multiple cavities and fill them in using different colors to create more elaborate patterns.
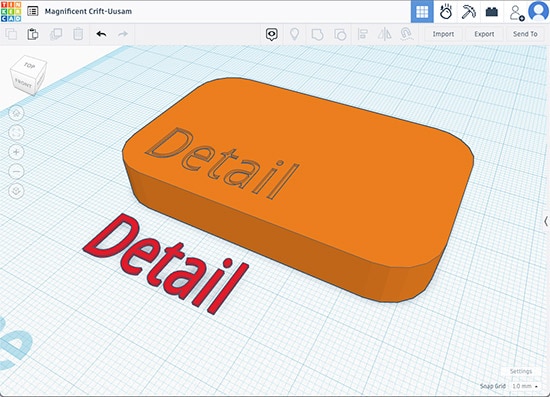
 This image shows a model with a cavity and the detail layer next to it. Note that for deeper inlays, the cavity’s edges should be beveled to better accommodate the print head’s shape.
This method requires a perfectly calibrated 3D printer, and it involves manually tweaking the G-Code to make the printer start at a different z-offset and lower the nozzle into the cavity. In addition, the cavities cannot be arbitrarily deep, as the nozzle may scrape against the already printed part when it has to reach too far into the model. For the same reason, the cavities should also contain tapered or beveled edges to accommodate the printer nozzle’s shape. Finally, the material may not perfectly fill the cavity due to manufacturing inaccuracies or material contraction during cooling.
The Bottom Line
Using a multi-extruder system is the most convenient way of creating multi-colored 3D prints. However, such devices are not as affordable as standard systems. With some practice, you can utilize a regular 3D printer to achieve similarly stunning effects.
The first method involves splitting the model into different parts and then printing them in separate colors before finally assembling the parts into a whole model. This method is the easiest to pull off but requires significantly more preparation and rework time and is only suitable for use with some models.
The second method requires you to swap filaments during the print process to make the printer lay down subsequent layers in a different color. While it requires minimal additional effort, this method is only well-suited for prints with details along the model's vertical axis.
The third method is similar to the second one. However, instead of manually swapping filaments, you can print the detail layer first and then print the rest of the model on top of the detail in a separate print process.
Finally, you could create your 3D models to contain a cavity for the printer to fill using a different color. With the help of this method, you can achieve fantastic results with some practice and tweaking. However, the final approach is for more experienced makers, as it requires significant knowledge about the print process and a perfectly calibrated 3D printer.
Have questions or comments? Continue the conversation on TechForum, DigiKey's online community and technical resource.


