制造商零件编号 KT-PR0058-BS1MLRP
TAZ SIDEKICK LE RED EDITION
LulzBot
Chances are, you’ve seen a 3D printer operating before. Something that you might’ve noticed from it is that when building up your 3D print, it goes from top to bottom, forming a single layer at a time. In order to get to this functionality, the model that you create in your CAD program needs to be “sliced” up into individual layers, hence the crucial step of slicing. This process is the bridge between your computer and your printer and understanding it will help you to improve the quality and efficiency of your printed models. Let’s talk about what slicing is, how it works, and how you can master it.
As mentioned, slicing is the process of going from the 3D model to the printer receiving the instructions (in the form of G-Code, more on that in this blog here!) The slicing software will take the 3D model (typically given in the form of a .stl file) and break it down, layer by layer. Similar to how 2D computer images can be generated by assigning pixels from left to right based on loops and statements, slicing does it in the form of layers from bottom to top. By analyzing each layer, appropriate G-Code commands (extrusion speed, extruder head location, temperature for the printer, and more) can be generated, giving the printer instructions on how to produce the model. This means that the slicer software that you utilize will directly impact the quality of your prints and that it is crucial to ensure that this step is done correctly.
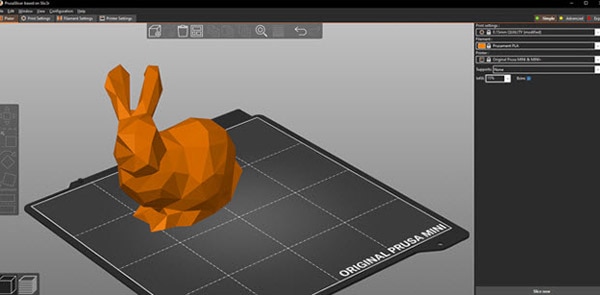
There are a handful of slicing software options out there, each having its own pros and cons. Generally, there are three popular options: Prusa, Cura, and Simplify3D.

Cura tends to be easier to pick up due to its user interface but does not have the customization and detail options that Prusa and Simplify3D may have. Also, certain slicing software will be more compatible with certain printers, so be sure to check which will work best for you. For example, I utilize Cura LulzBot Edition (Cura LE) for my Taz 747, mainly because it’s software-specific for my printer and because there’s a ton of community support for it.
Within the slicer, you’ll encounter a variety of decisions and settings to make use of. Generally, each slicer will have the following.
Layer Height: This determines the thickness of each of the layers that the 3D printer will utilize. Of course, smaller layers will result in greater details (as the feature size will get smaller and specific formations will not be compromised). Conversely, a larger layer height will result in lesser quality/detail but will reduce print time since it doesn’t need to work on super fine details. For my higher-quality prints, I do 0.1-0.2mm, and for my larger less detail-oriented prints, I do >0.3mm. This will depend on your printer though, so doing a lot of testing and calibration is necessary.
Print Speed: Similarly to layer height, your print speed will also determine the quality of the print. If you select a higher print speed, it will sacrifice the quality of the print while going faster, and vice versa. The speed will depend almost entirely on the 3D printer that you have, but for my LulzBot Taz 747, I typically use around 20-40mm for my detailed prints and above that for lower-quality prints. I haven’t tested too much with this yet, though, and suspect that I can go as far up as 100mm (depending on the filament).
Temperature: You can also adjust the temperature of your printing head in the slicing stage. This will depend entirely on the filament, though, and has no effect on the speed of your print. PLA should be roughly 190C-220C, and ABS 230C-250C. There is no compromise here—it needs to be set correctly, or your print will not come out correctly.
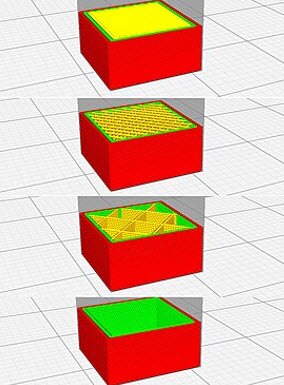
Infill: Infill refers to the structure within your 3D print. A high infill density will result in a heavier, but stronger print (while also utilizing a lot more material though).

Take the above picture for example, with the top picture depicting a 100% infill (totally solid inside), and the bottom a 0% infill (nothing at all). The middle two depict ideal %’s, roughly 15% and 40%. I typically utilize around those amounts depending on how strong it’ll need to be. Additionally, you can choose the pattern of the in-fill, which will depend on the outer shape of the model and how long you want to spend on printing it. For example, honeycomb patterns are good for a strong structure, but fast print time. Gyroid patterns give a strong structure but can flex/move (whereas honeycomb is rather rigid).
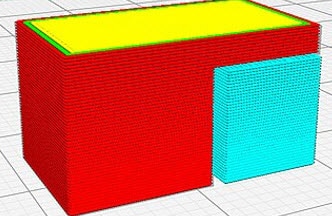
Supports: For prints that have a freestanding portion, it’s best to also utilize supports. If you were to print these portions without support, it’s likely they wouldn’t print properly nor would they come out nicely. Supports are temporary structures and will be removed after the print is done. Take the following for example:

The light blue portion is the theoretical support, holding up the freestanding red portion on the right. Once the red portion is completed, the blue portion can easily be snapped off. These supports can be set in slicing and, depending on the filament and printer, it is crucial that this is done effectively.
The First Layer: The first layer is the most crucial for any build, as messing it up can result in an unstable structure and copious misprints. Slicers will allow you to send first-layer commands to the printer, such as leveling the bed and a set nozzle height. Typically, I like to print the first layer a bit slower and with a greater extrusion width to make sure that it sticks to the bed and is done at a high detail.
Overall, slicing is an extremely important part of the process, and your print quality depends greatly on how it is implemented. It’s also good to check out the resulting G-Code and to make sure that there are no abnormal commands. Spend some time experimenting with your settings as each filament and printer will be slightly different.