Warped Prints? Try these Quick Tips with Your Next 3D Print
2021-09-15 | By Maker.io Staff
Warping is one of the most common problems that affect beginners and more experienced makers alike when 3D printing. The problem most commonly occurs due to bed adhesion problems, and this article dives into a few methods you can utilize to tackle warping problems with your 3D prints.
What Causes Warped 3D Prints?
 A bad case of warping, deliberately caused by unevenly heating the model with a hairdryer.
Different factors might affect how much a 3D-printed part warps at any time of the print process. However, the most common factors include environmental conditions, such as drastic changes in the room temperature, the material used, and bed-adhesion problems. Either way, warping is always caused by uneven cooling.
Whenever the 3D printer puts down a fresh layer of hot molten plastic, the already cooled layers experience stress due to the heat difference and contraction. The greater the difference is, the more likely it is that the 3D-printed part curls up. Typically, these forces are greatest where two edges of a printed component meet, causing the corners of a part to lift off the build surface first.
Note that warping doesn’t necessarily cause problems that ultimately lead to failed prints. However, curling can affect the visual appearance and tolerances of 3D printed components.
How to Prevent Warping When 3D Printing
To prevent warping, you either have to increase the print bed adhesion or decrease the cooling rate of the printed part. However, make sure that you calibrate and clean your printer before getting started with the tips in this article. Also, check that the z-offset is adjusted to your printer, and check whether you can use a material that’s less prone to warping, such as PETG. All these basic steps can drastically increase the print bed adhesion, and they might already fix light to medium warping issues.
Next, you should closely monitor the environment around the printer. Note that you should only operate the printer in a well-ventilated area. Doing so, however, means that cold air might rapidly cool down the part and thus cause warping. Therefore, you should try to use an enclosure when you manufacture a component that’s likely to warp. Makers can choose from several options ranging from complicated enclosures to something as simple as a cardboard box:
Next, turn on the heated bed of your printer if possible. Make sure that you set the temperature according to the filament manufacturer’s specifications.
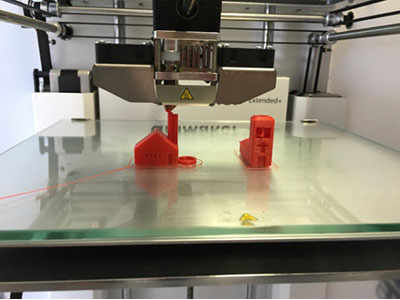
One less commonly discussed option is to decrease the number of parts that you print in one go. It’s tempting to print ten copies of an object in one session. However, remember that each of the ten copies might cool down significantly while the printhead manufactures the other nine copies. Therefore, you can try to decrease the number of parts on the build plate if you experience issues with warped 3D prints.
Slicing Options That Prevent Warping
Sometimes, you can’t control the environmental conditions around your 3D printer, and some machines don’t come with an enclosure or a heated bed. Fortunately, you can still tackle warping 3D prints by improving the bed adhesion of the printed parts.
Besides cleaning the print bed and employing an adhesion agent that works well with the material used, the two most common methods for increasing print bed adhesion are brims and rafts.
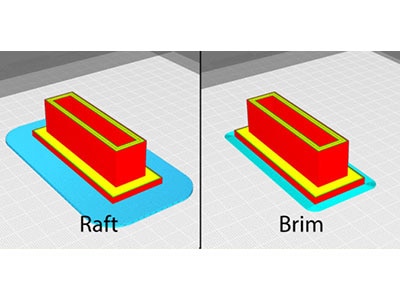
A raft layer is similar to a 3D printed support structure that you’d use to increase the quality of overhangs. The big difference between rafts and regular support structures is that rafts are solely located underneath the printed components. The parts will be printed on top of the raft instead of the print bed. The purpose of rafts is not to support overhangs of 3D printed components. Instead, rafts form a stable foundation underneath the printed components, and they aim to increase the adhesion of parts to the print bed. Rafts are especially useful when manufacturing components using ABS.
A brim is similar to a raft. However, a brim consists of a single layer that touches the part in multiple spots. To create a brim, the 3D printer puts down single lines that form a ring around the printed component. Brims act similar to support material. However, they touch the outside of the printed model in various spots to increase print bed adhesion along the walls and corners of a 3D printed part. You can think of a brim as extra arms that hold down the edges of a printed component. The thicker you make the brim, the better the part will adhere to the print bed:
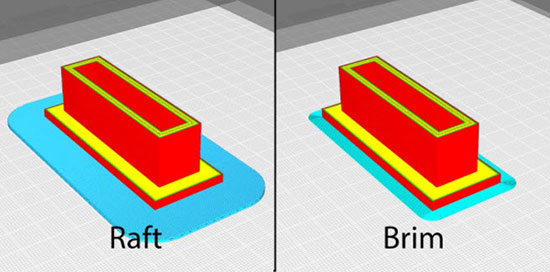 Brims and Rafts both increase the bed adhesion of models while 3D printing. However, rafts extend over multiple layers, while a brim consists of single lines that touch the walls of the model and form a ring around it.
Both rafts and brims are designed so that you can easily peel them away once the printed part cools. Brims are often the preferred method when trying to solve problems caused by warping, as they use less material and are faster to print than a raft layer.
Summary
Curled and warped 3D prints are usually caused by uneven cooling. You can try various methods to fix this problem. The simplest ones include cleaning the print bed, using an enclosure, brims, and rafts. The latter two options have to be enabled in the slicing software you use. A raft sits underneath the printed components and forms a solid foundation that aims to improve bed adhesion and thus eliminate warping. A brim, on the other hand, sits around the 3D printed components and holds down the walls of each object to the print bed.


