Selecting the Correct 3D Printing Infill Pattern in Cura
2021-08-04 | By Maker.io Staff
Infill pattern can have a significant impact on print time, cost, and the strength of the manufactured component. Cura supports many infill patterns, and each of them works best under certain circumstances. This article summarizes a few important infill patterns for 3D printing in the Lulzbot edition of the Cura slicer engine. Keep in mind that there are many more infill patterns out there and that other 3D printer manufacturers and slicers might support additional ones.
What are 3D Printing Infill Patterns?
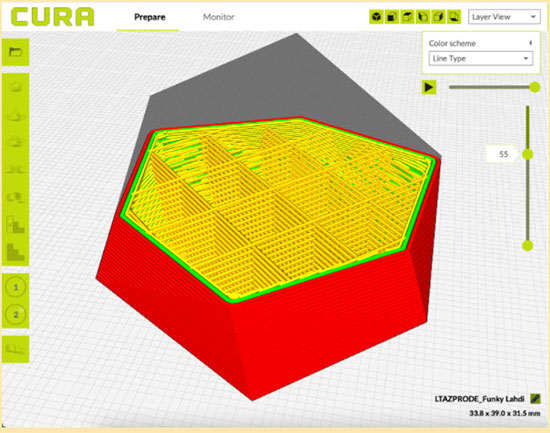
3D printing is quite a flexible manufacturing method that allows you to produce almost every watertight 3D object you can imagine. FDM 3D printers rarely create solid parts. Once the print finishes, you can only see the outer shell of the manufactured component. The printer usually fills the inside with an infill that follows a predetermined pattern with a given density. This density can range from zero percent (completely hollow) to 100%, which produces a solid object.
Typically, you don’t want to go to either of the extremes. Hollow objects are often not strong enough, and the print process wastes a lot of filament when it uses a completely solid infill. Currently, the Lulzbot edition of Cura supports 13 infill patterns, and each of them has its uses.
Choosing the Right Infill Settings for Figurines
You can manufacture figurines and other decorative objects that don’t need to be very strong using an infill density of 0% to 20%. Doing so helps reduce the material required for printing the parts, and you can use the time you saved to use slower print speeds to achieve a smoother surface finish. You can further cut down the print time by instructing Cura to use the zig-zag or lines infill patterns. Apart from figurines, these settings are also perfect for manufacturing prototypes and test pieces that allow you to verify that the tolerances and measurements of your model are correct.
These patterns both produce very similar results where the infill material forms a 2D grid with axes that alternate with each layer:
 The lines infill pattern produces lines that run along one axis. The axes alternate with each layer of the 3D print.
Infill Options for Everyday Prints
Infill patterns such as triangles, grids, and tri-hexagons are perfect for manufacturing functional parts with practical uses that don’t need to endure strong forces. For such components, choose an infill density between 20% and 50%, as these offer a good mix of stability, print speed, and cost-efficiency.
The triangles pattern generates a strong 2D infill well suited for everyday prints and light-duty functional parts. This pattern consists of small triangles, and the selected infill density determines the size of the triangles. Using this pattern usually produces components with durable walls, as the triangle mesh inside the part helps spread the forces applied to an object.
Tri-Hexagons is another strong 2D infill pattern that’s very similar to the triangles pattern above. However, unlike triangles, this pattern mainly consists of hexagons, where the spaces between the hexagonal shapes naturally form triangles:
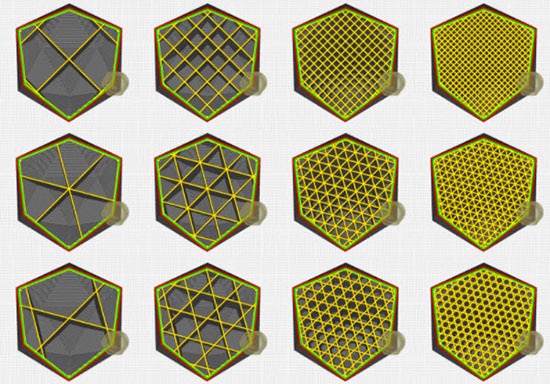
 A comparison of medium-strength infills with increasing densities. From top to bottom: Grid, Triangles, Tri-Hexagon. From left to right: 7%, 20%, 50%, and 75%.
The grid infill setting is an alternative to the triangles and Tri-Hexagon. The major benefit of using the grid pattern is the reduction in print time. As a downside, the prints often don’t turn out as stable.
What 3D Infill Pattern Should I Use for Printing Strong Functional Parts?
When high strength in multiple directions is needed, choose the cubic, octet, or gyroid infill pattern. Unlike the previously discussed infill patterns, which were all 2D patterns, using one of these three options generates a three-dimensional infill that stretches over multiple layers of the printed model. These infill patterns ensure applied forces are spread evenly, regardless of the direction. Therefore, the printed parts are well-suited for heavy-duty functional parts and production parts used in consumer-grade devices. For such applications, I recommend using an infill density of 50% to 75%.
The cubic infill option generates stacked and tilted cubes that stretch over multiple layers. Similarly, octet produces an infill pattern consisting of stacked pyramids. Gyroid, on the other hand, generates wavelike structures on the inside of printed parts. This pattern takes longer to print but also has the benefit of producing durable and light components.
Infill Patterns for Flexible Parts
So far, I’ve only discussed rigid 3D prints. However, many 3D printers can also work with materials such as Nylon to produce flexible parts. For such applications, choose an infill pattern that runs parallel to the walls of the component, such as concentric. Another good candidate for use with flexible parts is the cross-infill pattern. Any value between 0% and 100% will work fine for the infill density when printing elastic parts. However, keep in mind that the density determines how squishy the final component will be.
 The concentric infill pattern generates walls within the object. Those walls run in parallel to the outer shell of the component. This infill pattern is perfect for printing flexible parts.
Summary
Cura currently supports 13 infill patterns that all have their specific use. Use the zig-zag or lines infill pattern for parts that aren’t subject to strong forces, such as figurines and other decorative objects. In addition, such components work well with an infill density of 0% to 20%. Infill patterns such as triangles, grid, and tri-hexagons are perfect for manufacturing functional parts with practical uses that don’t need to endure much stress.
For such components, choose an infill density between 20% and 50%, as these offer a good mix of stability, print speed, and cost-efficiency. Infill patterns such as cubic, octet, or gyroid work best for strong, functional parts. These three-dimensional patterns evenly spread applied forces in all directions. Use infill patterns that run in parallel to the object’s walls when printing flexible parts. In those cases, the infill density determines the squishiness of the final component.


