How To Split and Join Large 3D-Prints
2024-06-19 | By Maker.io Staff
Splitting large objects into more manageable parts before 3D printing provides more benefits than fitting them on a small build plate. It’s easy to assume the process is complicated and may interfere with print quality. However, that’s typically not the case when joints are designed effectively.
This article motivates you to split large parts, even if your printer could build them in one go; it also presents you with four practical approaches to split large parts.

Why Split Large Parts Before 3D Printing?
The most obvious reason to split large parts is to build the components in a printer that would otherwise be too small. Splitting large parts reduces the chance of print failures. Placing multiple smaller components with a flat surface facing down is usually easier than doing it with a large part.
As printing large objects can take numerous hours or even days, depending on the settings, a single failed large print can set you back a considerable amount of time. However, the time lost in a single large print is not critical if only one section of a split part fails.
Print failures seem more common in large parts due to problems such as warping or parts coming loose from the print bed. Repeating the print process for a smaller subcomponent that failed reduces material waste and saves money.
However, creating multiple joinable components from a single large part also spreads the risk of print failures and challenges, according to each approach.
Simple Flat-Surface Joints
The simplest type of joint requires no additional modeling effort. You take whichever object you want to print and cut a straight line through it using your CAD program or slicer.

Splitting a complicated model along the center reduces the risk of it falling over while printing and yields two perfectly flat surfaces for ideal bed adhesion.
By creating this joint, you are rewarded with two smaller parts, each boasting a flat surface that enhances print bed adhesion. The absence of small-part tolerances and the joint's forgiving nature regarding the printer's accuracy make it a reliable choice.
One disadvantage of this method is that it requires glue to hold the two parts together. Thus, the part's structural integrity is usually lower than before, resulting in a possible problem in functional components. Further, there's no keying that helps you align the parts, and disassembling the glued pieces is typically not possible once the adhesive dries.
Alignment Holes and Pins
You can combine the simple flat-surface joint with keying holes in the parts and small plastic pins that you can either 3D print or buy at the hardware store. This technique is similar to how bores and dowels function in woodworking. The holes and pins help align the parts and offer additional structural strength. You can add glue to the joint to strengthen the bond between the parts.
Alternatively, the pins can be attached to one part, with the other containing the matching holes. In either case, the printer must accurately reproduce small outside and inside diameters to ensure the parts fit together tightly.
Keep in mind that not all parts are thick enough to allow adding holes and pins that are strong enough to keep the components together, a challenge for this technique.
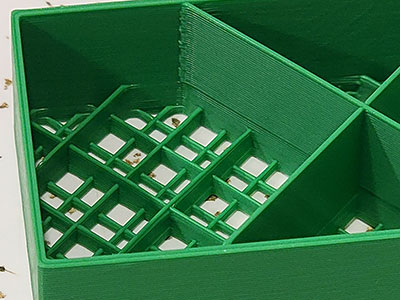
Interlocking Joints
You can choose from various interlocking joint patterns commonly employed in woodworking. Dovetail joints are the simplest form, offering greater strength and a more secure fit of parts than simple flat-surface joints.
Interlocking joints prevent incorrectly matched components, and the shape also helps with alignment, ideally allowing the components to slide together and lock in place only one way. These joints further offer improved mechanical strength compared to the previous types, and they often don’t require additional glue, facilitating effortless disassembly.
 Adding keying points to a split helps re-align the model after printing.
However, as the surface is no longer perfectly flat, additional support structures are often required.
However, depending on the complexity of the interlocking pattern, designing such joints can result in a more significant modeling effort. You will need a more accurate printer and account for material shrinkage during cooling to ensure that intricate interlocking pins align after the parts cool. Additionally, this technique doesn’t always yield a flat surface for printing, meaning that external support structures may be required.
Other Types of Joints
You can use screws for projects that require greater strength, and you can choose from a variety of ways to add screws to your 3D prints to join multiple components. The simplest method is to create holes in all parts that need to be joined and then add a screw on one side and secure the parts using nuts. This approach works well in most cases and requires minimal modeling effort. However, the nuts and bolts may not look visually pleasing, so they may not work in some instances.
Adding threads to one of the bores lets you use countersunk screws that are not visible from one side. You can add threads directly to the model using a CAD program. However, doing so increases the modeling effort and requires an exact 3D printer to reproduce the intricate threads.
You can also use a tapping tool to cut threads into a bore that's slightly smaller than the screw itself. This method is recommended for screw sizes smaller than M6 (7/32").
Using screws requires that the walls with the bores are thick enough to ensure they don't break when adding screws. With the appropriate wall thickness, using screws yields a very secure and reliable fit while simultaneously guaranteeing that you can easily disassemble the parts if needed.
You can also buy small magnets and heat-melt them into the parts so that they attract each other and stay together. This approach is ideal for prints that shouldn't have visible screws or holes; depending on the magnet's strength, the fit can be tight and secure. This method is also perfect for functional parts that regularly need opening, such as a removable access flap for connectors.
Summary
There’s no one-size-fits-all approach to joining large 3D prints that comprise multiple components. Ultimately, each approach offers unique benefits and drawbacks that you should consider when splitting your 3D printing project.
The simple flat-surface join is easy to design and offers a flat surface for printing. However, this technique requires additional adhesive and doesn’t help you align the individual parts. Alignment holes and pins can help mitigate these problems and strengthen the joint.
Interlocking joints have parts for aligning the individual components. Depending on the joint complexity, you might need a well-calibrated 3D printer to manufacture intricate locating pins and their matching holes.
Using nuts and bolts is a fantastic method for joining large prints that need to be functional, robust, and easy to disassemble, and you can choose from a variety of approaches. The easiest ones include adding simple holes for the screw and then using a nut to hold the pieces together. Cutting or printing a thread in the parts is a more elaborate approach that you can utilize when you want to conceal the screw or can’t use nuts, for example.
Whatever approach you choose for splitting large parts for 3D printing, keep in mind that finding a good way to reattach the parts may require some flexibility and creativity.