使用 Thonny 对 XRP 机器人进行编程
在 SLAM 博客系列第 1 部分,我们讨论了什么是 SLAM(同步定位与绘图)以及机器人如何利用它进行导航。第 2 部分则深入探讨了 SLAM 算法中用于创建机器人未知区域导航地图的三种主要技术。在这篇博客,我们将讨论一个适合初学者的实验机器人平台 (XRP),以及如何通过另一种方式 Thonny 来对其编程。
什么是 XRP(实验机器人平台)?
XRP 是一个开源机器人平台,帮助学习编程和机器人基础知识。它是一个入门级机器人平台,提供了完善的说明文档和良好的社区支持。XRP 是一个基于 Raspberry Pi Pico 的机器人(图 1)。
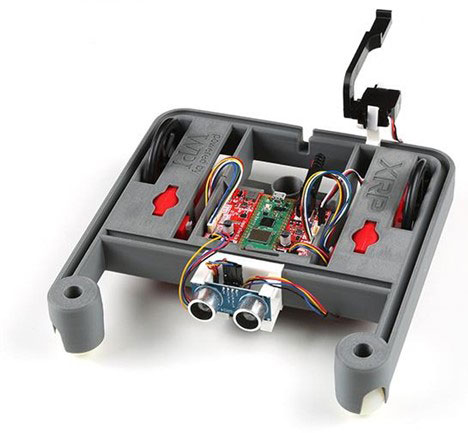 图 1:XRP 机器人。(图片来源:SparkFun)
为什么使用 Thonny?
Thonny 是一个开源 Python IDE(集成开发环境),用于 Python 编程和基本游戏开发。传统上,我们使用称为 XRP 代码的网络接口对 XRP 进行编程。XRP 代码适用于 Google Chrome 浏览器和 Microsoft Edge 浏览器。我们正在尝试使用 Thonny 来替代 XRP 代码,因为使用 Thonny 有很多好处。Thonny 可以让 XRP 上的 Micro Python 库的安装变得更简单,而且还能改善 XRP 的编程体验,尤其是在 Ubuntu OS 中。鉴于 Ubuntu OS 上基于浏览器的 XRP 代码存在缺陷,Thonny 不失为一个很好的替代方案。
设置 Thonny 进行 XRP 编程只需三步。
第一步:安装 XRP 固件(可选)
如果您尚未在机器人上刷新 XRP 固件,请按照以下步骤下载并安装固件。如果您已经安装了固件,请跳过此步骤,继续执行步骤 3。
1.从以下 URL 下载最新版 XRP 固件:
URL:Releases · wpilibsuite/xrp-wpilib-firmware (github.com)
- 您应该可以下载 '.uf2' 文件,或下载并解压包含 '.uf2' 文件的固件 ZIP 文件。
2.将 XRP 插入笔记本电脑的 USB 端口
3.按住 BOOTSEL 按钮的同时,按下并松开 RESET 按钮(图 2)
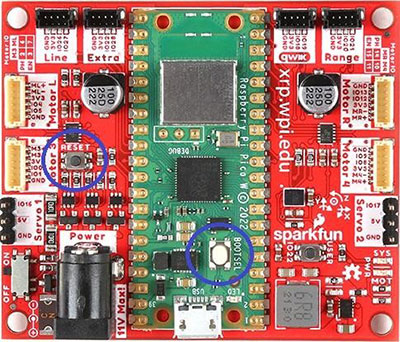 图 2:XRP 控制板。(图片来源:SparkFun)
4.现在,XRP 将暂时断开与电脑的连接,然后以 USB 存储设备“RPI-RP2”的形式重新连接
5.现在将下载的 '.uf2' 文件复制到 RPI-RP2 驱动器中
6.复制完成后,驱动器将自动断开连接,这时您可以拔下 XRP 与电脑的连接线。
第二步:使用 XRP 代码编辑器验证固件安装
在继续使用 Thonny 之前,让我们先使用 XRP 代码编辑器验证已安装的固件。
- 使用 Google Chrome 浏览器或 Microsoft Edge 访问以下 URL,打开 XRP 代码编辑器:XRP 代码 URL
- 使用 USB 电缆将 XRP 插入电脑
- 要将 XRP 机器人连接到 XRP 代码,请按 'CONNECT XRP' 按钮
第三步:使用 Thonny 对 XRP 进行编程
- 下载并安装 Thonny:
- 将 XRP 连接到 Thonny IDE
- 安装后,打开应用程序,使用 USB 电缆将 XRP 连接到 PC
- 配置 Thonny IDE
- 进入 Tools > Options > Interpreter (图 3)
URL:Thonny 网站
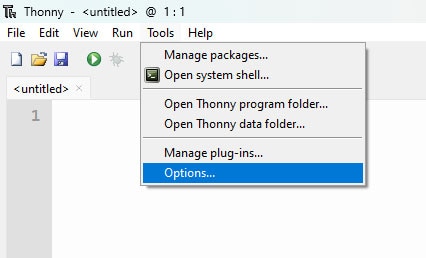 图 3:Thonny IDE 配置。(图片来源:Thonny.org)
- 然后从下拉列表中选择 “Micro Python (Raspberry Pi Pico)”(图 4)
- 在端口下拉列表中,选择 Try to detect port automatically(尝试自动检测端口)以自动检测 com 端口进行连接(图 4)
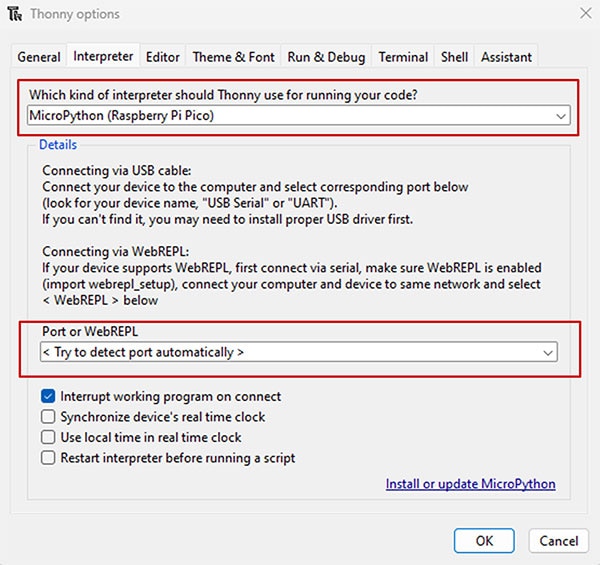 图 4:Thonny IDE 配置。(图片来源:Thonny.org)
测试
为了验证一切已经顺利完成,让我们尝试访问 XRP 硬件上的默认程序。
- 进入 File > Open..> ,在弹出的窗口中选择 Raspberry Pi Pico (图 5)
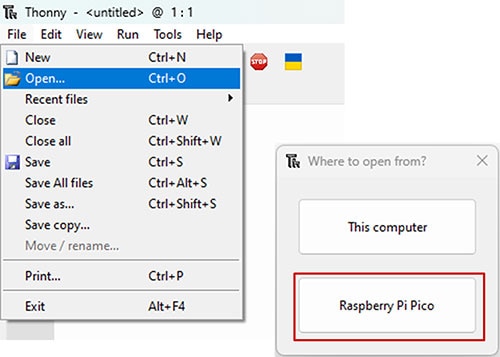 图 5:Thonny IDE,访问 XRP 文件。(图片来源:Thonny.org)
- 现在,您应该可以看到所有默认文件或您保存在 XRP 上的任何文件(图 6)
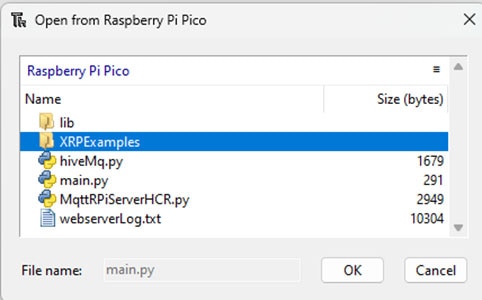 图 6:显示 XRP 代码文件的 Thonny IDE。(图片来源:Thonny.org)
- 打开 ‘XRPExamples’ 并运行您选择的任何代码
- 此时应该会看到如图 7 所示的输出结果
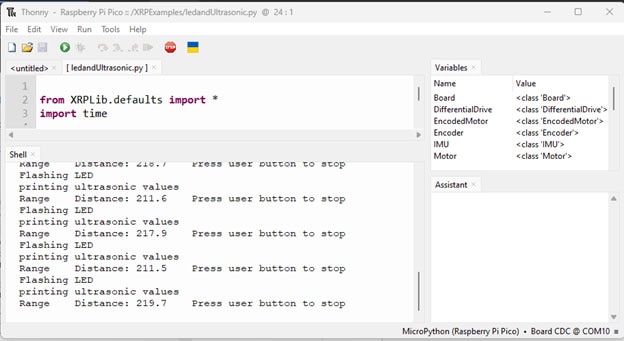 图 7:运行代码后 Thonny IDE 的输出窗口。(图片来源:Thonny.org)
恭喜,现在你已经成功使用 Thonny IDE 对 XRP 进行了编程。
结语
使用 Thonny 作为 XRP 代码的替代方案有很多好处。主要优点是 Thonny 可以让 XRP 上安装 Micro Python 库变得更容易,而且可以改善 XRP 的编程体验,尤其是在 Ubuntu 操作系统中。只需按照这篇博客中所列的步骤,就能完成对你的 XRP 的编程并运行起来。

Have questions or comments? Continue the conversation on TechForum, Digi-Key's online community and technical resource.
Visit TechForum


