制造商零件编号 SC1111
SBC 2.4GHZ 4 CORE 4GB RAM
Raspberry Pi
The XRP is a great robot with many different functions, making it a great learning tool for all users. This guide is more advanced for people who want more I/O or computer power. With this guide, you will be able to connect a Raspberry Pi to your XRP, allowing your XRP projects to be taken to the next level.

Transferring data between the Raspberry Pi and Pico can be complex. There are various methods to achieve this, including Bluetooth, USB, and wired serial connection. In our project, we opted to transmit data using a serial connection by establishing a connection over UART.
It’s important to note that UART communication is a type of serial communication. UART communication takes data in bytes and transmits the bits in order, like a queue. Serial communication can often have two lines, one for receiving and one for transmitting.
UART communication is great for analyzing data in the order it is received. This allows you to send each piece of data to the Pico for processing and makes it easier to set the data size and speed. The main benefit of using UART is that data can simultaneously be sent and received, using two separate wires for transmission and reception.
One drawback of using UART is that it requires extensive configuration. For example, it's important to ensure that data is being sent and received at the same speed. If one device is operating at a different speed than the other, the data may not be transmitted and received properly.
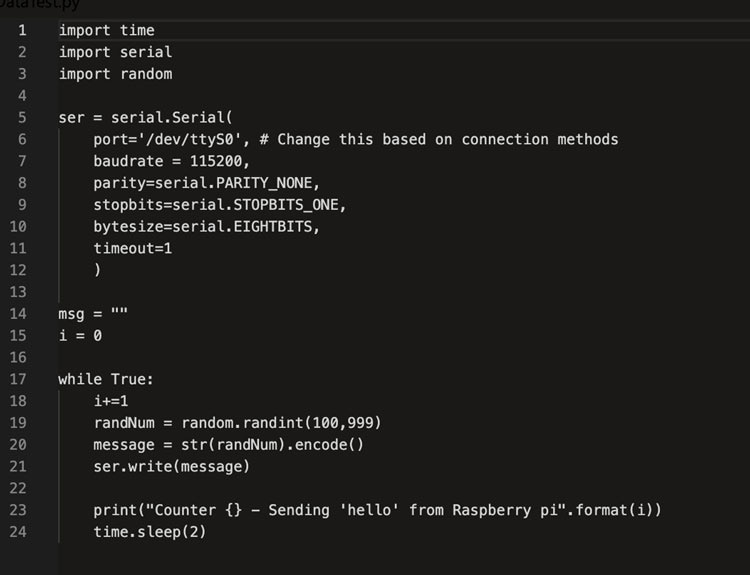
The transmitter code:

This is basic code to test sending data to the XRP. In this code, there is a random generator that will send random numbers between 100 and 999 to the XRP. To verify the functionality of this code, look for the Counter {} - Sending ‘hello’ from Raspberry Pi. The {} will display a number corresponding to the frequency of the printed message.
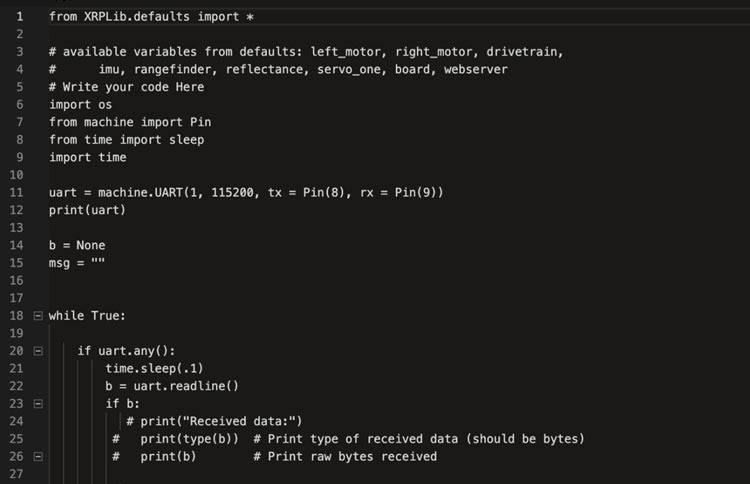
The receiver code:

This is the code for the XRP, which is how the data is being received from the Raspberry Pi. This will print each number, which is the variable b. The time.sleep() method is important, so the Pico board has time to receive the data, especially when sending strings.
Once everything was set up, I was able to test the code being sent to the Pico board from the Raspberry Pi. When both boards were running, the XRP would receive the message “Hello” from the Pi, or, if I initialized a random number generator in the Raspberry Pi then the Pico board would print out random numbers. Once I got this to work, we incorporated object detection into the Raspberry Pi to start sending information to the Pico. A more in-depth write-up can be found here.