制造商零件编号 954
CABLE USB TO TTL SERIAL DEBUG
Adafruit Industries LLC
Sometimes, using a WiFi or wired Ethernet network is unsuitable for various reasons. In those cases, you can still utilize a Raspberry Pi’s serial console to interface with the computer without using a monitor, keyboard, or mouse. However, enabling the serial console and establishing a connection is not necessarily as intuitive as one would expect, especially for beginners. Therefore, this article summarizes the steps necessary for establishing a link to a headless Raspberry Pi using a USB-to-serial adapter and a modern computer.
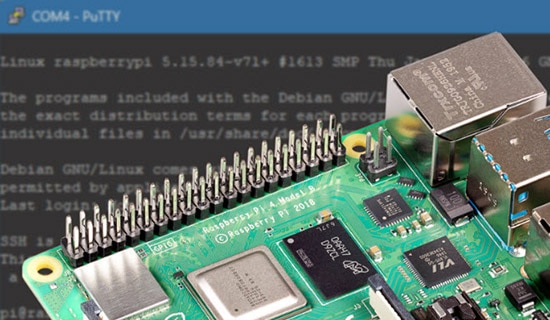
On more recent versions of the Raspbian OS, users will have to enable the serial console by editing the configuration file on the SD card’s boot partition before powering up the Raspberry Pi and establishing a serial connection. To accomplish this, insert the Pi’s SD card into a computer, and open the config.txt file in the boot folder using any text editor. Then, add the following line to the end of that file to enable the Pi’s serial console:
enable_uart=1
Save the file and insert the SD card into the Raspberry Pi. However, do not power up the Raspberry Pi just yet.
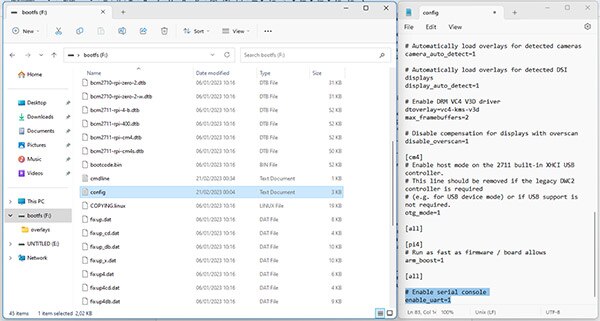 Open the config file located on the SD card’s boot partition and add the highlighted text.
Next, install the drivers for the USB-to-serial adapter in use to allow the host computer to interface with the Pi’s serial console. This step depends on the cable or adapter manufacturer and the OS on your PC. The drivers are typically available for download on the device manufacturer’s website, and installation can be done by following the manufacturer’s recommendations, which are typically also outlined on the website.
Finally, install a terminal emulator for sending commands to the Pi over serial. Users of Unix operating systems like macOS and Linux can skip this step. Windows users can install any terminal emulation program they like. However, Putty is a popular and easy-to-use choice that comes as a standalone executable without needing installation.
Once all the installation steps are done, reboot the computer, if necessary, before reinserting the SD card into the Pi and connecting the USB-to-serial adapter to the Raspberry Pi’s GPIO pin header, as shown in the following image:
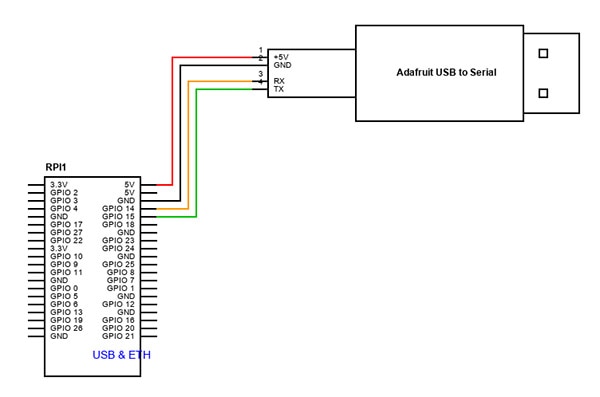 Connect the USB-to-Serial adapter, as shown in the image. Make sure to connect the adapter’s TX pin to the Pi’s RX pin and vice-versa. Also, omit the red wire when powering the Pi using an external USB power supply. Scheme-It link
Note that some adapters, like this Adafruit adapter cable, can supply enough power to run the Pi off the computer’s USB port. However, you may wish to run the Pi via a dedicated external power supply, and it’s crucial not to connect both power sources simultaneously, as doing so may damage the Pi or the adapter cable. Either power the SBC via the adapter or an external power supply, but not both simultaneously. If opting for the USB power supply, omit the red wire shown in the diagram above. However, make sure to still connect the black GND wire, as it’s required for communication.
There are multiple ways to find the correct serial port on a Unix-based system, but the two most popular ones include manually scanning the system log for messages after plugging in the device and listing all connected serial devices. Use the following command to view the system log:
sudo dmesg
And look for an event that includes a serial device. However, I didn’t have success using that method on a Mac. Therefore, you can alternatively list the serial devices using the following command:
ls /dev/cu.*
Note that this command will likely only return entries on a Mac, as the OS uses the cu-prefix for assigning names to serial ports. On Linux-based operating systems, the OS often gives the device a name starting with tty, such as /dev/ttyUSB0. However, it’s also possible that the system uses an entirely different name:
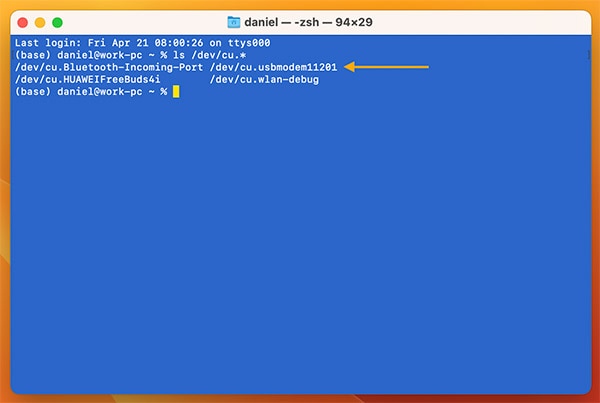 Take note of the name that the OS assigned to the USB-to-serial adapter.
Luckily, things are easier on Windows, as you can utilize the operating system’s device manager to list all connected serial devices and find the adapter cable. In this example, the OS assigned it to the serial port COM4:
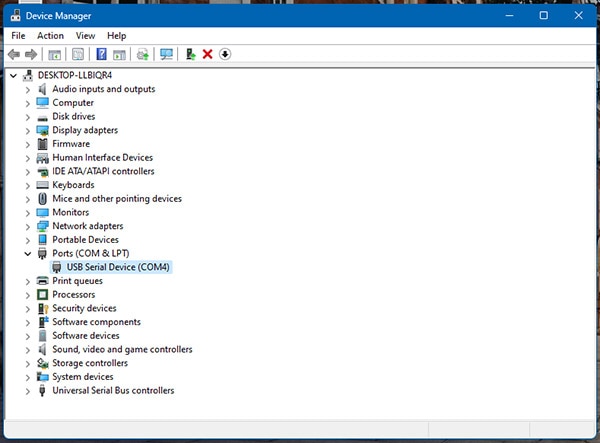 Use the Windows device manager to find the serial port assigned to the adapter. Depending on the adapter in use, the device’s name may differ in the list.
Finally, after finding the device’s serial port on the OS, you can use Putty or a similar program to establish a connection to the Raspberry Pi’s serial console. Using Putty, make sure first to set the connection type to serial. Then, enter the serial port you identified earlier, and change the baud rate according to the adapter’s manufacturer’s recommendations. Typically, that will be 115200 or 9600 bps:
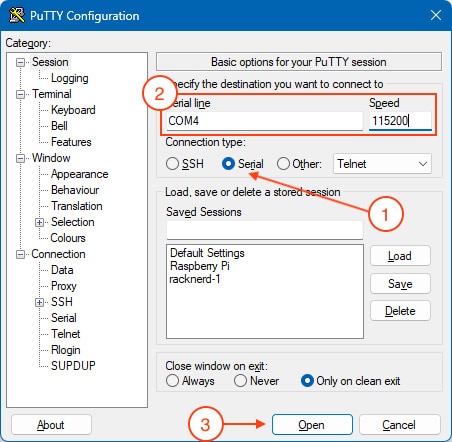 Change the settings in Putty, as indicated by this screenshot. However, make sure to replace the serial port and baud rate with the correct values identified earlier.
Unix-based operating systems include a program called “screen” that can be used to establish a serial connection to the Raspberry Pi’s serial console using the following command in a terminal window:
sudo screen SERIAL_PORT BAUD_RATE
Make sure to replace the SERIAL_PORT and BAUD_RATE with the values that match your adapter, for example:
sudo screen /dev/tty0 115200
sudo screen /dev/cu.usbmodem11201
Users may favor establishing a serial connection to a headless Raspberry Pi over using an Ethernet or WiFi network for various reasons, for example, when no such network is available or for tracking the console output of the Pi during boot-up.
While the exact process of finding a Raspberry Pi connected via a serial cable differs slightly, depending on the adapter and OS used on the host computer, the general steps remain the same. First, the Pi’s serial console has to be enabled by editing a configuration file on the SD card’s boot partition. Next, you have to download and install drivers for your host computer’s OS and adapter cable. In addition, Windows users may have to install a terminal emulator, such as Putty.
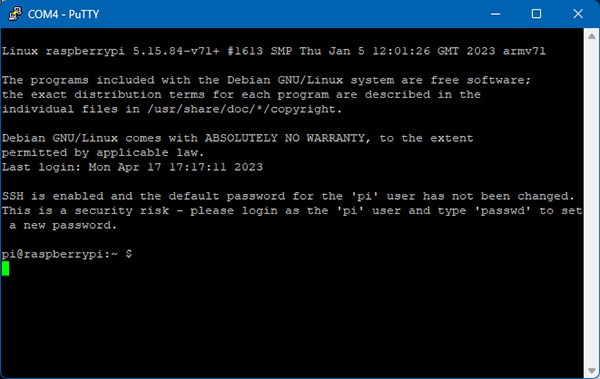 Upon establishing a connection, the serial monitor shows the output coming from the Pi.
Some USB-to-serial adapters allow the host PC to power the Pi via the adapter. In such cases, makers should ensure not to power the Raspberry Pi via the SBC’s onboard USB power supply. Running the device on two separate power sources may cause irreparable damage to the Pi or the USB-to-serial adapter.
Finally, finding the Pi’s serial port also depends on the OS in use. Windows users can utilize the device manager, and Unix users can list the USB device files or track changes in the OS’s log when connecting and disconnecting the adapter. Either way, once makers know the serial port assigned to the Raspberry Pi, they can use any supported terminal emulator to communicate with the Pi’s serial console.