Control Your XRP Robot with the Kitronik Mini Controller for Raspberry Pi Pico
2024-10-23 | By Travis Foss
One interesting question that has been brought up over and over, is what are the different ways out there to control the XRP. I happened to find the Kitronik Mini Controller for Raspberry Pi Pico and Kitronik has an excellent write-up about using this controller with their Pico Autonomous Robotics Platform which is also a Raspberry Pi Pico-based robot. I thought since these two platforms were similar, it would be an easier transition to get working with the XRP.
I started digging into their GitHub repo, KitronikLtd/Kitronik-Pico-Mini-Controller-MicroPython (github.com) and the first thing I noticed in the Readme portion of the GitHub page is that both the controller and robot need a copy of the KitronikPicoWBluetooth.py from this page, Kitronik-Pico-W-Bluetooth-MicroPython/KitronikPicoWBluetooth.py at main · KitronikLtd/Kitronik-Pico-W-Bluetooth-MicroPython (github.com). I downloaded a copy of this file to my computer for future use.
After browsing through Pico Controller.py, I found this file needed no changes to work with the XRP. Since the Kitronik Bluetooth and the Pico controller files were needed on the controller, I installed both the Kitronik_Pico_W_Bluetooth and the Pico controller files onto the Pico W that I was going to use in the controller
Next, I started diving into the code for the robot. At the top of the Pico ARP.py file, I noticed that they imported the PicoAutonomousRobotics file. Because of this, I decided to dive into that file, which is located here, Kitronik-Pico-Autonomous-Robotics-Platform-MicroPython/PicoAutonomousRobotics.py at main · KitronikLtd/Kitronik-Pico-Autonomous-Robotics-Platform-MicroPython (github.com). In reviewing this file, I noticed that a lot of the functions they are using are already being called out in the libraries set up on the XRP. This got me curious if I could get the XRP to work without using this library. I then proceeded to investigate the Pico ARP.py file again. Knowing that I was going to attempt to get the XRP to run without using the previously mentioned library, I started by commenting out the line where it calls the library and the functions it uses. I started by removing the beginning section where it sets up the buggy.

I then looked at the next section where it turns on the LEDs to show the robot is on. Knowing that it used the library I was not going to use, I then decided to write a new function that is called test_leds. That function is then called right away so that the LEDs would blink as soon as the robot is ready. Currently, the code is set up to blink three times before turning off, however, it can easily be changed to blink more times by changing the number in parenthesis on line 20 in my code.

The next series of lines in the code define functions that are related to connections to the controller, so I left those lines as they are without making any changes.
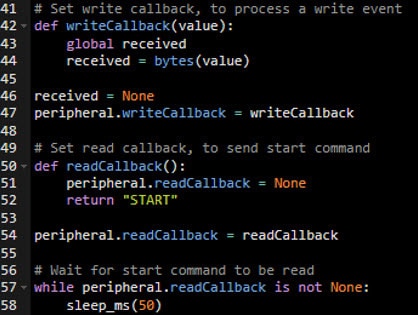

The next section of code controls the motion of the robot. This is the section where I realized I could control the robot with the XRP libraries.
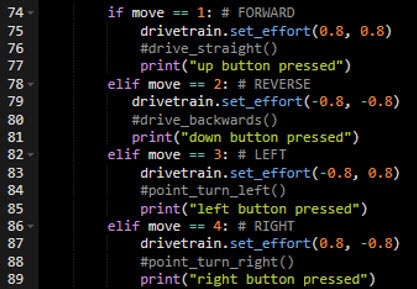
I decided to get one of the buttons working to test out the code change. I started on line 74 which calls out if the up button on the controller is pressed that it would cause the robot to move forward. Instead of using the buggy.motorOn command that is used in the Kitronik example, I decided to try to use a command that I had set up based on the original drive examples on the XRP. I called the file driving_for_controller and set up a few distinct functions, drive_straight, drive_backwards, point_turn_left, and point_turn_right. These functions were set up in a similar matter where the robot would set an effort the robot and move for a short period, in this case, ½ a second.


After testing this on the XRP, it did work, however, the robot would stutter as it would cause the robot to drive forward and then stop before moving on to the next move forward command. This was not how I wanted the robot to perform. Because of this, I started pondering ideas and thought why not have the button press to set an effort level to the motor until the button is released? To accomplish this, I changed the code to a drivetrain.set_effort command when the button was pressed.

I then went to the else statement, for when the button is released, and set the effort to the left and right wheel to 0. The sleep time between checks was already set, so I thought I would try it as it was in the example.

To my surprise, this code worked very well. It worked so well that I decided to leave it as is and moved on to setting up the other directional buttons. As you will notice on lines 76, 80, 84, and 88 I commented out the previous drive methods I had set up in the code as well as commented on the line where I called the driving for controller library.
Lastly, I left the A and B buttons alone without any code for them, other than a print statement I added so that I could confirm these buttons are working correctly.

Depending on which project I was working on, I could set these buttons to accomplish a certain task, however for testing, I was not sure what I would use so I just left them with a print statement. While thinking about this at a later point, I could have used them to set the efforts to half or used them to control the servo to pick up objects, however, I never dug into that before writing this guide. That may be part of a future project.
Now that the coding portion was done on the XRP, the last step was to test it out. First, I plugged the Pico W that I programmed for the controller into the controller. Next, I turned on the XRP and once the light started flashing on the onboard Pico, I then turned on the Controller. With this code, If the pairing binds successfully between the controller and the XRP, the LED on the Pico on the controller will light up and stay lit. If for some reason this does not happen the first time, it seemed to help to power cycle the controller and it then seemed to bind right away. Once the light on the controller turns on, the program should be up and running. Set the XRP on a surface where there is room to drive around and try it out. I have linked the full code at the bottom of the page for your reference.
One wonderful thing about this controller is that it has the pinouts to add joysticks via the analog input pins as well as extra buttons with the other IO that are broken out. I am planning on experimenting with the extra buttons on a future project, however, at this point, it was not needed. If you would like to see a tutorial on this, let us know and I can put one together.
Here is the full code from the XRP:
from bluetooth import BLE from time import sleep_ms #from PicoAutonomousRobotics import KitronikPicoRobotBuggy from KitronikPicoWBluetooth import BLEPeripheral #from driving_for_controller import * from XRPLib.defaults import * import time # Setup Pico Autonomous Robotics Platform Buggy #buggy = KitronikPicoRobotBuggy() # Set the buggy speed to 50% #speed = 50 # Set LEDs to red to show its turned on #for i in range(4): # buggy.setLED(i, (100, 0, 0)) #buggy.show() def test_leds(): board.led_blink(3) time.sleep(1) board.led_off() test_leds() # Setup Bluetooth peripheral peripheral = BLEPeripheral(BLE()) # Wait for connection...


