Receiving Data Over Bluetooth
2019-12-04 | By Maker.io Staff
In the previous how-to, we learned how to send data to a mobile app from a device over Bluetooth using the Atmosphere IoT Studio. This is great if we want our device to send information from sensors and GPIO states, but what if we want to send data back? What about controlling IO such as LEDs, buzzers, and other output devices? This is where reading Bluetooth data is needed. In this how-to, we will learn how to receive data over Bluetooth!
BOM
- Adafruit Huzzah 32
- Breadboard
- Smartphone
Reading the Data
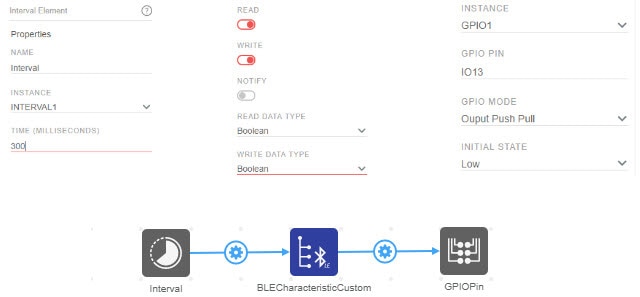
The first step is to create a new project (make sure to select the Adafruit Huzzah32 as the target device). Also, rename the project to something more suitable (such as “Bluetooth Example – Reading Data”). Once this has been done, insert an interval element, a GPIO element, and a BLE element in the order shown below.

The next step is to connect these three elements together, so the interval element connects to the BLE element, and the BLE element connects to the GPIO element. The interval element will be set to cause events once every 300ms and choosing a number over 1000ms will create a more responsive device. The BLE element must be set to both read and write over Bluetooth, and the data types for both read and write need to be set to “Boolean.” The GPIO element should be set as an output push-pull and must use IO13. This is because the Adafruit Huzzah32 has an LED connected to IO13, and the push-pull configuration allows the output pin to drive the LED.

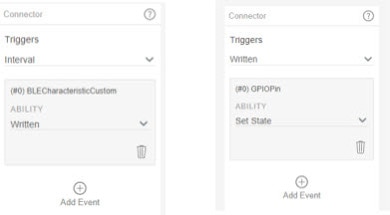
With the elements configured, we also have to check and configure the connections. Sometimes the default choice for the connections is correct, but in other cases, it is not (for example, the GPIO element uses interrupts by default instead of read and write). The connection between the interval and the BLE elements needs to have the trigger set to “interval” and the ability set to “written.” The connection between the BLE and GPIO elements needs its trigger set to “written” and the ability set to “set state.”

Creating A Mobile App
The next stage is to create our mobile app that will send commands to the Huzzah32 via Bluetooth. In the app, insert a toggle element and connect it to the BLE element (as shown in the image below).

For this Bluetooth project, we do not use an interval to send data over the BLE element, but instead use an event that is triggered when a change in the toggle element is detected (i.e., pressed). However, when you connect the two blocks together, you will not be presented with an autocomplete or option for sending the value of the toggle switch. When you connect the two together, you will need to configure the connection trigger to “changed” and the ability to “write.” When you do this, the value to send will be empty, but you need to enter “value” manually. This is a JavaScript variable, which refers to the toggle switches state, but you could enter any value you want here (in this example, we want the state of the toggle switch).

Test Our App
At this stage, it’s time to test our system to see if it works. First, make sure you have saved your project, as you do not want to lose any information. After you have saved the project, click compile. Once the “compile complete” notification appears (at the bottom of the screen), download the project to the Huzzah32 via USB. When this has been downloaded and flashed, you will need to reprovision your device, as a new project is now loaded onto the Huzzah32.

As soon as it’s reprovisioned, you can test your project and see if the built-in LED on the Huzzah32 turns on and off when you toggle the switch on the IoT app. When you provision the Huzzah32, the app might ask about Wi-Fi details, these are unneeded, as we are not using Wi-Fi. You will find that when you press the toggle switch, the light will briefly turn on and then off again. This is because the Huzzah32 is constantly looking for new data, and once no more new data is available, the BLE element will return false. If you want the LED to stay on, you will need to wait for the upcoming project, which will look at elements firing when they receive information instead!


