制造商零件编号 AKX00066
ARDUINO ALVIK
Arduino
Equipped with a variety of sensors, this robot offers great flexibility for different projects. The Alvik features a distance sensor, a line-following array, and a color sensor, allowing you to create various projects. For example, you could create an obstacle course for the Alvik to navigate, showcasing the versatility the robot offers.
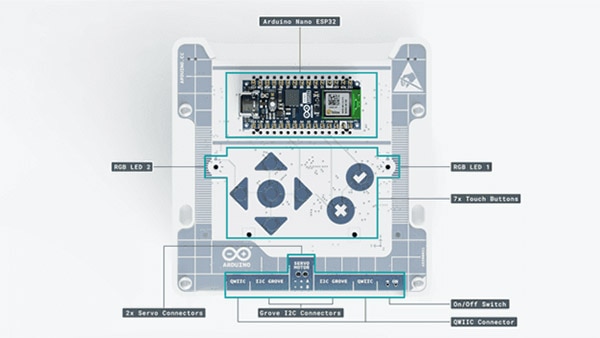
The main controller that is the brains of the whole robot is the Arduino Nano ESP32, located at the top of the robot. This is where all data is processed, program instructions are executed, and communication with the sensors occurs. The Nano ESP32 is advantageous for debugging due to its placement at the top of the robot, which facilitates easy connection and access to the board.

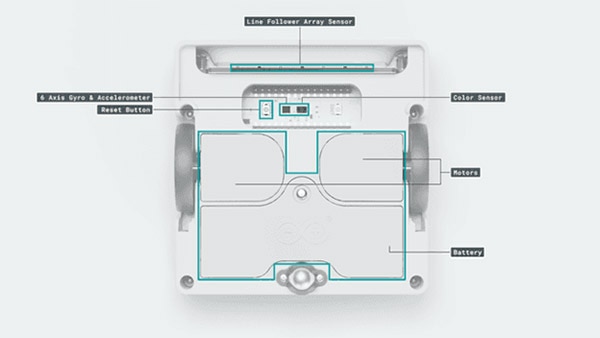
In the image below, you can see where each of the sensors is placed. The line follower array sensor is at the front of the robot towards the bottom, which makes it easy for the robot to sense lines as it’s driving. This placement is crucial for certain tasks, such as following a certain path, as it allows the Alvik to perform some tasks like an obstacle course.
The color sensor is by the line follower array, where it senses the colors of the floor. This allows you to code the robot to perform different tasks based on where the robot is being placed. Consider incorporating the color sensor by having the robot change speeds or directions when detecting specific colors.
The primary components of the robot, including the motors and batteries, are situated in the central part of the device. This arrangement ensures that the motors are securely placed, allowing for balanced operation on both sides of the robot. Furthermore, the batteries are positioned for easy access, making it convenient to change them when necessary.

To begin your projects, download the Arduino Lab for MicroPython app on your computer. You can find the files needed for your computer here: Arduino Lab for MicroPython.
Here is some basic code I worked with to learn how to use the motors with the rotate and drive functions. This helped me understand the basics of the motors, which I can use to enhance my coding projects by incorporating the various sensors. The Arduino website offers a tutorial on how to use object detection, which can be found here: Getting Started with Alvik | Arduino Documentation

This is a starter code that allows the Alvik to rotate and drive. After importing the libraries listed in lines 1-3, initialize the robot as shown on line 5. This allows you to use it in all subsequent coding lines. Here, the robot is initialized as Alvik, but you may name your robot anything you’d like as the ArduinoAlvik().
Once that is initialized, I would recommend including a sleep_ms function so you have time to turn on the robot and place it where needed. Once all of that is initialized, you may set the distance, degrees, and speed to whatever number you’d like. This is your time to experiment and understand the robot’s functions!
In this code, I did an infinite loop and had the robot sleep after each move so that I could see how the Alvik is operating. You may choose to do this exact order of code to see how it works and then add and customize the program however you’d like.
There are many other functions you can test with your code. A more detailed API can be found on the Arduino website: Alvik Robot API.
In conclusion, the Arduino Alvik Robot is an accessible learning tool for all students interested in the world of robotics and programming. The compact design makes it easy to take with you everywhere, and the variety of sensors allows you to be creative with projects. The versatility of the robot also provides a great platform for hands-on learning and experimentation.
From basic coding exercises to more complex functions, users can gain a strong understanding of coding principles and robotics. The platform of both MicroPython and block-based coding makes this tool accessible to all ages, from elementary students wanting to do a fun little block-based coding project to college students wanting to create portfolio projects from this robot. Whether you choose to build obstacle courses for the robot, experiment with the line following or color detection, or the motor function, there are endless opportunities to be creative and develop your technical skills.