制造商零件编号 ABX00052
ARDUINO NANO RP2040 CONNECT
Arduino
Displays LCD / TFT Arduino Raspberry Pi MCU
A previous article discussed how you can begin designing stunning graphical UIs in EEZ Studio, a straightforward WYSIWYG user interface editor. That article concluded with exporting the design as C++ files. However, the application cannot run on Arduino in that state, and there are still some steps left to get it working on a supported Arduino. This article discusses the prerequisites and the procedure of deploying an EEZ Studio project on an Arduino Nano RP2040 Connect.
The EEZ Studio project builds on top of LVGL version 8.3, and you must thus choose a development board capable of running the library code. The LVGL documentation lists the hardware requirements. I decided to run the code on an RP2040 board, as it can reliably fit the code in its memory and run the UI without struggling to keep up.
Besides the development board, you also need to choose a display compatible with Arduino and LVGL. LVGL itself does not provide drivers to interface hardware screens. Instead, it relies on additional libraries, such as TFT_eSPI, which this article uses. The libraries work together like a charm, and the driver supports the Adafruit ILI9341 resistive touch screen used in this build.
Finally, neither LVGL nor TFT_eSPI can handle all touch screens that you can find. Therefore, you may need to utilize a third library for reading and processing touch inputs. In this example, the Arduino program uses the Adafruit touchscreen library.
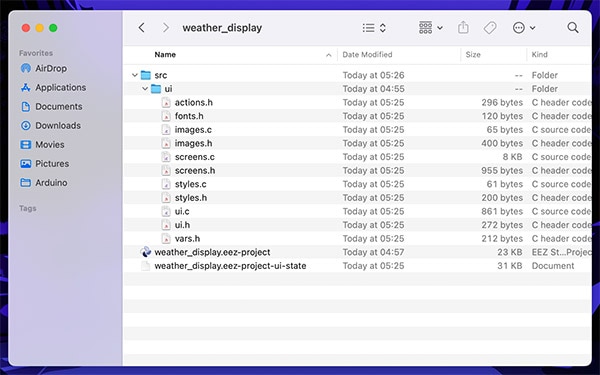
Upon exporting the UI from EEZ Studio, you end up with a few code and header files located within their EEZ Studio project directory, similar to the following screenshot:
 This screenshot shows the files exported by EEZ Studio.
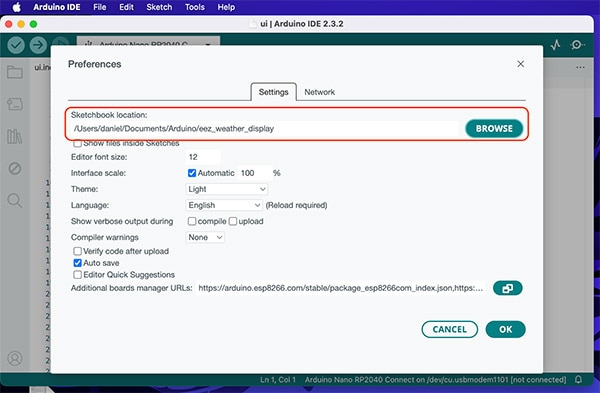
Before doing anything with these files, you should use the Arduino IDE to create a new sketch in a location of your choice. Once you save it, you have to adjust the sketchbook location to ensure that the libraries get installed within the new project’s folder and that the Arduino IDE can find the EEZ Studio UI files later on:
 This screenshot highlights where you need to define the new sketchbook location.
The sketchbook location must point to the folder that contains the newly created Arduino project. Then, you can start installing the necessary libraries. They must match the selection made in EEZ studio to ensure that the project compiles without errors. In my case, I had to install LVGL 8.3, TFT_eSPI 2.5.0, and the Adafruit Touch library using the Arduino IDE’s library manager.
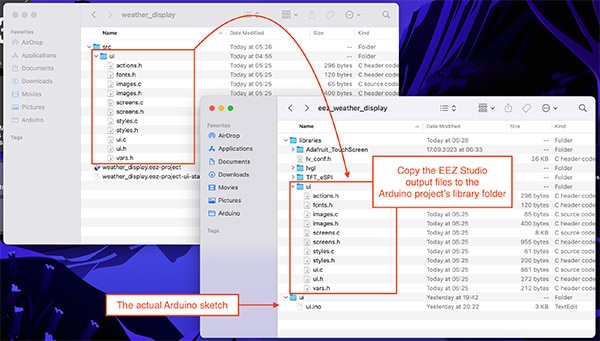
Finally, copy the generated code from the EEZ Studio project folder into the new Arduino library folder. That folder should then contain the generated UI code files and the installed libraries with your configuration files, as shown in the following screenshot:
 Copy the UI files to the libraries folder, as shown in the screenshot.
It’s essential that you select the correct lv_conf.h configuration file to the chosen LVGL version, as failing to do so may result in mysterious and hard-to-track compilation errors later. If you are experiencing difficulties setting up the project you can download or fork a pre-configured version from GitHub.
The pre-configured GitHub repository contains an example TFT_eSPI user configuration file for the Arduino Nano RP2040 Connect and the Adafruit ILI9341 display. However, if you are using different devices you must change the pin numbers in the configuration file to match your devices and the GPIO pins you used. A previous article explains the exact process in great detail.
Lastly, it’s worth noting that I ran into compatibility issues with Mbed OS versions above 3.0.0 on the Arduino Nano RP2040 Connect, which led to sporadic crashes during and shortly after upload. Therefore, if you experience such problems, it’s worth trying to downgrade the board version to 3.0.0 in the Arduino IDE board manager.
With the project structure set up and all libraries installed, you can start coding your embedded UI application. Luckily, only minimal changes to the source code are required if you choose the appropriate LVGL version in EEZ Studio. Firstly, go through all auto-generated UI header files and update the LVGL library import:
// Replace all occurrences of this import:
#include <lvgl/lvgl.h>
// with the following statement:
#include <lvgl.h>
Doing so ensures that the compiler can find the necessary files when building the application. Next, you import the generated UI’s main header file in your Arduino sketch by adding the following imports:
#include <lvgl.h>
#include <TFT_eSPI.h>
#include <ui.h>
#include "TouchScreen.h"
Note that these include statements apply to the setup described in the prerequisites section, and they may need to be adjusted when using a different display or touch controller.
Lastly, initialize the UI generated by EEZ Studio in the sketch’s setup method, and you must also periodically call the UI’s tick function from within the main Arduino program’s loop function:
void setup()
{
  lv_init();

  tft.begin();
  tft.setRotation(2);

  /* Other setup code discussed later */

  ui_init();  // Init EEZ-Studio UI
}

void loop() {
  lv_timer_handler();
  ui_tick();
}
Note that, like before, the example setup also contains the initialization code required for starting the display, and the actual code may differ in some cases. The setup method also includes some additional code that will be discussed later.
Functions related to user actions and custom variables defined in EEZ Studio are stored in the actions.h and vars.h header files, and you must implement custom methods before compiling the code. You should add C source files containing the implementations in the same folder as the headers and the implementations can be empty for now. For example, the following snippet shows the empty implementations of the actions.h header:
#include "actions.h"

void action_update_app_units(lv_event_t * e) {
}

void action_navigate_to_settings(lv_event_t * e) {
}

void action_navigate_to_main_screen(lv_event_t * e) {
}
As the example illustrates, the actions.h file contains the handler callbacks that the UI calls whenever users interact with the UI elements with linked actions. You will have to implement these functions according to their requirements.
At this point, you should be able to compile the entire project and upload it to the Arduino board without errors. When everything was configured correctly earlier, the screen may already display the graphical UI. However, in some cases, further screen setup may be required, and touch inputs will not work at this point.
Before arriving at a functional graphical UI, you must add the final puzzle pieces. Unfortunately, the final pieces of code are highly dependent on the project hardware and libraries used for interfacing the devices. However, the basic structure of the setup function remains the same, and it is given in the following snippet:
void setup()
{
  lv_init();

  tft.begin();
  tft.setRotation(2);

  lv_disp_draw_buf_init(&draw_buf, buf, NULL, screenWidth * screenHeight / 10);

  // Register the custom display function
  static lv_disp_drv_t disp_drv;
  lv_disp_drv_init( &disp_drv );
  disp_drv.hor_res = screenWidth;
  disp_drv.ver_res = screenHeight;
  disp_drv.flush_cb = my_disp_flush;
  disp_drv.draw_buf = &draw_buf;
  lv_disp_drv_register( &disp_drv );

  // Register the custom touch-input handler
  static lv_indev_drv_t indev_drv;
  lv_indev_drv_init( &indev_drv );
  indev_drv.type = LV_INDEV_TYPE_POINTER;
  indev_drv.read_cb = my_touchpad_read;
  lv_indev_drv_register( &indev_drv );

  // Init EEZ-Studio UI
  ui_init();
}
The first few and the very last lines have already been discussed above. They initialize LVGL, TFT_eSPI, and the EEZ Studio UI. The lv_disp_draw_buf_init call initializes LVGL’s draw buffer with a specified size that depends on the display resolution. The next few lines register a custom screen flush function, which is necessary because LVGL does not provide a display driver. Instead, it relies on TFT_eSPI to send data to the display, and the custom display callback function is the part that accomplishes this task. Similarly, LVGL does not handle touch inputs but relies on users defining a custom touch input handler. The handler is registered in the next few lines of code.
The custom display flush function looks like this:
void my_disp_flush( lv_disp_drv_t *disp, const lv_area_t *area, lv_color_t *color_p )
{
    uint32_t w = ( area->x2 - area->x1 + 1 );
    uint32_t h = ( area->y2 - area->y1 + 1 );

    tft.startWrite();
    tft.setAddrWindow(area->x1, area->y1, w, h);
    tft.pushColors((uint16_t *)&color_p->full, w * h, true);
    tft.endWrite();

    lv_disp_flush_ready(disp);
}
It calculates the address range for storing the pixel data on the display before initializing the process and sending the data to the screen. An example implementation of the touch-input handler can be found in the GitHub repository linked above, but it is omitted for brevity.
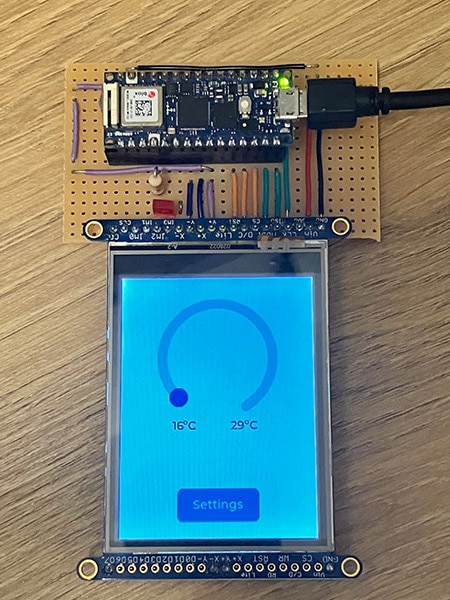
Once you upload the updated code with these custom handler methods in place, the screen should show the UI, and it should also react to touch inputs, even without defining any custom events or code for the user actions:
 This image shows the UI running on an Arduino Nano RP2040 Connect.
Before you can utilize the generated code in your projects, you must take care of a few tasks when exporting a graphical UI from EEZ Studio to Arduino. Start by creating a new Arduino project. Then set the Arduino IDE’s sketchbook location to the new project’s root folder. Next, you must find and install the necessary libraries for your setup. As LVGL relies on external libraries to communicate with the display and input devices, you also have to provide custom implementations for the display and input handlers.
Only minimal adjustments to the generated code files are required. First, replace certain import statements in the header files so that they point to the correct directories. Then, provide custom implementations for all variable-related tasks and user actions you set up in EEZ Studio.
After these steps, you should be able to upload the code to your Arduino and have a beautiful, functional UI for your embedded projects.