How To Get Started with Embedded UI-Design in EEZ Studio
2024-10-16 | By Maker.io Staff
Graphical user interface design can seem daunting to beginners and hobbyists, and building practical embedded UIs requires years of experience and practice. Just like with any task, using the right tools can drastically simplify the job. This article discusses EEZ Studio, a novel embedded UI design software that lowers the barrier of entry for beginners and can help more experienced developers cut the time between ideation and deployment of a functional graphical user interface.
Prerequisites and Installation
Absolute newcomers to UI design should start by familiarizing themselves with the basic UI and UX design concepts and how those terms differ. Going in-depth is optional, as using tools like SquareLine Studio and EEZ Studio drastically simplifies the process. These so-called WYSIWYG (what-you-see-is-what-you-get) designers let developers drag and drop UI elements onto a canvas, allowing them to craft beautiful graphical user interfaces without writing a single line of code. All that beginners need to do for now is download EEZ Studio from the official GitHub repository and install the program.
Creating a New Project
When launching EEZ Studio, the program shows a screen with multiple tabs, one of which lets you set up a new project. The program includes a few templates for various project types. In this case, the finished UI should run on an Arduino using LVGL without custom actions. After selecting the project type, enter a name and change some presets, most notably the LVGL version. For compatibility reasons, this project's target is LVGL version 8.3. However, EEZ Studio also supports version 9.0.
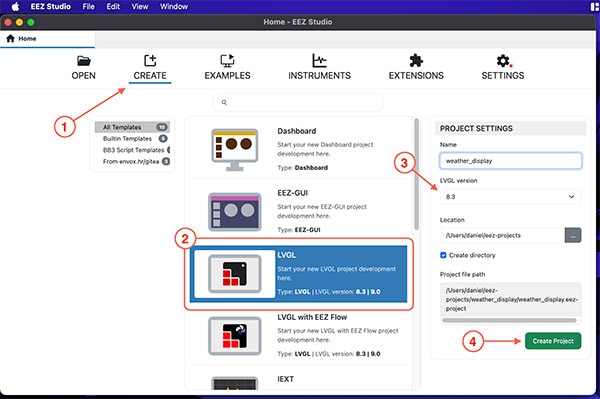 Follow the outlined steps to create a new LVGL project in EEZ Studio.
Upon clicking the green ‘Create Project’ button, the program sets up and opens the newly created template project with a single screen and a simple hello-world label. Next, set up the target screen resolution before adding UI elements to the project. You can do so by clicking the gear icon in the application’s top menu bar. Next, select the general settings category from the list of options and then change the width and height values to match the target hardware.
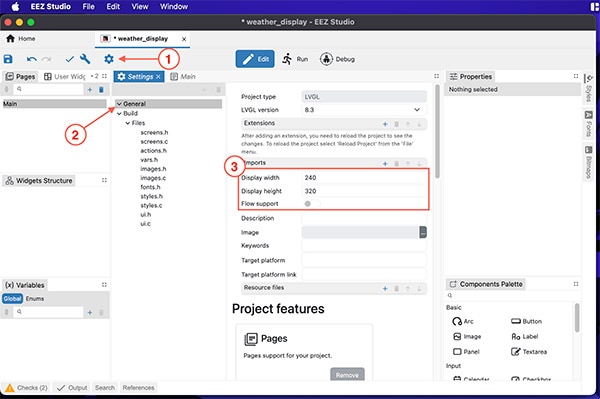 Adjust the project’s screen size to match the physical hardware.
Next, update the default page’s size in the UI designer to match the project settings via the main tab. Next, select the page to edit and, finally, adjust the page’s width and height:
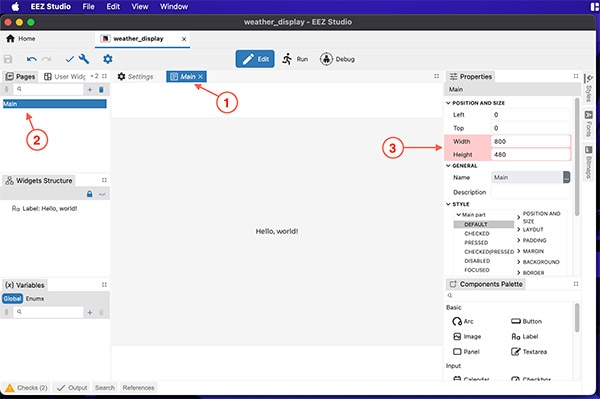 Apply the same adjustments to the default page.
This process is only required when creating a new project. All subsequently added pages will already have the correct size.
Understanding the EEZ Studio Interface
Take a minute to familiarize yourself with the main UI before starting the design process. The following screenshot highlights the most important sections for beginners:
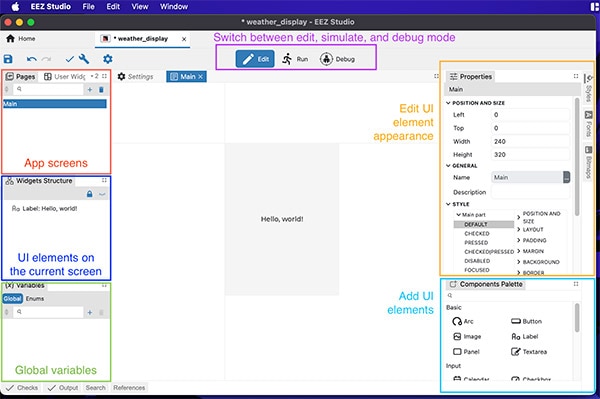 This screenshot highlights the most important areas of the EEZ Studio interface.
The red section in the top-left corner lists all screens of the embedded UI. A page contains UI elements, such as buttons and labels, and is displayed on the screen. As their name suggests, pages are like individual pages of a website that users can jump between to perform various actions. The blue section lists the UI elements added to the current page, and the green area beneath lists the variables. The top bar contains buttons for switching between the edit and test modes. The program’s right side includes two areas for customizing the appearance and layout of the currently selected element and adding new UI elements to the currently active page.
Designing a Simple Main Page
Adding and positioning elements on a page is a straightforward drag-and-drop process, and you can add new UI elements by dragging them from the list in the bottom-right corner onto the page in the center of the screen:
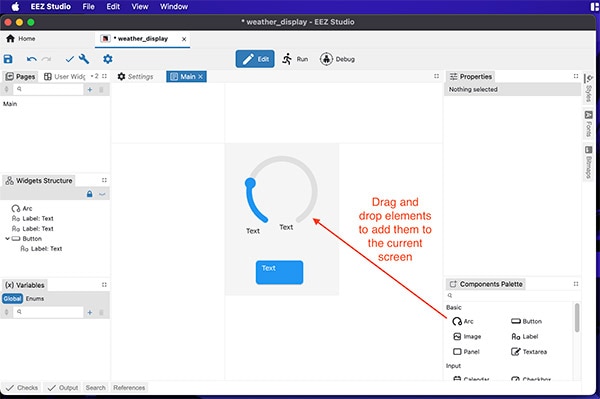 This screenshot illustrates how you can add UI elements by dragging them into the main working area.
Widgets can be moved around by dragging them to the desired spot on the page or by adjusting the left, top, width, and height values in the properties panel. Widgets can also have children, and the relationships between widgets can be changed by organizing the entries in the widget structure panel. When you are done adding widgets to a page, you should rename each widget to make it easier to identify and reference later:
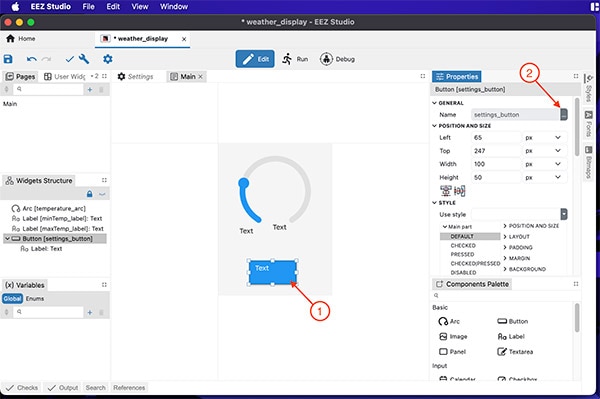 Ensure to always use meaningful names to help identify UI elements in the generated code.
Tweaking a Widget’s Appearance and Layout
Most widgets have multiple user-customizable parameters, and you can adjust them using the properties panel. In this example, the text in the two labels underneath the arc widget should be centered. To accomplish this, select one of the labels, find the appropriate category in the properties panel, tick the checkbox beside the setting you want to override, and select the value to use.
 The properties panel lets users change the appearance of UI elements.
Following a similar process also lets you adjust the positioning of children within a parent element. In this case, the label within the button is a child of the button and should always be positioned in the parent's center. You can select the button and then navigate to the layout category in the properties. Using the flex layout option, you can center the child along all axes within its parent:
 The properties panel also helps arrange child items within parents.
Some widgets, like the arc, comprise multiple parts, and you can usually adjust the individual component’s appearance. In this example, the arc’s handle should have a different color from the rest of the element. Finding the appropriate sub-category in the list of available options lets users adjust only the knob’s background color, resulting in a two-tone design:
 This screenshot illustrates how some UI elements have multiple adjustable parts.
Adding and Linking Global Variables
Although this step is not strictly required for designing a functional UI in EEZ Studio, adding, and linking variables to certain components at this point in the process helps save time later on, as it reduces the amount of code developers have to change manually.
You can add new variables by clicking the plus icon in the variable section, and then entering a variable name and defining its type:
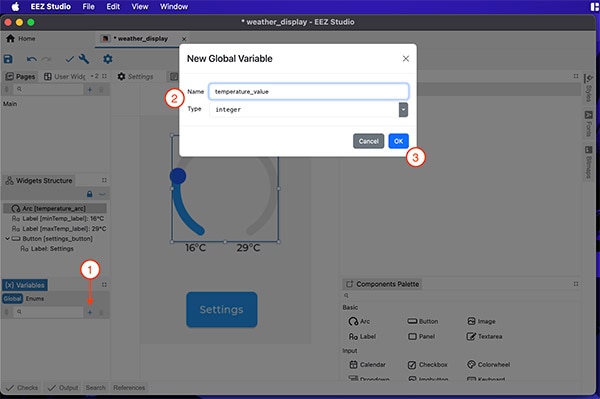 The screenshot outlines the required steps for creating variables.
Next, link the variable to UI elements that should be affected by variable value changes. To accomplish this, select the UI element to link, find the value entry in the properties, and then choose the variable to link from the dropdown:
 This screenshot illustrates how to link variables to UI element values.
Adding Pages
This example application contains a second page for adjusting settings. You can add new pages to your UI by clicking the plus icon in the pages tab and then entering a name:
 This image shows how to create new pages.
Variables are shared across all pages in the same application. However, each page has a unique list of elements. Like before, you can design the new page by dragging elements onto the page and changing their properties:
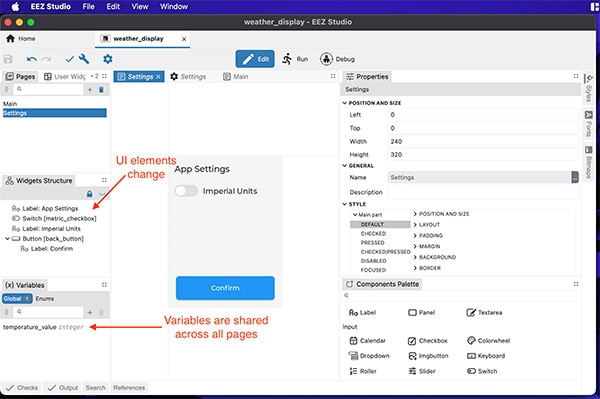 UI elements are unique for each page, while variables are global.
UI Element States and Events
Many UI elements have a state that you can change by interacting with the component. Examples include the checked state of checkboxes or toggle buttons:
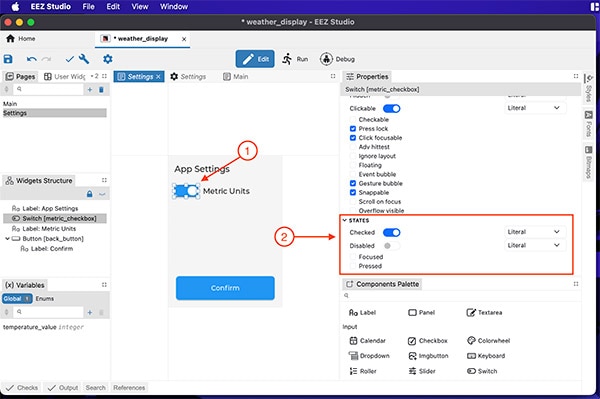 The default state can also be changed using the properties panel.
UI designers can adjust the default state by changing the appropriate setting in the element’s properties. Like before, they can link the element’s state to a variable to save some time later.
Events represent the final important concept UI design beginners must know. Events fire whenever certain conditions occur. Common instances include an element’s state change or when users interact with a component by, for example, clicking on it or entering values. The application can react to such events by defining so-called event handlers. These handlers are functions that execute application code in reaction to an event.
To add event handlers, you first create a user action within EEZ Studio. You can accomplish this by scrolling to the actions tab and then clicking the add button before entering the action name:
 This screenshot illustrates how to add custom actions.
Next, click the UI element for which they want to add an event handler. They can add new handlers within the properties panel in the events category by clicking the plus icon:
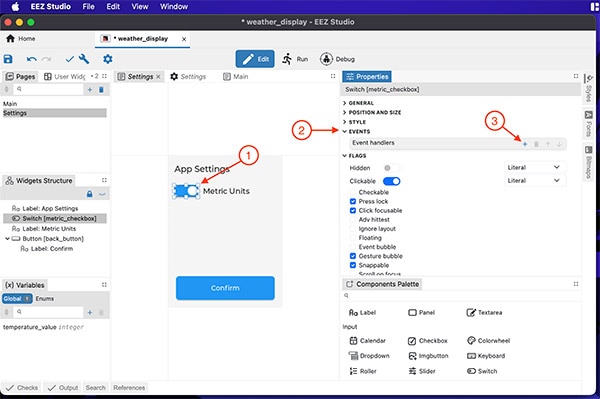 User actions can be assigned to event handlers.
In the dialog that opens up, designers must choose the event type and then link it to an existing action:
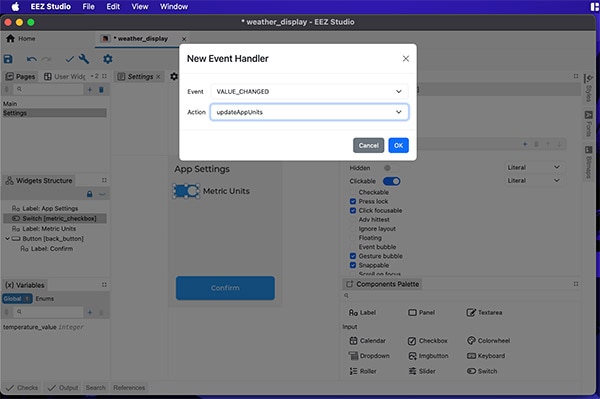 This screenshot outlines exemplary settings for an event handler.
In this example, the user actions do not perform any tasks, as the behavior will be set up in the Arduino code later. However, you could also use EEZ Studio’s built-in action editor to configure the app’s behavior.
Generating the UI Code
You can instruct EEZ Studio to compile the design into executable LVGL code by clicking the wrench icon in the app’s main menu bar:
 The highlighted button compiles the design into C++ code files.
Doing so generates the necessary C++ files in the project’s directory:
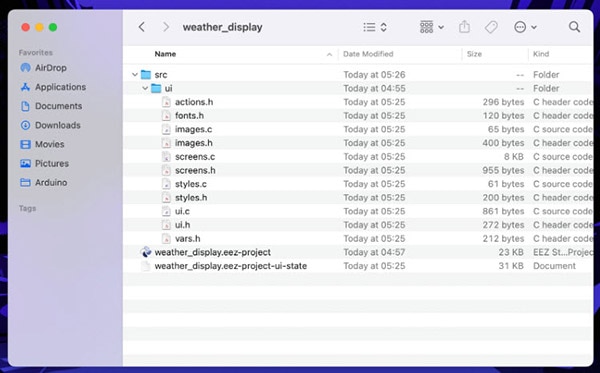 This screenshot shows the UI build process result.
Summary
EEZ Studio is a straightforward yet feature-rich drag-and-drop UI editor for designing embedded graphical user interfaces. The software lets developers define multiple pages, add UI elements, and arrange the components to match their design requirements.
Designers can alter an element’s appearance by adjusting the component’s properties. Parent-child relationships ensure that a parent’s transformations apply to all children unless a child element overrides a setting.
Variables and actions help reduce the code designers must write to make their UI applications functional. UI elements can have a state, which users can typically affect by interacting with a component. Designers can define event handlers that fire when a specific condition is met, for example, when an element’s state changes.
When done, you can export the UI design with a single click. In this example, the generated C++ code uses the LVGL graphics library, which is compatible with many development platforms, such as ESP32 and Arduino.
Have questions or comments? Continue the conversation on TechForum, DigiKey's online community and technical resource.


