制造商零件编号 AWC-001
HD 1080P USB WEBCAM WITH MICROPH
Eaton Tripp Lite
Single Board Computers Imaging Camera Raspberry Pi SBC
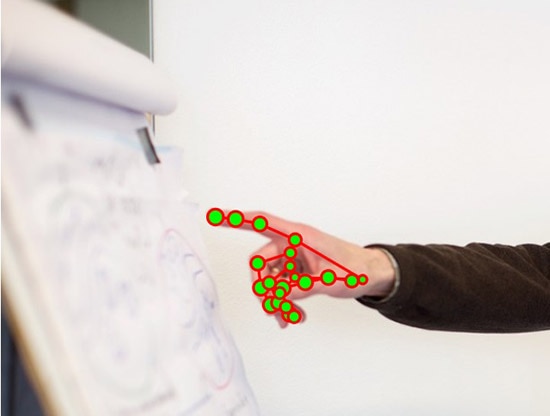
This article explains how to use a Raspberry Pi to detect hand gestures and track where a user points. By monitoring the position of the index finger, the system triggers actions when the finger enters predefined regions. Possible actions include starting animations, flashing lights, or playing audio samples. This setup can enhance interactive museum exhibits, offering visitors an engaging experience with audible explanations or sound effects that augment the displays.
Newcomers to artificial intelligence (AI) and machine learning (ML) should review the essential terms and concepts explained in a previous article. This project utilizes Google MediaPipe, a powerful, free, lightweight, and open-source ML SDK built to run on various devices and work with common programming languages. A previous article dives into the details of getting started with MediaPipe, and it’s a recommended read before continuing with this project.
This project requires a recent Raspberry Pi with a camera module or compatible third-party USB webcam. Working with USB cameras can be tricky, and if you experience camera issues, you can follow this guide to troubleshoot and resolve the problems. Lastly, Python novices should read this article about managing Python installations, virtual environments, and external packages.
The final product has a few limitations to keep the code simple and easy to follow. For example, it assumes the camera remains stationary once set up. This is usually manageable in settings like galleries or classrooms, where the camera can be positioned to cover the whole area of interest without needing to be moved during use.
The second limitation relates to the first one. The example program includes predefined regions of interest that trigger specific actions, like playing a short audio clip when a user points at a particular area. Before running the Python script, the programmer must set these regions in the code. However, adding a second ML model that automatically detects objects when the program starts and uses their bounding boxes as regions of interest is easy – just follow the instructions in the MediaPipe introduction article to set this up.
Lastly, the program tracks only the first hand it detects, ignoring others in the frame. This approach helps conserve the Raspberry Pi's limited resources and ensures that only one action is triggered at a time. While there's technically no reason why the program couldn't detect multiple hands, doing so would likely lead to chaotic results, as multiple actions could be triggered simultaneously.
Like the simple object detector, this program relies on a powerful pre-trained ML model available for download from Google. The model was trained on a diverse set of natural and artificial hands, and it is incredibly powerful in classifying and tracking landmarks in 3D space. The model functions for left and right hands, and it can even estimate the location of partially or fully obstructed landmarks:
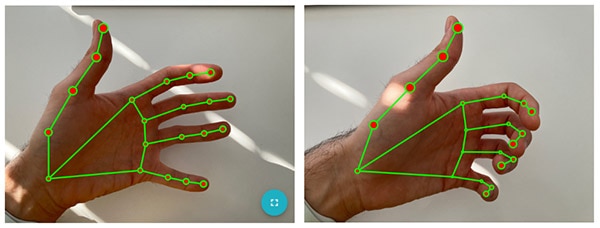
These images visualize the model’s output when classifying hand landmarks in an ideal case (left) and with partially obstructed landmarks (right).
The model’s output can initially be a bit challenging to understand. It returns three lists, where each entry in each of the lists corresponds to one of the detected hands. The first list indicates whether the detected hand is a left hand or a right hand. The second and third lists each have a nested list that contains the detected landmarks, where the indices in the nested list correspond to the following map:
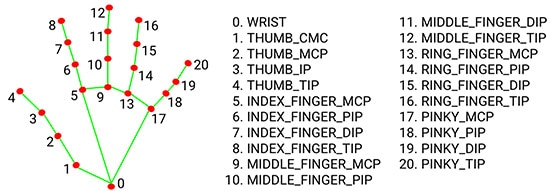
This image shows an annotated map of the landmark indices and their meaning. Image courtesy of Google
The difference between the two landmark lists lies in the units. The first uses normalized coordinates between 0.0 and 1.0 to describe the landmark position in the frame relative to the image origin. The second list contains the results in absolute coordinates. An empty list means that the model did not detect any hands.
As this application only tracks the first detected hand, it only utilizes the first entry in each list the ML model returns. From the list containing the landmarks in relative units, the program only extracts the 9th point (at index eight), corresponding to the tip of the index finger.
Use the Python version manager to download and install a version compatible with MediaPipe. Currently, the SDK supports Python 3.7 through 3.10 and was tested using version 3.9.10. Then, make a new Python virtual environment and activate it. Once done, create the following requirements.txt file:
absl-py==2.1.0
attrs==24.2.0
cffi==1.17.0
contourpy==1.2.1
cycler==0.12.1
flatbuffers==20181003210633
fonttools==4.53.1
importlib_metadata==8.4.0
importlib_resources==6.4.4
jax==0.4.30
jaxlib==0.4.30
kiwisolver==1.4.5
matplotlib==3.9.2
mediapipe==0.10.14
ml-dtypes==0.4.0
numpy==2.0.2
opencv-contrib-python==4.10.0.84
opt-einsum==3.3.0
packaging==24.1
pillow==10.4.0
protobuf==4.25.4
pycparser==2.22
pydub==0.25.1
pyparsing==3.1.4
python-dateutil==2.9.0.post0
scipy==1.13.1
six==1.16.0
sounddevice==0.5.0
zipp==3.20.1
Next, download and install the listed libraries using pip:
pip install -r requirements.txt
The pre-trained model can be downloaded directly from Google to the Raspberry Pi by running wget within the virtual environment’s root folder:
wget https://storage.googleapis.com/mediapipe-models/hand_landmarker/hand_landmarker/float16/latest/hand_landmarker.task
The application’s main loop is similar to the object detector mentioned above. However, it uses a different detector from the MediaPipe SDK, and the ML model’s callback function behaves differently. As an overview, the following chart outlines the program flow:
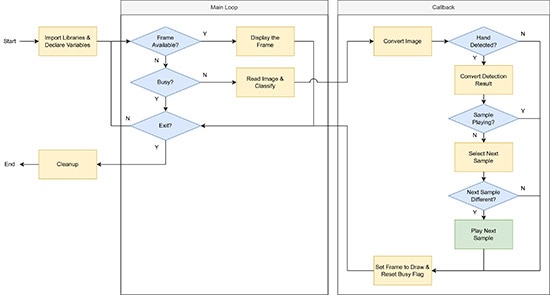
This chart illustrates the program’s main tasks. Green nodes indicate steps that run in parallel to the main program.
The import statements are the same except for two additional libraries for playing back audio samples:
import cv2 as cv
import numpy as np
import threading
import mediapipe as mp
from mediapipe.tasks import python
from mediapipe.tasks.python import vision
from pydub import AudioSegment
from pydub.playback import play
The program then defines some variables for configuring the model:
BaseOptions = mp.tasks.BaseOptions
HandLandmarker = mp.tasks.vision.HandLandmarker
HandLandmarkerOptions = mp.tasks.vision.HandLandmarkerOptions
HandLandmarkerResult = mp.tasks.vision.HandLandmarkerResult
VisionRunningMode = mp.tasks.vision.RunningMode

options = HandLandmarkerOptions(
    base_options=BaseOptions(model_asset_path='./hand_landmarker.task'),
    running_mode=VisionRunningMode.LIVE_STREAM,
    num_hands=1,
    result_callback=processGestureDetection)
Make sure that the model_asset_path value points to the downloaded ML model. The options also define the running mode – video live stream, in this case – and the maximum number of hands to detect. The program contains some additional variables for managing the application state. The audioSamples map defines the areas of the image that should trigger playback of the associated sample when a user moves their finger into the rectangle:
frameToShow = None
selectedSample = None
currentPlaybackThread = None
processingFrame = False
firstDetectedHand = {
	'handedness': '',
	'landmarks': [],
	'indexFingerTip': []
}
audioSamples = {
	(0.1, 0.1, 0.15, 0.15): '/home/pi/samples/pen.mp3',
	(0.5, 0.1, 0.2, 0.25): '/home/pi/samples/mug.mp3',
	(0.05, 0.35, 0.35, 0.25): '/home/pi/samples/clock.mp3',
	(0.5, 0.5, 0.45, 0.45): '/home/pi/samples/cat.mp3'
}
The following custom callback function handles the core logic:
def processGestureDetection(result: HandLandmarkerResult, image: mp.Image, timestamp_ms: int):
    global frameToShow, processingFrame, currentPlaybackThread, selectedSample
    frameToShow = np.copy(image.numpy_view())
    if len(result.handedness) > 0:
        firstDetectedHand['handedness'] = result.handedness[0][0].category_name
        firstDetectedHand['landmarks'] = result.hand_landmarks[0]
        firstDetectedHand['indexFingerTip'] = firstDetectedHand['landmarks'][8]
        if currentPlaybackThread is None or not currentPlaybackThread.is_alive():
            nextSample = None
            for rect, sample in audioSamples.items():
                if intersects(firstDetectedHand['indexFingerTip'].x, firstDetectedHand['indexFingerTip'].y, rect):
                    nextSample = sample
                    break
            if nextSample is not selectedSample:
                selectedSample = nextSample
                if selectedSample is not None:
                    currentPlaybackThread = threading.Thread(target=playSample, args=(sample,))
                    currentPlaybackThread.daemon = True
                    currentPlaybackThread.start()
    processingFrame = False
The callback first converts the camera frame to a numpy image for later display. It then checks whether the ML inference result contains at least one entry. If it does, the program copies the first detected hand’s values to a custom map for easier access. The code then determines whether a sample is currently being played back. If no sample is playing, the program goes over all predefined areas and checks whether the detected index finger position intersects with one of them. If it does, the program inspects whether the previously selected audio clip matches the newly selected one. It only starts playback if the user selects a different sample. The application plays the sample in a new thread to ensure the program does not stall during playback. The two helper functions used within the callback look as follows:
def intersects(x, y, rect):
    rect_x, rect_y, rect_w, rect_h = rect
    return rect_x <= x <= rect_x + rect_w and rect_y <= y <= rect_y + rect_h

def playSample(name):
    audio = AudioSegment.from_file(name)
    play(audio)
Lastly, the central part of the program opens the video feed, performs error handling, creates the ML model object, and shows new image frames as they are being processed. This code snippet is practically identical to the object detector program discussed in the introduction. However, it utilizes a different detector class from the MediaPipe SDK:
cap = cv.VideoCapture(0)
if not cap.isOpened():
    print("Cannot open camera")
    exit()
with HandLandmarker.create_from_options(options) as detector:
    while True:
        ret, frame = cap.read()
        if not ret:
            print("Can't read frame. Exiting ...")
            break
        if frameToShow is not None:
            cv.imshow("Detection Result", frameToShow)
            frameToShow = None
        elif not processingFrame:
            mp_image = mp.Image(image_format=mp.ImageFormat.SRGB, data=frame)
            frame_ms = int(cap.get(cv.CAP_PROP_POS_MSEC))
            detector.detect_async(mp_image, frame_ms)
            processingFrame = True
        if cv.waitKey(1) == ord('q'):
            break
cap.release()
cv.destroyAllWindows()
Running the program with additional debug annotations (omitted in the code snippets above for brevity) shows the trigger areas, the associated audio clips, and a circle drawn on top of the detected index finger:
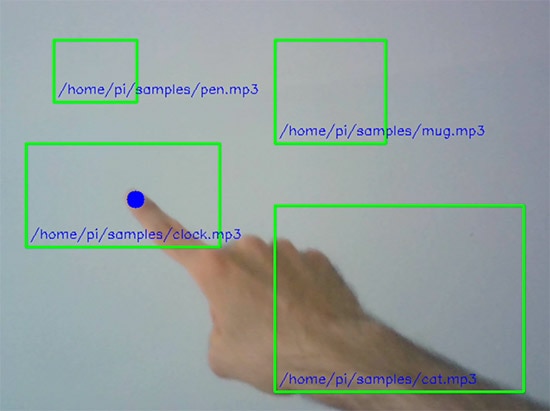
This image shows the result of running the application with additional debug annotations.
Google’s MediaPipe SDK makes building an AI-based hand landmark recognition and finger-tracking application on the Raspberry Pi a breeze. The system can detect the presence of hands in a continuous live video feed, extract multiple landmarks, such as the tip of each finger, and trigger actions when users point their fingers at certain areas.
The main application loop starts the camera feed, converts the images, and performs ML inference using a pre-trained model. The model calls a callback function once it finishes its classification task. This callback handler converts the result into a more manageable format and then checks whether the first detected hand’s index finger intersects with one of the predefined regions. Each region is associated with an audio sample, and the program plays the selected sample in a new thread whenever users move their fingers from one area to another.
The program relies on fixed trigger areas to keep the code more straightforward. This limitation also implies that the camera cannot be moved once set up, which is typically manageable in interactive displays. However, the program could be combined with an object classifier that automatically detects the bounding boxes of known objects at startup.