制造商零件编号 SC1111
SBC 2.4GHZ 4 CORE 4GB RAM
Raspberry Pi
This post is a continuation of my last article, which explained how to set up a pre-trained object detection model (efficientdetlite0) on Raspberry Pi using Mediapipe. This article will focus on customizing your own image detection algorithm and deploying it to your Raspberry Pi.
In object detection applications, neural networks are trained to detect important features of images. Depending on the model used, they can detect patterns in images like areas of high contrast, areas with a dominant color, and shapes. It’s usually mostly in the last layer that these detected features are all considered to decide what object is being detected and where. Taking this into account, we can customize a neural network by simply retraining the last layer of an existing image detection model!
Note: Retraining the whole model will provide better model accuracy, but it will take significantly longer than retraining the last layer. I will only be covering retraining the last layer in this article, but many resources on how to retrain the whole model are readily available in the Google Mediapipe documentation.
Thankfully, due to how easy Google’s Mediapipe library is to use, we don’t have to concern ourselves with any of the working operations behind retraining a neural network. We’ll also be using Google Collab’s hosted runtimes to perform the retraining, so we don’t even need a powerful computer! We’ll be dividing the retraining process into four steps:
1) Image Collection
2) Labeling
3) Retraining
4) Testing
To start, we’ll first need some pictures! These pictures will be fed to the model so that it can be retrained. Despite this being one of the more tedious parts of the process, it’s important to take your time on this step. The images you feed into your model will directly determine how well your model performs. When we take pictures for our model there are a few things that we should consider.
First and foremost, it is well advised to take pictures with the same camera that will be used to perform inference. This is because properties of the camera like noise, contrast, aspect ratio, and more can create significant differences in the pixel properties of an image. When a neural network looks at an image, it (generally) analyzes most, if not all the pixels in the input image, so even differences that aren’t discernible to the human eye can have a large impact on the result.
The fact that object detection models generally read the pixels of the input image is the high-level motivation behind Nightshade, a research project at the University of Chicago that offensively targets generative AI models. Models trained on artwork or images poisoned with Nightshade will exhibit unpredictable or unreliable behaviors. I recommend reading about it as it’s an interesting read, highlighting the ongoing fight between artists and the rise of large AI models.
Secondly, you want to ensure you take pictures of your object in as many different environments and lighting conditions as possible. This will allow your model to generalize to more situations and prevent it from overfitting to one lighting condition or feature. When training my model to detect a basket, I only took pictures of it on the ground or a table. When I tested the model for accuracy, I found that the accuracy was diminished when I held the basket above the ground. Thankfully, for my application, the basket will always be on the ground, so I didn’t have to redo the training process.
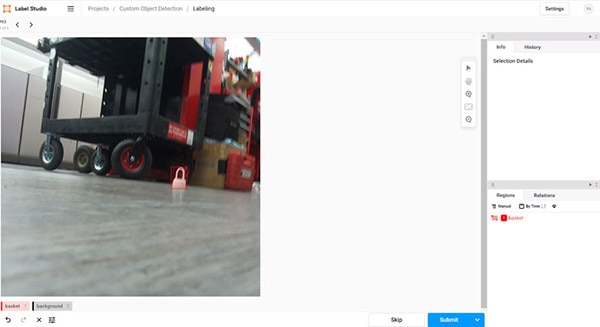
Finally, you want to ensure you have plenty of other objects in the background, especially those that look like your object. This will reduce the number of false positive detections that your model outputs. Here’s an example of a good training picture:

For decent model accuracy, you’ll generally want to collect around 100 images. Put 80 of these images in a folder called training and 20 images in a folder called validation. Splitting a dataset into training and validation datasets is a common practice in machine learning. Then, export those images to another computer for the training and labeling process.

If you happen to be also using a Raspberry Pi Camera 3 to take your images, I’ve provided code to take your own images on Raspberry Pi using your keyboard as the trigger to take a picture.
So now we have a variety of images, but how does the model know where your object is? In the labeling stage, we go through all the images we’ve taken and mark where our object is. For this, we’ll be using an open-source labeling software called Label Studio. You can find an installation guide here. I ended up using Anaconda to install Label Studio, but however you choose to install it shouldn’t make a difference. Once you have it installed, go ahead, and create an account. You should see the following screen afterward.

In preparation for this write-up, I’ve already made two projects. You shouldn’t see these projects on your dashboard if you’ve never done a project on Label Studio before.
Click on the “Create” button at the top right of the screen. You should see the menu shown in the picture below. We will be making two separate projects in Label Studio for the training and validation datasets and then combining them later. Let’s start with the training dataset. Name the project whatever you want followed by “train” (adding “train” to the end is so that we can differentiate between the training and validation datasets later.)
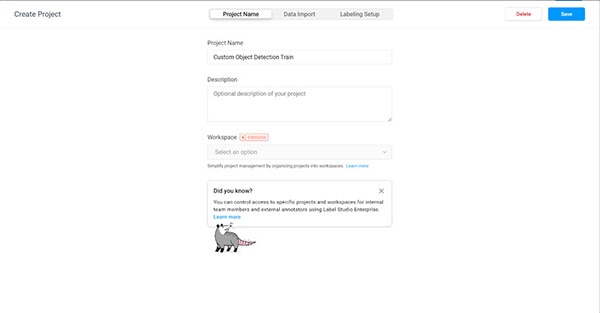
In the “Data Import” tab, import all the images you set aside for training.

In the “Labeling Setup” tab, select the “object detection with bounding boxes” option.
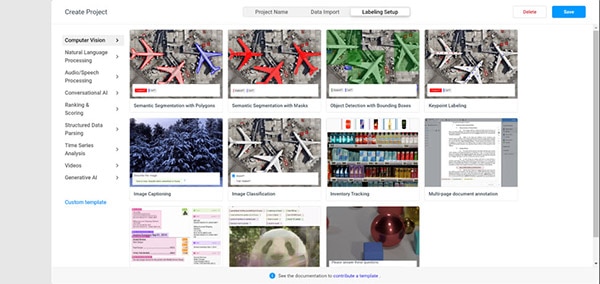
You should then be directed to a new page with options to configure your labeling process. Delete the default labels. In the add label names box, type “background” and whatever other classes you wish to add. I only have the basket class, so I end up with basket and background. The backgrund class is required for the COCO data format that we’ll eventually use.
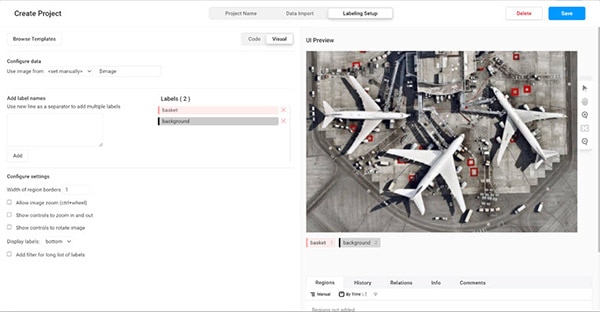
Click on the save button. You should be sent to a new page that looks like this (you should have more images; this is just an example):
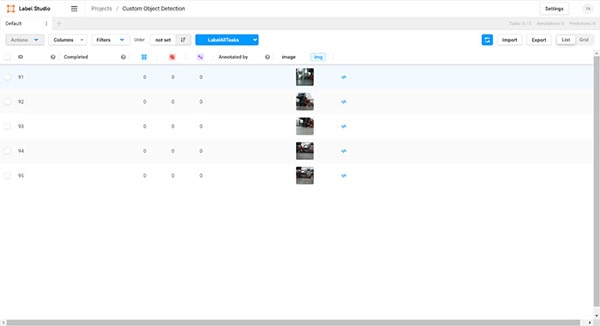
This is the homepage where you’ll manage all your labeling tasks. To label images, we’ll click the “LabelAllTasks” button in blue at the top of the screen. This will bring up a new screen:

To annotate the image, select the class from the bottom left and click on the image once to place a corner of the bounding box. Click again to place the second corner. You should aim to fully box your object with the bounding box. Take your time on this section, as how well you bound your object will correlate to the performance of the model (especially since we don’t have many data samples).
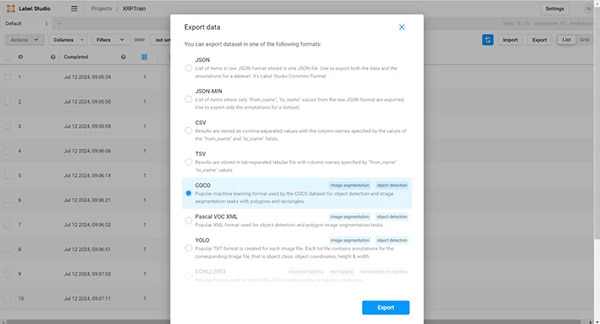
This is a long process, so be sure to turn your favorite show on or listen to some music while you annotate your images! When you’re finally done with the annotations, return to the homepage. Click the “export” button in the top right of the screen. You should be presented with a screen that asks you for the export format. You should select the “COCO” format.
Label Studio should automatically download a zip file with your images and their annotations. Extract the zip file and name it train (remember, this is only just the training data). Inside the folder, rename the JSON file to “labels.”

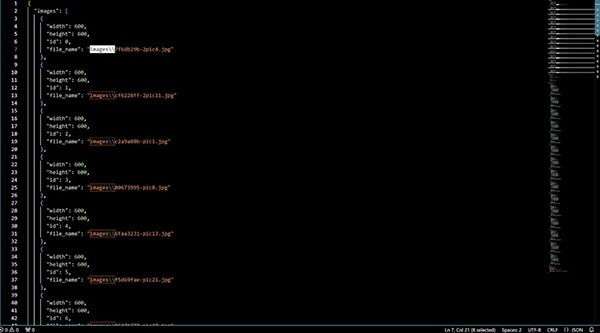
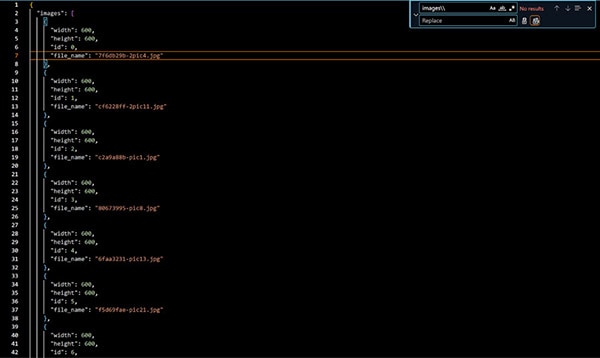
While we’re at it, open the JSON file with the text editor of your choice and delete the highlighted part of the labels using the find and replace all command.
It should now look like this:
Repeat the process for the validation dataset, starting from creating a new Label Studio project.
After you’ve got both, organize them with the following folder structure:
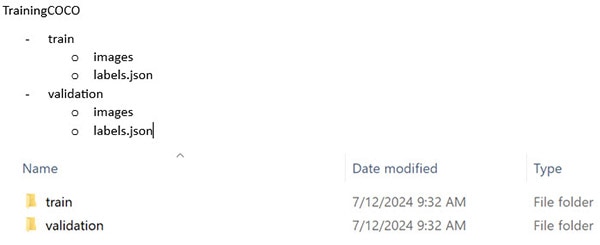
Now that we’ve got our labeled dataset, go to this Colab notebook. This is a retraining example given by Google as part of the Mediapipe developer documentation. You can find this in the Mediapipe Developer documentation under object detection >> examples.
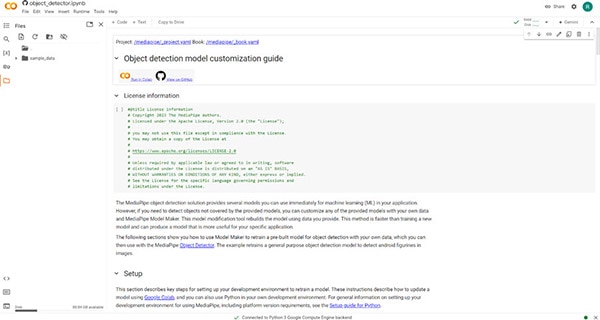
This collab notebook will walk you through the process of customizing your own image detection model with your training data, but it needs a few tweaks. The notebook currently grabs its own data, but we want to use our own. First, zip up your training and validation data inside one folder and import it to collab by dragging and dropping it into the directory on the left.

Run all the code blocks until you get to the “Prepare Data” section. These code blocks set up the required dependencies in your environment. The first block under the prepare data section is responsible for importing the example dataset and configuring the file paths.

We need to modify the above to use our own data. Replace the code in that cell with this code, which simply unzips our data and assigns the correct names for the paths. Take care to replace “TrainingCOCO” with whatever you named your parent directory.

Now it’s time for retraining! Run all cells up to “model quantization”. This will retrain the model and download the finished model for you (the finished model will be in your downloads folder). The exported model will be simply named “model.tflite”. You’re welcome to read through the code and documentation to get more of an idea of how to further customize the model, but I won’t be covering that. The training process will take a while to run, but it utilizes a hosted runtime (it’s running on a server, not your laptop). This means you can accomplish re-training on almost any laptop!
Once you’ve got your new model, it’s good practice to test it before deploying it. We’ll be using a convenient web tool provided by Google, Mediapipe Studio. Mediapipe studio is a convenient tool that allows you to quickly test models you’ve trained. Here’s the homepage. Usually, the website will start using your webcam (if one is available). It will immediately start making inferences based on a default model (efficientdetlite0).
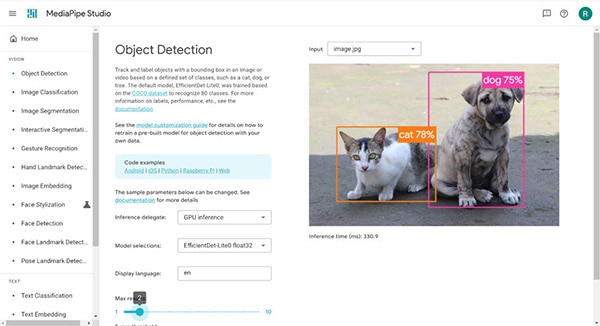
There are a few fields that you can customize. You can choose your input type, the hardware used for inference, the model used, the max number of detections shown, and the minimum threshold required for a detection to be shown. For our purposes, feel free to either use your camera or a validation image that you took earlier. You should set the inference delegate to CPU, as the Raspberry Pi doesn’t have an onboard GPU. For the model selection, you should select “Choose a model file” at the bottom of the dropdown menu. Go ahead and pick the model that you’ve exported in the retraining step (it should be a tflite file). You can configure the max results and score threshold fields as desired.
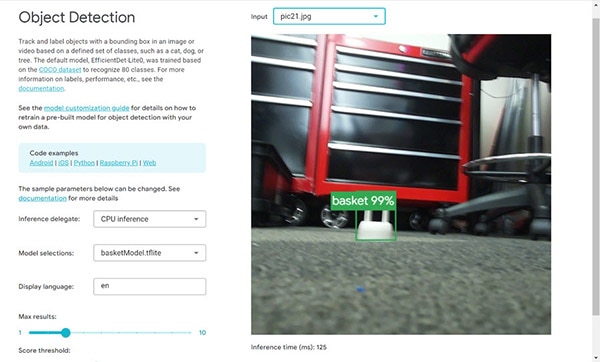
The output on the right should either show the result of object detection in your video feed or the image you provided. If you’re having trouble, reduce your score threshold and see if your object is being detected at all. The box around the object is the bounding box. This indicates where exactly the object detection algorithm thinks your object is. The bounding box is the most obvious difference between image recognition and object detection. Image recognition models tell you if an object is in an image, but don’t give you a bounding box.
Now that we’ve verified our model, we can export it to the Raspberry Pi! I used Google Drive, but you can use a USB stick or any other method to transfer the tflite file from your laptop to your Raspberry Pi. If you haven’t already, you should follow my previous article on setting up object detection on a Raspberry Pi. Here’s the GitHub repo.
From here, simply add your model to the detect folder and edit the “VideoFeedDetection” code to initialize the model with the name of your new model file instead (change the model_asset_path variable to the name of your new .tflite file.)

Run the program and voila! The object detection should be working and picking up on your new object.