制造商零件编号 SC1111
SBC 2.4GHZ 4 CORE 4GB RAM
Raspberry Pi
The Google MediaPipe SDK is an open-source machine-learning (ML) framework for handling various ML tasks without requiring in-depth knowledge of complex models and algorithms. Instead, developers can effortlessly build impressive applications using only a few lines of code that run well, even on hardware with limited resources. Read on to learn how to write a Python-based object classifier in just a few minutes.
Google MediaPipe is a robust machine-learning framework that lets developers build and train complex models with only a few lines of code. The framework accomplishes this by allowing developers to plug together pre-built solutions in a graph-based architecture. These solutions are building blocks for performing various common tasks, such as detecting the presence of objects in a video or estimating the sentiment of a text. Developers can combine these blocks to perform more complex tasks that suit their requirements.
Google offers the framework free of charge for many different platforms and languages. The framework can handle multiple input modalities and work with diverse data sources, such as still images, videos, audio snippets, and text. This article discusses the Python-based SDK for Raspberry Pi and how to process video frames from a live camera feed.
If you want to try the Google MediaPipe SDK on a Raspberry Pi, ensure your system is up and running, connected to the internet, and all relevant updates are installed. In addition, reading up on the basic concepts of machine learning can be tremendously helpful in understanding what the system does and how to troubleshoot it if something goes wrong.
Next, install a series of programs on the Raspberry Pi within a new Python3 virtual environment. These help handle video-processing tasks, and this step also downloads and installs the MediaPipe SDK itself.
sudo pip install opencv-contrib-python numpy mediapipe
It’s important to note that Mediapipe currently only supports Python versions 3.7 through 3.10, and the installation succeeded with Python 3.9.10.
Once you have updated your Raspberry Pi, you will need to decide which camera to use. The default Raspi camera module, a safe and reliable choice, is guaranteed to be compatible with the SBC. However, you also have the option to use a standard USB webcam if your project requires higher-resolution images or special features like thermal imaging. Unfortunately, not all USB cameras are compatible with the Raspberry Pi, so you might have to do some research to find one that works.
Regardless of the chosen camera, a correctly installed camera should show up in the list of available devices:
v4l2-ctl --list-devices
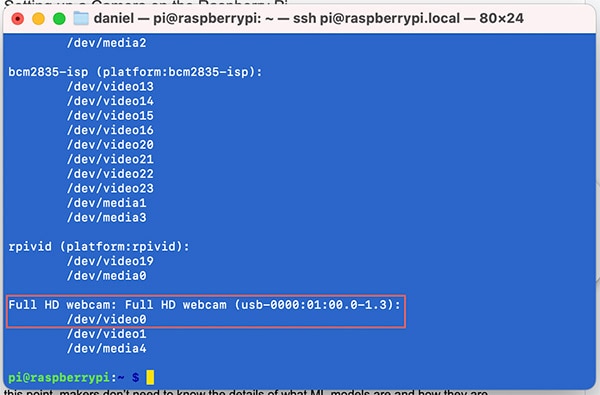
If the search returns more than one device, the first one, commonly camera0 or video0, is usually the correct one to use. However, the exact device name may vary depending on the model and manufacturer:
 This screenshot shows an example list of media input devices connected to a Raspberry Pi.
The connected USB camera has two video interfaces.
Finally, you will need to select a trained machine learning model before writing the ML application. A model contains the trained information of a machine-learning network generated by a specific algorithm. At this point, there’s no need to worry if the details of what ML models are and how they are built is unclear. However, it’s essential to understand that models are trained for a specific task and that training one from scratch requires many samples and knowledge to avoid common pitfalls.
Luckily, Google offers pre-trained object detection models that strike a good balance between latency and accuracy, and you can download them for free and import them into your projects to get them up and running quickly. More experienced makers can create and train custom models using MediaPipe, too. The following command downloads a pre-trained model from Google:
wget -q -O efficientdet.tflite -q
https://storage.googleapis.com/mediapipe-models/object_detector/ef
ficientdet_lite0/int8/1/efficientdet_lite0.tflite
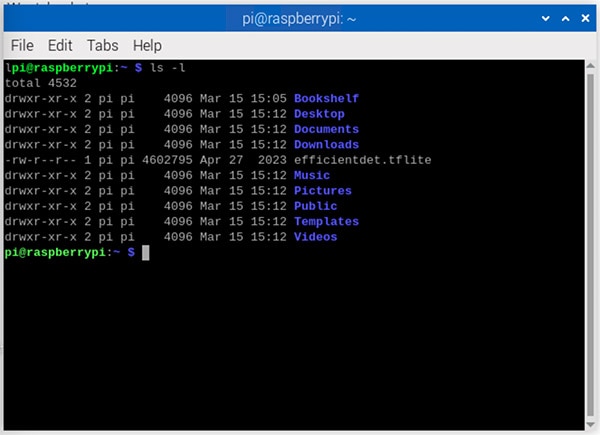
Take note of the file path of the downloaded model, as the Python application requires it later.
 This image shows the downloaded file in the pi user’s home directory.
Finally, it’s time to get started with writing the detector application itself. The first few lines of the Python program import the previously downloaded dependencies:
import cv2 as cv
import numpy as np
import mediapipe as mp
from mediapipe.tasks import python
from mediapipe.tasks.python import vision
OpenCV is required for reading the camera feed and converting the individual frames to still images for further processing. The MediaPipe imports load the ML framework’s components. Numpy is required for fast matrix operations.
The following variables hold the model options and the classifier objects:
BaseOptions = mp.tasks.BaseOptions
DetectionResult = mp.tasks.components.containers.DetectionResult
ObjectDetector = mp.tasks.vision.ObjectDetector
ObjectDetectorOptions = mp.tasks.vision.ObjectDetectorOptions
VisionRunningMode = mp.tasks.vision.RunningMode

options = ObjectDetectorOptions(
    base_options=BaseOptions(model_asset_path='/home/pi/efficientdet.tflite'),
    running_mode=VisionRunningMode.LIVE_STREAM,
    max_results=2,
    result_callback=annotateFrame)
The Options Object defines which model to use for making predictions. In this example, the code references the previously downloaded pre-compiled model stored in the pi user’s home folder. Further, the options define that the model operates on a live video feed, should stop after classifying two objects in the image, and should call the annotateFrame function once it concludes.
Next, define a callback function for the model to call whenever it finishes classifying the objects in a frame:
MARGIN = 10
ROW_SIZE = 10
FONT_SIZE = 1
FONT_THICKNESS = 1
TEXT_COLOR = (255, 0, 0)

frameToShow = None
processingFrame = False

# Annotate each frame
def annotateFrame(result: DetectionResult, image: mp.Image, timestamp_ms: int):
	global frameToShow, processingFrame
	frameToShow = np.copy(image.numpy_view())
	for detection in result.detections:
		# Draw bounding_box
		bbox = detection.bounding_box
		start_point = bbox.origin_x, bbox.origin_y
		end_point = bbox.origin_x + bbox.width, bbox.origin_y + bbox.height
		cv.rectangle(frameToShow, start_point, end_point, TEXT_COLOR, 3)
		# Draw label
		category = detection.categories[0]
		category_name = category.category_name
		result_text = category_name
		text_location = (MARGIN + bbox.origin_x, MARGIN + ROW_SIZE + bbox.origin_y)
		cv.putText(frameToShow, result_text, text_location, cv.FONT_HERSHEY_PLAIN, FONT_SIZE, TEXT_COLOR, FONT_THICKNESS)
	frameToShow = frameToShow
	processingFrame = False
This callback function converts the current frame to a numpy image and then iterates over all detection results returned by the model. Besides other information, each detection result contains the predicted labels sorted by the model’s certainty in ascending order, the certainty values, and a bounding box around the detected object. The callback uses OpenCV to draw the bounding box around the detected object. The function then adds the label to the image. It stores the result in the global frameToShow variable. Finally, the callback resets the processingFrame flag to inform the global loop that a new frame is ready for display.
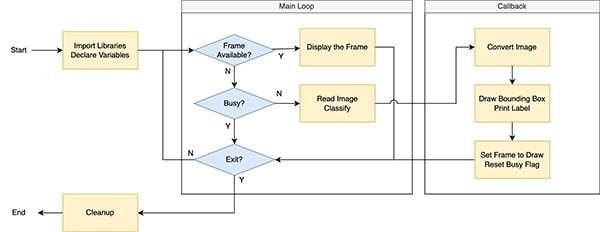
 This flowchart outlines the most critical steps of the object detector program.
Finally, the main loop continuously checks whether a frame is ready for display. If so, the main loop shows the annotated image. Otherwise, the main loop uses OpenCV to obtain the current frame from the connected camera. The program then passes that frame to the classifier and sets the busy flag from before. This measure leads to many dropped frames, but it performs better with the Raspberry Pi’s limited computing capabilities. The computer only processes one frame at a time before displaying the result, which leads to a more responsive user experience.
cap = cv.VideoCapture(0)
if not cap.isOpened():
	print("Cannot open camera")
	exit()
with ObjectDetector.create_from_options(options) as detector:
	while True:
		ret, frame = cap.read()
		if not ret:
			print("Can't read frame. Exiting ...")
			break
		if frameToShow is not None:
			cv.imshow("Detection Result", frameToShow)
			frameToShow = None
		elif not processingFrame:
			mp_image = mp.Image(image_format=mp.ImageFormat.SRGB, data=frame)
			frame_ms = int(cap.get(cv.CAP_PROP_POS_MSEC))
			detector.detect_async(mp_image, frame_ms)
			processingFrame = True
		if cv.waitKey(1) == ord('q'):
		 	break

# Release the capture before closing the program
cap.release()
cv.destroyAllWindows()
Processing every frame introduces a significant delay between reading a frame and displaying the result, meaning that multiple seconds pass between a user moving the camera and the program displaying the result.
Either way, the last “if” block checks whether a user pressed the q-key on the keyboard. If it detects a keypress, it breaks out of the main loop. Finally, the program frees the camera resource and closes the output window.
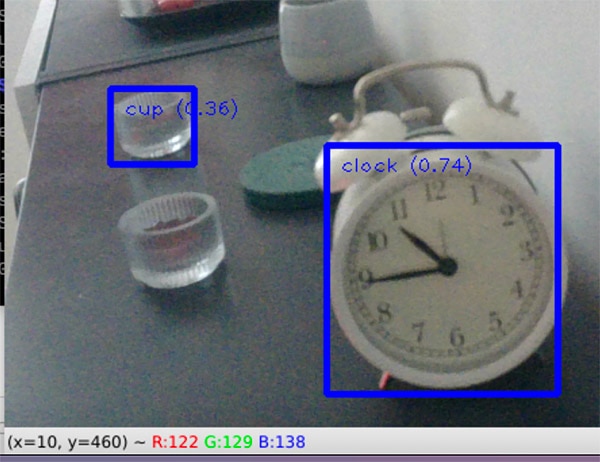
 This screenshot shows how the model classifies two objects the camera can see.
It outputs the two results with the highest certainty, which are a clock and a cup, in this example.
The Google MediaPipe SDK, a powerful and user-friendly machine-learning framework, enables developers to easily build applications without the need for extensive knowledge of complex models and algorithms. It offers pre-built solutions that can be combined to perform various tasks, such as object detection in videos and sentiment analysis of text. The SDK is available for free on different platforms and languages and supports multiple input modalities, inspiring developers to explore its versatility.
You can use pre-trained object detection models from Google or create custom models using MediaPipe. Writing the detector application involves importing necessary dependencies, defining model options and classifier objects, extracting frames from the video feed, and creating a callback function for the model to use when classifying objects in a frame.