制造商零件编号 A000066
ARDUINO UNO R3 ATMEGA328P BOARD
Arduino
Programming languages get utilized to instruct a computer to perform certain tasks. Every programming language follows a set of rules and defines a vocabulary, just like a natural language. However, processors can't directly understand them, and a human-readable program needs to get converted into binary values that a computer can understand. C++ is an immensely popular and versatile language that usually requires a compiler which performs the translation.
At first, all these concepts might look confusing. However, you’ll benefit from learning how to use a modern programming language, especially when your electronics projects get more and more complicated. Besides on the Arduino, you can also use C++ to write computer programs and games. Furthermore, once you understand the core concepts, you should easily be able to learn other programming languages that you can, for example, use to write mobile apps.
In this five-part series of blogs, you’ll learn how to quickly get started with programming an Arduino and the C++ programming language in general. Upon reading it, there shouldn’t be anything holding you back from jumping right into your first Arduino project -- so let’s take a look at the Arduino IDE and some variables to understand to get you started!
Make sure to download and install the Arduino IDE. For this series, you can utilize any official Arduino or compatible boards. However, if you’re a beginner, a great recommendation is an Arduino UNO because it’s cheap, easy to handle, and hard to break.
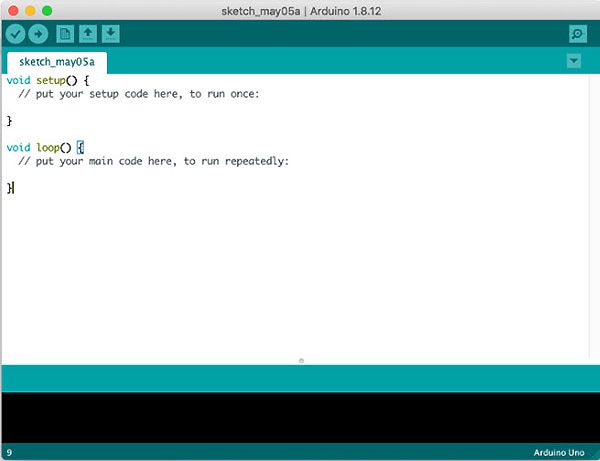
To begin, launch the Arduino IDE. You’ll notice that the program has already written some lines of code for you:

This is the barebones skeleton of a runnable Arduino sketch. By default, it contains two methods (setup and loop). You can also find two comments that describe what the methods do. Every line that starts with double slashes gets ignored by the compiler. These comments are solely meant for describing what your code does.
Luckily, the Arduino IDE is incredibly easy to use. The main UI consists of the following buttons:

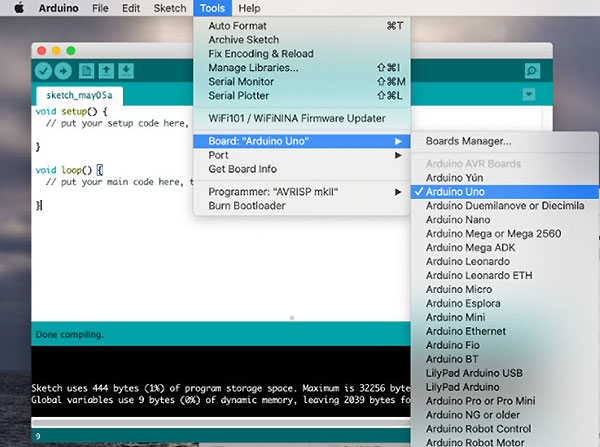
But before you can upload a program, you have to select your Arduino from the following list:

Note that this list contains all officially supported Arduino models by default. Please refer to your board's documentation if you’re using a third-party device that’s not listed. Make sure that your Arduino is connected to your computer and select it from the same menu:

There is a lot of power here, and a lot to learn to wield that power effectively in your programs. Let’s take a brief detour, then, and look at some of the variables you need to understand and master in order to make your projects work in the first place.
C++ is a so-called strongly-typed language, which means that you’ll always have to define what the type of variable in your program is. The language supports various predefined ones like string, integer, and boolean. In C++, the type of a variable can't change once it’s been assigned.
Besides a type, every variable needs a name. Identifiers get used as the names of variables, methods, and other user-defined items. Such an identifier always starts with a letter or an underscore, followed by zero or more other letters, underscores, or numbers. Special characters and reserved words aren’t allowed.
Last but not least, a variable needs a value. The type of the variable dictates what values it can hold. Here’s a short example that highlights the most commonly used data types and example values, helping to generate a “lucky number” for one somewhat-lucky person:
// Integer - for whole numbers (unsigned integers are also a thing!)
int lucky;
unsigned int positive_number = 42;
long int identifier;

// floating point numbers (single and double precision)
float percentage = 9.55f;
double high_precision_percentage = 71.421000000003;

// Strings
String greeting = "Hello,";
String your_name = "YOUR_NAME";
String message = "Your lucky number is";

// Single characters
char character = 'c';

// Boolean values (true or false)
boolean started = true;

// Some examples for invalid variables:

// boolean = true; - The name is missing!
// int 98 = 98; - Invalid name!
// String abc = 120; - Invalid value!
As you just saw, there are certain data-types for numbers, like integers, floats, and doubles, while other variables can hold text and single characters. Note that you can change the value of a variable throughout your code, but you can never change its type. In the example above, I declared a variable called lucky, which is of type integer. Right now, it doesn’t have a value - It’s uninitialized.
When a variable is uninitialized, it will usually not receive a default value in C++. This means that the variable exists in memory, but its concrete value is not defined. The Arduino IDE will allow a variable to be uninitialized. However, you should always make sure to initialize it before you access it for the first time because accessing an uninitialized variable might lead to program errors and undefined behavior.
Now it’s time to put your shiny new Arduino to work! Copy the following code and paste it in the Arduino IDE:
int lucky;

String your_name = "YOUR_NAME";
String message = "Your lucky number is: ";

void setup()
{
  // The code inside this method gets executed once (when the Arduino starts up)

  // This line starts the serial console to allow the Arduino to output text messages
  Serial.begin(9600);

  // Exchange with your lucky number!
  lucky = 17;
}

void loop()
{
  // Repeatedly print a message and then wait for two seconds

  Serial.print("Hello, ");
  Serial.println(your_name);

  Serial.print(message);
  Serial.println(lucky);

  delay(2000);
}
The code declares three variables (your_name, message, and lucky), one of which doesn't get initialized right away. Instead, the lucky variable receives a value inside the setup method. The two string variables can only contain text, while the integer variable, called lucky, can only hold numbers.
Inside the loop method, the two variables get passed to a print function that prints them to the console.
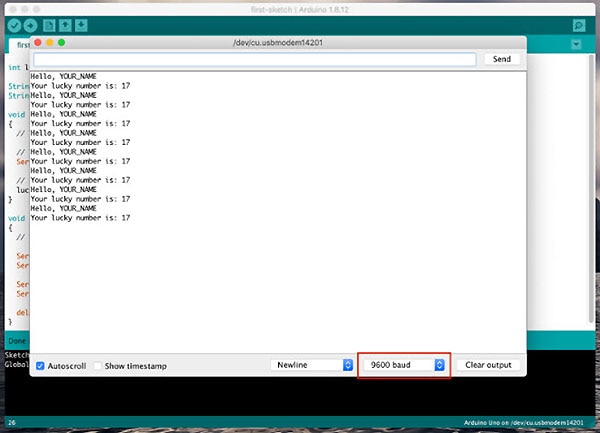
To see your program in action, open the serial monitor:

Once the serial monitor pops up, make sure that the baud-rate is set to 9600 before you hit the upload button in the code window. Once your code gets compiled and sent to the Arduino, the console should start printing the following message:

C++ is a versatile and fast language, and it can be a lot of fun to program an Arduino with it. It is strongly-typed, which means that variables must always have a valid type that can't get changed later on. Besides that, they also have a name and a value.
We’ve run an extraordinarily simple program to start, and we’ve gotten our first set of building blocks for C++ variables. In the next blog post of this series, we’ll look at methods and functions to see how they can define certain behaviors and capabilities that we might need in our programs.