制造商零件编号 A000066
ARDUINO UNO R3 ATMEGA328P BOARD
Arduino
This Basics of C++ on an Arduino series is covering many different elements necessary for all sorts of projects and ideas on an Arduino. In this entry, we cover importing external software libraries into the Arduino IDE so that you can use them in your projects.
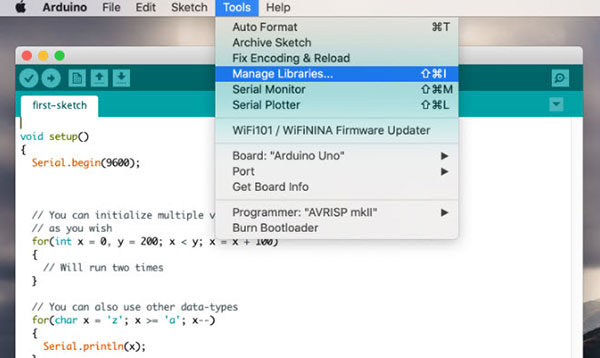
Connecting external modules and other devices to your Arduino is a common thing to do. Often, this will require you to load additional software libraries to interface the external components. One way, to do so, is to use the library manager of the Arduino IDE:

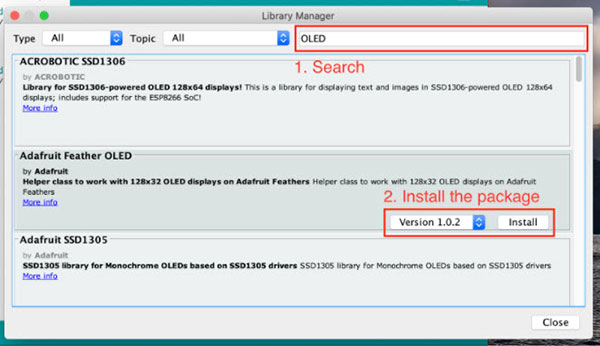
Once the dialogue window pops up, search for the library you want to download and hit the install button once you found it:

Once the installation finishes, you can use the IDE’s main menu bar to include any installed library:

Note that, although you’ll find many libraries here, sometimes a manual installation is necessary. If that’s the case with your component, please refer to the device’s manual or datasheet.
A C++ class is a collection of associated variables and functions that get defined in one place. They make your code easier to read, maintain, and understand. Furthermore, you can share your custom classes with others. Their contents can be public, which means that they are exposed to the outside, for example, other programs, or you can make them private to restrict access to them.
Every class needs at least one constructor, which is a special function that has the same name as the class and no return type (not even void). A class may also define multiple constructors with different parameters.
You might remember header files, which were covered earlier in the series. You’ll need one to define the contents of your class. Note that the header file only contains the definitions, not the concrete implementation, which still resides in a separate cpp file.
This might be best explained with an example. First, the header file:
// File: Truck.h
// These statements are optional. However, I recommend that you add them because
// they'll prevent the library code from getting imported multiple times.
#ifndef Truck_h
#define Truck_h

// You need to import Arduino.h to write a custom library
#include "Arduino.h"

class Truck
{
  public:
    // One or more constructors (two in this example)
    Truck(int hp, int torque, int axles, String manufacturer);
    Truck(int hp, String make, String model);
    // Four public methods
    void drive(String from, String to);
    void load(String goods, int amount);
    void unload(String goods, int amount);
    void unloadAll(void);
    // One static function
    static float barToPsi(float bar);
  private:
    // Three private string variables
    String currentLocation, make, model;
    // And three private integers
    int hp, torque, axles;
};

#endif
As mentioned, the header file consists of a listing of what the class contains. The implementation of the methods is done in the cpp file:
// File: Truck.cpp
// Import your custom header file and the Arduino header file
#include "Truck.h"
#include "Arduino.h"

// Then, define all the functions and implement their functionality

Truck::Truck(int hp, int torque, int axles, String manufacturer)
{
	// Do something
}

Truck::Truck(int hp, String make, String model)
{
	Truck::hp = hp;
	Truck::torque = 2400;
	Truck::axles = 6;
	Truck::make = make;
	Truck::model = model;
}

void Truck::drive(String from, String to)
{
	// Do something
}

void Truck::load(String goods, int amount)
{
	// Do something
}

void Truck::unload(String goods, int amount)
{
	// Do something
}

void Truck::unloadAll(void)
{
	// Do something
}

float Truck::barToPsi(float bar)
{
    return bar * 14.504f;
}
As you can see, the cpp file contains all the methods from the header file. Note how all methods have Truck:: before their name. This indicates that a function or variable is part of the Truck class.
Here, you have two options. You could copy and paste the cpp and header files to the folder that your sketch resides in. This isn’t always a recommended approach, as it’ll get hard to keep track of your libraries. Instead, it’s better to create a new folder inside of the Arduino library folder and move the files there:

You’ll then find your custom library in the top header bar together with all other installed libraries:

To use the newly created library, you’ll first have to import it to an Arduino sketch. You’ll then have to create a new instance of the Truck class using one of the constructors before you can call a function.
Note that it’s also possible to create static functions that won’t belong to an object. Instead, all instances of a class will share the same method. In such a case, you call the method using the class name:
// Import your custom module
#include <Truck.h>

// Create a new instance of the Truck class
Truck t = Truck(600, "Trucker", "120-deluxe");

void setup()
{
  // Call methods that got defined in the Truck module
  t.load("Canned Corn", 20);
  t.load("Bread", 5);

  Serial.begin(9600);
}

void loop()
{
  float bar = 20;
  // Call a static function that belongs to the entire class
  // rather than a concrete instance of the class
  float psi = Truck::barToPsi(20);

  Serial.print(bar);
  Serial.print(" bar in PSI: ");
  Serial.println(psi);

  delay(10000);
}
Classes are useful for bundling similar behavior and variables. They allow you to make your code more readable and easier to understand. Furthermore, you can share your custom libraries with others. Classes can either expose methods and variables to the public or hide details. In C++, classes consist of a header file, which contains the declarations, and a cpp file with the concrete implementation.