制造商零件编号 A000066
ARDUINO UNO R3 ATMEGA328P BOARD
Arduino
Sometimes, using simple physical I/O with your Arduino is just not good enough. In these cases, a more sophisticated output method is required, and often, simple LCD screens are utilized for that purpose. These allow you to display short status messages, errors, results, and other information in an easy-to-understand and intuitive way. In this article, we’ll discuss how a standard LCD module works and how you can connect one to your Arduino!

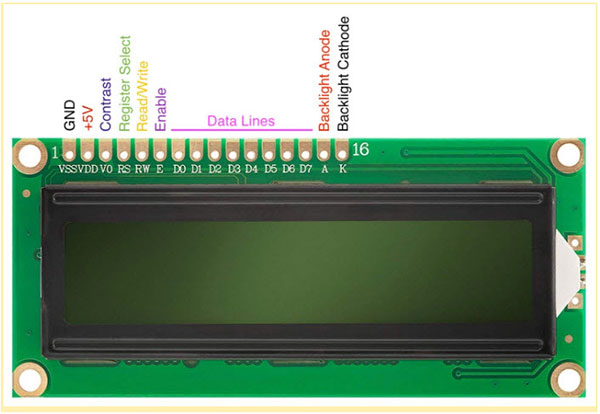
All LCD modules that use the Hitachi HD44780 integrated circuit - or a similar compatible one - will work the same way. Luckily, that’s the majority of LCDs and modules that you can buy. Such devices will typically have the following pins that you need to connect:

Note that the anode and cathode connections may be positioned elsewhere or in a different order. If your LCD doesn't have an integrated backlight, these pins may be omitted entirely.
These displays have two registers that you can write to and read from: an instruction and a character register. The RS pin determines which register to use. The R/W pin changes the mode.
You can write data to the control register to perform certain actions: for example, move the cursor on the display or clear the contents of the screen. Writing to the character register will display the matching character in the current cursor position.
The information for these operations is supplied by the data pins. Although there are eight connectors in total, it’ll suffice if you only use the last four lines to transmit data. This way, you can still use the most important features of the LCD and display most characters, while simultaneously saving four GPIO pins of your Arduino for other peripherals.
Lastly, the enable pin is used to apply the current values of the data pins and store them in the selected internal register on the display controller IC.
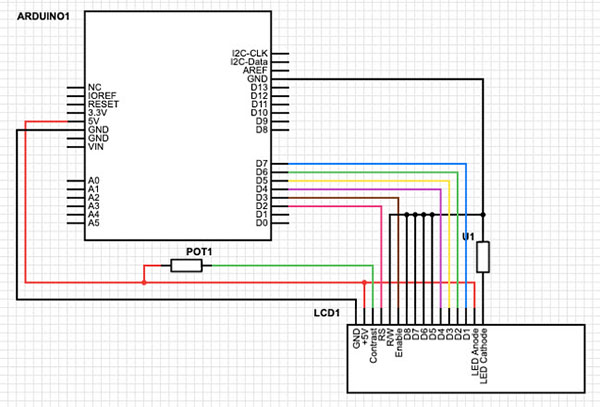
For these simple LCDs to work, you only have to connect the register-select, enable, and four data lines to the Arduino. The contrast control pin should be connected to a potentiometer to allow the users to adjust the contrast of the display:

If your display has a backlight, connect its anode and cathode to a power source, but don’t forget to use an appropriate resistor. In this case, the power is supplied by the Arduino.
Luckily, you don’t have to implement the communication protocol for an HD44780- compatible liquid crystal display yourself, because a simple-to-use library is included with every installation of the Arduino IDE. Therefore, you only need to import the LiquidCrystal library and use its functions to control the display:
// include the library code:
#include <liquidcrystal.h>

// define, where the LCD pins are connected
#define RS 2
#define EN 3
#define D4 4
#define D5 5
#define D6 6
#define D7 7

// initialize the library with the numbers of the interface pins
LiquidCrystal lcd(RS, EN, D4, D5, D6, D7);

void setup()
{
  // set up the LCD's number of columns and rows:
  lcd.begin(16, 2);

  // Print a message to the LCD.
  lcd.print("hello world!");

  // Move the cursor to the next line:
  lcd.setCursor(0, 1);

  lcd.print("Seconds: ");
}

void loop()
{
  // set the cursor to column 9, line 1
  lcd.setCursor(9, 1);

  // print the number of seconds since reset:
  lcd.print(millis() / 1000);
}
Besides other features, the library allows you to clear the display, move the cursor, and send the characters that you want to display.
Common LCD modules use a Hitachi HD44780- compatible controller, and therefore utilize the same connections and communication to drive the display with an Arduino. Those pins include the register-select, enable, and data lines. You can either connect all eight data pins to utilize all functions the display has to offer, or only use the last four lines (D4 to D7) to save some GPIO pins. Once the display is connected, you can utilize the LiquidCrystal library to conveniently communicate with it.