What Are RC Timing Circuits (DC)
With asynchronous clock example using the original Digi-Keyer
Introduction
Resistor/Capacitor (RC) timing circuits are useful in countless direct current (DC) applications as they are simple and predictable. Practical applications include generating pulses and creating delay and oscillator circuits to name a few. In general, timing is achieved using a resistor that governs the charge/discharge rate of a capacitor. A boundless number of resistor/capacitor combinations yields an endless array of timing values from microseconds to minutes or even hours between high and low cycles. RC circuits rely on the capacitor’s ability to pass DC when discharged and block an increasing amount of DC as its charge increases. A fully charged capacitor blocks DC.
RC Circuit Functionality
Timing calculations involve simply multiplying the resistance by the capacitance resulting in a time constant (T) that represents the time it takes to charge the capacitor to 63% of capacity. During the second time constant (2T), 63% of the remaining 37% capacity is charged. It takes roughly 5 time constants (5T) to fully charge a capacitor.
Figure 1 is a diagram for an RC reset circuit. On circuit power-up, the RESET is held low until the capacitor charges to the voltage level required to end the reset. Pushing the button (S1) performs a reset but also quickly discharges the capacitor. When the button is released, the reset is again held low until the capacitor charges.
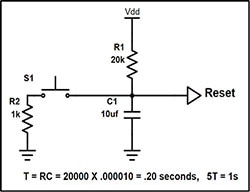 Figure 1: RC RESET circuit
Note: It is important to know the voltage threshold of inputs like a reset. If it is less than 63% of Vdd, the end of the reset occurs in 1T rather than later time constants.
Asynchronous RC Timing Made to Order
On-board clock generators are a common way to keep a circuit running in perfect harmony. But what if the clock needs to “synch” to human input? What if that input is unpredictable and highly variable like the rapid manipulation of key or paddle contacts by hand? The solution is an asynchronous timing system that responds to random input and then “takes over” for a period. A more complex RC circuit easily performs this function. Be aware it can be difficult to follow and keep straight the chain of events.
This example is taken from DigiKey’s original Morse character generator known as the Digi-Keyer. To create the unique waveform, two RC circuits and a few logic gates are used. One RC circuit for the HIGH time and another for the LOW time. The rest of this blog will explain the timing circuit in sections until the entire circuit is complete. Let’s start with an inverter as the initial signal and a simple RC circuit as shown in Figure 2. Timing starts when a key or paddle is pressed placing a HIGH on the inverter input.
 Figure 2: First step RC pulse generator
Inverter output is the complement of the input. When the input is HIGH, the output is LOW, and vice-versa. It is obvious at this point that the inverter drives the output, and the RC circuit does nothing but charge when the inverter output is LOW and discharge when the inverter output is HIGH. The next stage is basically the same circuit added in series as in Figure 3.
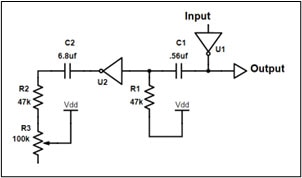 Figure 3: Second step RC pulse generator
When U1 output is LOW, the input to U2 is also LOW until C1 is charged (blocking) causing a delayed transition of U2 input from LOW to HIGH. Now C2 charges when the U2 output is LOW and discharges when the U2 output is HIGH.
The final stage includes another inverter, two NOR gates (U4, U5), and a momentary push button. A NOR gate’s output is HIGH only when both inputs are LOW. See Figure 4.
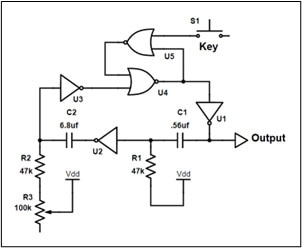 Figure 4: Final step RC pulse generator
Pressing the key starts the formation of the wave. Notice that the timing circuit is circular, which means once started, the RC circuits will continue charging and discharging indefinitely even after the key is released. To prevent this, a feedback loop from U4 back to U5 stops the timing after one complete cycle when the key is released. To allow continuous timing, connect the output of U3 directly to U1 or keep S1 closed.
Summary
The resulting waveform is used to cycle a set of flip-flops that form Morse code DITs and DAHs in the Digi-Keyer circuit. Without the use of crystals or microcontrollers, a precise and predictable pulse is generated using two RC blocking circuits that may be tailored to work in a wide array of applications.
 Figure 5: RC pulse generator waveform
Resources
Creating Quasi-Sine from Square Waves
How Does the Modern Digi-Keyer Work
Updating the Original Digi-Keyer
Interested in building the Digi-Keyer and learning how it works? DigiKey provides the full set of plans, bill of materials, programming code, PCB files, and more in this repository:
https://media.digikey.com/pdf/Project%20Repository/Digikeyer.zip

Have questions or comments? Continue the conversation on TechForum, Digi-Key's online community and technical resource.
Visit TechForum


