制造商零件编号 5300
ESP32-S2 TFT FEATHER STEMMA QT
Adafruit Industries LLC
License: See Original Project Displays LCD / TFT Light
Courtesy of Adafruit
Guide by Trevor Beaton
Overview
This project demonstrates how to build a color sensor detector using the APDS-9960 and the Adafruit Feather ESP32-S2 TFT (you can also use Adafruit Feather ESP32-S3 TFT) to control HomeKit devices through ItsaSNAP.
This example uses a Nanoleaf light strip to display the detected colors, but this method works with any HomeKit-compatible light capable of showing colors. itsaSNAP acts as a bridge between Adafruit IO feeds and HomeKit devices, allowing updates to HomeKit accessories based on sensor input—all without writing a single line of code.
What is itsaSNAP
itsaSNAP is a simple iOS app that explores Adafruit IO. It lets you send data to your Adafruit IO feeds and link it to control or monitor your internet-connected projects. We recently added HomeKit functionality. You can now send Adafruit IO data to HomeKit devices. This lets you control and check Adafruit devices from your phone, anywhere.
Parts
Adafruit ESP32-S2 TFT Feather - 4MB Flash, 2MB PSRAM, STEMMA QT
Adafruit ESP32-S3 TFT Feather - 4MB Flash, 2MB PSRAM, STEMMA QT
Adafruit IO+ Subscription Pass – One Year
Assembling the Color Detector
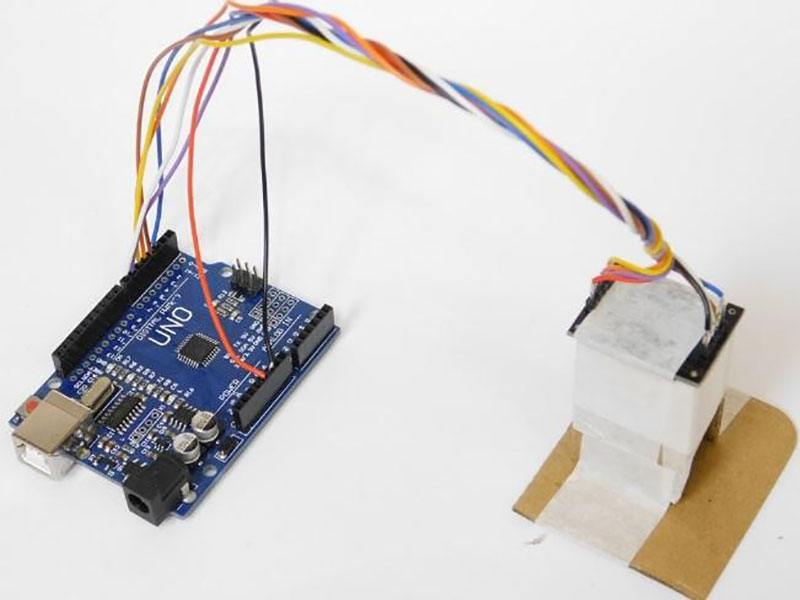
Connection
This build is designed for ease of use with a plug-and-play feature, meaning that no soldering or complex setup is necessary.
Connect the ADPS-9960 sensor to the Feather board using the provided STEMMA QT cable. You can use a USB power source or a battery to power the board.
CircuitPython
CircuitPython is a derivative of MicroPython designed to simplify experimentation and education on low-cost microcontrollers. It makes it easier than ever to get prototyping by requiring no upfront desktop software downloads. Simply copy and edit files on the CIRCUITPY drive to iterate.
CircuitPython Quickstart
Follow this step-by-step to quickly get CircuitPython running on your board.
Click the link above to download the latest CircuitPython UF2 file.
Save it wherever is convenient for you.
Plug your board into your computer, using a known-good data-sync cable, directly, or via an adapter if needed.
Double-click the reset button (highlighted in red above), and you will see the RGB status LED(s) turn green (highlighted in green above). If you see red, try another port, or if you're using an adapter or hub, try without the hub, or different adapter or hub.
For this board, tap reset and wait for the LED to turn purple, and as soon as it turns purple, tap reset again. The second tap needs to happen while the LED is still purple.
If double-clicking doesn't work the first time, try again. Sometimes it can take a few tries to get the rhythm right!
A lot of people end up using charge-only USB cables and it is very frustrating! Make sure you have a USB cable you know is good for data sync.
You will see a new disk drive appear called FTHRS2BOOT or FTHRS3BOOT.
Drag the adafruit_circuitpython_etc.uf2 file to the BOOT drive.
The BOOT drive will disappear, and a new disk drive called CIRCUITPY will appear.
That's it!
Setting Up Your Network Credentials
To make network inquiries using your Feather ESP32-S2, you'll need to provide your WiFi and Adafruit IO credentials in a settings.toml file.
Plug your Feather ESP32-S2 to your computer via a known good data + power USB cable. Your board should show up as a thumb drive in your File Explorer / Finder (depending on your operating system) named CIRCUITPY.
Using a plain text editor, create a file with the name settings.toml in the root directory of the CIRCUITPY drive.
Add the following below:
The file should contain the keys CIRCUITPY_WIFI_SSID, CIRCUITPY_WIFI_PASSWORD, CIRCUITPY_WEB_API_PASSWORD, AIO_USERNAME, and AIO_KEY.
Once these are defined, CircuitPython will automatically connect to the network and start the webserver used for the workflow.
The web server is on port 80 unless overridden by CIRCUITPY_WEB_API_PORT. It also enables MDNS.
Here is an example settings.toml:
# To auto-connect to WiFi
CIRCUITPY_WIFI_SSID="YOUR-WIFI-NETWORK-NAME"
CIRCUITPY_WIFI_PASSWORD="YOUR-WIFI-NETWORK-PASSWORD"

# For Adafruit IO
AIO_USERNAME="YOUR-USERNAME"
AIO_KEY="YOUR-AO-KEY"

# To enable modifying files from the web. Change this too!
# Leave the User field blank in the browser.
CIRCUITPY_WEB_API_PASSWORD="passw0rd"

CIRCUITPY_WEB_API_PORT=80
Download the ItsaSnap by Adafruit App
This section will guide you through downloading and installing the ItsaSnap by Adafruit app.
Download and Install ItsaSnap
To install and download ItsaSnap for your iOS device,
Open the App Store
Tap on the "Search" icon at the bottom of the screen
Type "ItsaSnap by Adafruit" or "ItsaSnap" in the search bar and tap "Search"
Locate the ItsaSnap app in the search results and tap on it
You may be prompted to enter your Apple ID password or use Face ID/Touch ID to confirm the installation.
After you have downloaded and installed ItsaSnap, open the app.
You will need to enter your Adafruit username and Adafruit IO Key (which is different from your Adafruit account password).
Your Adafruit IO key is a long string of letters and numbers. To make it easier to add to the app, we've also included a QR code scanner that allows you to easily copy the Adafruit IO Key from the Adafruit IO website to the app.
On the ItaSnap app, the QR code scanner is located below the Adafruit IO Key and above the login button. To access it, press the 'Scan QR code for IO Key' button. This will open the QR code scanner.
To find the QR code for your Adafruit IO account, navigate go to the overview page. Once there, click the yellow button with a key in the center (it's next to the "New Device" button) to reveal your Adafruit IO Key.
After clicking it, a window with your information will appear. Then, find the QR code and scan it, and log in.
Get Started with Adafruit IO
Adafruit IO is integrated with your adafruit.com account so you don't need to create yet another online account! You need an Adafruit account to use Adafruit IO because to make sure the data you upload is available to only you (unless you decide to publish your data).
I have an Adafruit.com Account already
If you already have an Adafruit account, then you already have access to Adafruit IO. It doesn't matter how you signed up, your account will make all three available.
To access Adafruit IO, simply visit https://io.adafruit.com to start streaming, logging, and interacting with your data.
Create an Adafruit Account (for Adafruit IO)
An Adafruit account makes Adafruit content and services available to you in one place. Your account provides access to the Adafruit shop, the Adafruit Learning System, and Adafruit IO. This means only one account, one username, and one password are necessary to engage with the content and services that Adafruit offers.
If you do not have an Adafruit account, signing up for a new Adafruit account only takes a couple of steps.
Begin by visiting https://accounts.adafruit.com.
Click the Sign Up button under the "Need An Adafruit Account?" title, below the Sign In section.
This will take you to the Sign Up page.
Fill in the requested information and click the Create Account button.
For example, to begin working with Adafruit IO, click the IO link between the Forum and LIVE! Links.
That's all there is to creating a new Adafruit account and navigating to Adafruit IO.
Creating Adafruit IO Feeds
Adafruit IO allows users to create feeds to write or read data in a centralized location. In this project, you will create an Adafruit IO feed to which you will send your color Hue and that itsaSNAP will observe. Upon a feed change, itsaSNAP will send the new value to the HomeKit device.
In a web browser, navigate to io.adafruit.com/feeds and click "+ New Feed"
Name the Feed hue. The description is optional. Click Create to create the new feed.
Code the APDS-9960
Once you've finished setting up your Feather ESP32-S2 with CircuitPython, you can download the project bundle to access the code and necessary libraries.
To do this, click the Download Project Bundle button in the window below. The file will download to your computer as a zipped folder.
Upload the Code and Libraries to the Feather ESP32
After downloading the Project Bundle, plug your Pico W into the computer's USB port with a known good USB data+power cable. You should see a new flash drive appear in the computer's File Explorer or Finder (depending on your operating system) called CIRCUITPY. Unzip the folder and copy the following items to the Feather's CIRCUITPY drive.
lib folder
code.py
Your Feather CIRCUITPY drive should look like this after copying the lib folder.
# SPDX-FileCopyrightText: 2024 Trevor Beaton for Adafruit Industries
#
# SPDX-License-Identifier: MIT
'''This is a program for a color detection project using the APD-9960 and Feather ESP32-S2 & S3'''

import os
import ssl
import time
import wifi
import board
import busio
import socketpool
import adafruit_requests
from adafruit_apds9960.apds9960 import APDS9960
from adafruit_io.adafruit_io import IO_HTTP, AdafruitIO_RequestError

# WiFi and Adafruit IO setup
aio_username = os.getenv("aio_username")
aio_key = os.getenv("aio_key")

wifi.radio.connect(
    os.getenv("CIRCUITPY_WIFI_SSID"), os.getenv("CIRCUITPY_WIFI_PASSWORD")
)
print(f"Connected to {os.getenv('CIRCUITPY_WIFI_SSID')}!")

# Initialize network pool and Adafruit IO HTTP
pool = socketpool.SocketPool(wifi.radio)
requests = adafruit_requests.Session(pool, ssl.create_default_context())
io = IO_HTTP(aio_username, aio_key, requests)

# Set up I2C connection and APDS9960 sensor
i2c = busio.I2C(board.SCL, board.SDA)
apds = APDS9960(i2c)
apds.enable_proximity = True
apds.enable_color = True

# Adafruit IO feed setup
try:
    hue_feed = io.get_feed("hue")
except AdafruitIO_RequestError:
    hue_feed = io.create_new_feed("hue")


# Function to convert RGB to Hue
def rgb_to_hue(r: int, g: int, b: int) -> float:
    r_norm = r / 255.0
    g_norm = g / 255.0
    b_norm = b / 255.0
    c_max = max(r_norm, g_norm, b_norm)
    c_min = min(r_norm, g_norm, b_norm)
    delta = c_max - c_min

    if delta == 0:
        calculated_hue = 0
    elif c_max == r_norm:
        calculated_hue = (60 * ((g_norm - b_norm) / delta) + 360) % 360
    elif c_max == g_norm:
        calculated_hue = (60 * ((b_norm - r_norm) / delta) + 120) % 360
    elif c_max == b_norm:
        calculated_hue = (60 * ((r_norm - g_norm) / delta) + 240) % 360
    else:
        calculated_hue = 0  # Fallback case

    return calculated_hue


# Main loop
while True:
    color_data = apds.color_data
    red_value, green_value, blue_value = color_data[0], color_data[1], color_data[2]
    hue_value = round(rgb_to_hue(red_value, green_value, blue_value))
    print(f"Detected Hue: {hue_value}")

    try:
        io.send_data(hue_feed["key"], hue_value)
        print(f"Sent Hue value {hue_value} to Adafruit IO feed 'hue'")
    except AdafruitIO_RequestError as e:
        print(f"Error sending data: {e}")

    time.sleep(3)
Add Your settings.toml File
As of CircuitPython 8.0.0, there is support for Environment Variables. Environment variables are stored in a settings.toml file. Similar to secrets.py, the settings.toml file separates your sensitive information from your main code.py file. Add your settings.toml file as described in the Create Your settings.toml File page earlier in this guide. You'll need to include your CIRCUITPY_WIFI_SSID and CIRCUITPY_WIFI_PASSWORD.
CIRCUITPY_WIFI_SSID = "your-ssid-here"
CIRCUITPY_WIFI_PASSWORD = "your-ssid-password-here"
Setting up Adafruit IO Connection
This code sets up a networking connection to Adafruit IO using the aio_username and aio_key. It also configures a "hue" data feed to send hue values calculated from the detected colors.
# Adafruit IO setup
aio_username = os.getenv("aio_username")
aio_key = os.getenv("aio_key")

# Adafruit IO feed setup
try:
    hue_feed = io.get_feed("hue")
except AdafruitIO_RequestError:
    hue_feed = io.create_new_feed("hue")
I2C Sensor Initialization
This code initializes the APDS9960 color and proximity sensor over the I2C bus. it also enables proximity detection and color sensing features to gather RGB color data.
i2c = busio.I2C(board.SCL, board.SDA)
apds = APDS9960(i2c)
apds.enable_proximity = True
apds.enable_color = True
RGB to Hue Conversion
This function rgb_to_hue converts RGB values (red, green, blue) into a Hue value based on the HSB (Hue, Saturation, Brightness) color model.
def rgb_to_hue(r: int, g: int, b: int) -> float:
    r_norm = r / 255.0
    g_norm = g / 255.0
    b_norm = b / 255.0
    c_max = max(r_norm, g_norm, b_norm)
    c_min = min(r_norm, g_norm, b_norm)
    delta = c_max - c_min

    if delta == 0:
        calculated_hue = 0
    elif c_max == r_norm:
        calculated_hue = (60 * ((g_norm - b_norm) / delta) + 360) % 360
    elif c_max == g_norm:
        calculated_hue = (60 * ((b_norm - r_norm) / delta) + 120) % 360
    elif c_max == b_norm:
        calculated_hue = (60 * ((r_norm - g_norm) / delta) + 240) % 360
    else:
        calculated_hue = 0  # Fallback case

    return calculated_hue
The Main Loop
The main loop captures color data, processes it, and sends the calculated hue value to Adafruit IO. It also adds a delay of 3 seconds between iterations to control update frequency.
while True:
    color_data = apds.color_data
    red_value, green_value, blue_value = color_data[0], color_data[1], color_data[2]
    hue_value = round(rgb_to_hue(red_value, green_value, blue_value))
    print(f"Detected Hue: {hue_value}")

    try:
        io.send_data(hue_feed["key"], hue_value)
        print(f"Sent Hue value {hue_value} to Adafruit IO feed 'hue'")
    except AdafruitIO_RequestError as e:
        print(f"Error sending data: {e}")

    time.sleep(3)
Use
On your iOS device, open the itsaSNAP app, enter your Adafruit IO credentials, and log in.
Upon entering itsaSNAP, you'll see all HomeKit devices currently connected to your network. This includes both native HomeKit devices and third-party accessories, like the Nanoleaf light strip used in this guide.
When logging in, remember to use your AIO key rather than your password - this is a common mistake that can cause connection issues.
Using itsaSNAP
Navigate to the Adafruit Feed section within itsaSNAP to find your Hue feed. Select the feed to access its detailed view, where you'll find options for HomeKit integration.
In the feed's detailed view, you'll need to make two important selections:
Choose your target HomeKit device from the available list
Select "Hue" from the characteristics drop-down menu
This configuration allows itsaSNAP to observe your Adafruit IO "hue" feed and send any updated data to the device connected to your HomeKit. Here, we will send it to the "Essentials Lightstrip" and select the Hue characteristic.
In order to use this feature, the app must be open and not suspended or run in the background.
Troubleshooting
If you have not yet agreed to HomeKit usage, follow these steps to enable it within ItsaSNAP:
1. Grant HomeKit Permission:
Open the Settings app on your iOS device.
Scroll down to find itsaSNAP in the list of installed apps.
Tap on itsaSNAP to access its permissions.
Ensure the toggle for Home Data is turned on.
2. Restart itsaSNAP:
Close ItsaSNAP completely by swiping up in the app switcher.
Reopen ItsaSNAP to refresh the connection with your HomeKit devices.
3. Check for HomeKit Setup:
Ensure your HomeKit setup is configured in the Home app on your device.
If HomeKit is not set up, you must create a home and add your devices through the Home app first.
4. Retry in itsaSNAP:
Launch ItsaSNAP again and check if your HomeKit devices are now visible.
If prompted, agree to any additional permissions or access requests.
If devices still aren’t showing, ensure you are connected to the same WiFi network as your HomeKit hub.
Verify that your devices function correctly in the Home app before using them in itsaSNAP.