Adding Object Detection Vision to the XRP Robot
2024-03-18 | By ShawnHymel
License: Attribution Coral
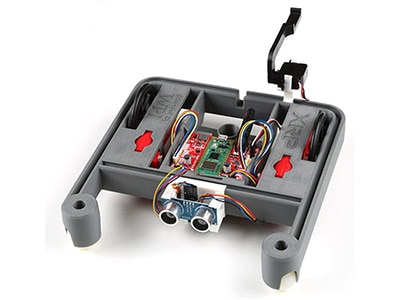
The eXperiential Robotics Platform (XRP) is 3D printed robot designed and built as a collaboration between DigiKey, SparkFun, WPI, FIRST, Raspberry Pi, and several other well-known organizations. It is intended to provide students, hobbyists, and tinkerers with an introduction to robotics and programming on a low-cost platform. You can read more about the features of the XRP here.
Out of the box, the XRP includes several activities to navigate a course, identify and avoid collisions with walls, follow lines, and manipulate objects. However, I wanted to take the robot to the next level by introducing machine learning. Specifically, I added a low-power camera running a custom-trained object detection model to identify and manipulate objects.
If you would like to see the robot performing object detection in video format, check out this link:
All code and 3D models for this project can be found in this GitHub repository.
The Challenge
The Introduction to Robotics curriculum for the XRP contains a final challenge that encourages students to program the XRP to identify 3 baskets in given locations along a track, pick up the baskets, and deliver them to a target zone. The track is marked with tape to encourage the use of the line-following sensor.
Image credits: Delivery Challenge for XRP by Worcester Polytechnic Institute
On its own, this is a challenging project for beginner roboticists; it’s a great way to get students thinking about algorithm design and automating the process of interacting with objects in the real world. However, I wanted to create something for intermediate and advanced students who want to add something extra to their robot.
My challenge is similar to the 3-basket delivery problem: modify the XRP so that it can identify a single basket anywhere in a 1 m by 1 m area, pick up the basket, and deliver it to a zone marked by tape. It should be able to do this without any road or track markings and without any user assistance.
While we could identify the only 3D object on the course using the distance sensor, I wanted to demonstrate a more complex solution by using object detection.
3D Printing
You need to 3D print the basket and Coral Micro mounting bracket. The STL files for each can be found here. Note that while the color of the bracket does not matter, you may want to pick an obvious color (such as red) for the basket to make it easier to identify.
Object Detection
Object detection is a computer vision technique for identifying and locating instances of objects in images or video. Rather than classify an entire image as containing a single instance of something (e.g. the image is of a dog or a cat), object detection aims to identify all objects (e.g. the image contains 1 dog and 2 cats) and where those objects can be found in the image.
For our project, we want to identify a red 3D-printed basket and a target zone marked in blue painter’s tape.
To do this with just a camera, we need to perform object detection. While there are a number of ways to accomplish object detection, we will use the machine learning model MobileNetV2-SSD. This is a fairly complex model, and you are welcome to dive into the details of its operation here.
To start, we need to collect various images of our target objects and train the model to recognize those objects. We will deploy the model to a Google Coral Dev Board Micro, which allows us to perform object detection at about 10 frames per second (fps) on 320x320 color images. While this is not extremely fast, it is enough to provide the robot with the information necessary to interact with those objects.
I covered training the object detection model in a previous tutorial. Feel free to follow those steps to train and deploy the model to the Coral Micro. We will assume that you have followed these instructions for the remainder of this post and have an object detection system running on the Coral Micro. When you have completed this step, you should see bounding box information coming out of the Coral Micro’s serial port (both USB and UART).
Hardware Connections
If you have not done so already, you will need to build your XRP.
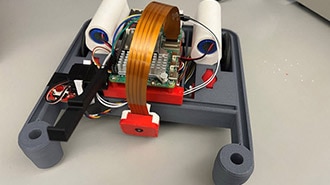
Attach the Coral Micro to the bracket, and attach the bracket to the front of the XRP. Cut and splice some wires to a 6-pin JST SH cable assembly (or create your own assembly). You will need to make the following connections between the Coral Micro and XRP:
Coral Micro - XRP
GND - GND
VSYS - 5V
TXD - IO1 (on Motor 3 port)
RXD - IO0 (on Motor 3 port)
Additionally, you will want to put the servo and lift arm in the front of the robot, just to the left of the Coral Micro mounting bracket. Connect the servo to the port labeled Servo 1.
Programming
Download the xrp-object-detection repository and unzip it on your computer. I recommend using Thonny as your development environment for MicroPython, but you are welcome to use anything you’d like.
Open Thonny, and connect your XRP (Raspberry Pi Pico). If you have not already installed MicroPython to the Pico, follow these instructions.
In the file browser on the left side, navigate to the xrp-object-detection directory that you unzipped. Go into the firmware directory. Right-click on the phew directory and select Upload to /. Repeat this process for the XRPLib directory.
Open basket-delivery/main.py. Feel free to look through the code and run it from Thonny. If you would like the robot to run the code on boot (regardless of connection to Thonny), right-click on main.py and select Upload to /.
Run!
You are now ready to run the robot! Disconnect the USB cable and connect the battery pack to the XRP driver board. Slide the power switch to on. After a few moments, the Coral Micro board should start identifying objects. The green LED in the middle of the board will flash every time the Coral Micro takes a photo.
The XRP will begin to drive toward your first object (class 1, which in my case, is the basket). It will attempt to line up the basket in the lower-left part of the image frame. Once it does that, it will run a simple routine to pick up the basket.
Next, the XRP will search for the delivery zone marked with tape (class 2). It will repeat the process of trying to align the delivery zone in the bottom-left of the image frame. Once it does that, it will execute a simple routine to deliver the basket somewhere in the zone.
And that’s it! Note that we assume the basket’s handle is easily available for the robot’s arm, as determining the orientation and twisting the basket is outside the scope of this challenge. Additionally, in my testing, the pickup routine does not work 100% of the time. It requires some trial and error to get the timing and positioning right. Feel free to play with the settings in the basket-delivery code to see if you can get more consistent pickups!
Recommended Reading
I hope this project helps inspire you to take your XRP further! If you would like some additional XRP guides, please check out the following material:


