制造商零件编号 SC0915
RASPBERRY PI PICO RP2040
Raspberry Pi
License: Apache License, Version 2.0 Robot Kits Raspberry Pi SBC Raspberry Pi MCU
In the first part of this blog series, XRP Meets Raspberry Pi: Simplifying Robot Control with Flask Server, we explored how to wirelessly control an XRP using a Raspberry Pi powered web server. But why stop at local networks when we can take it global?
In this sequel, we will see how we can use a similar setup to control XRP through the internet remotely. The difference is that this time, we are using a cloud-based (Google Cloud Platform (GCP)) Ubuntu Virtual Machine (VM) to host our Flask web server. This upgrade helps us control the XRP from anywhere around the globe, unlike the previous setup, where the Raspberry Pi's website and thus the XRP itself were only accessible inside the local network.
XRP is an open-source robotics platform for students who wish to learn the basics of robot programming. Learning is simpler and effortless on an XRP as it includes access to a free open curriculum developed by Worcester Polytechnic Institute (WPI).
XRP Robot
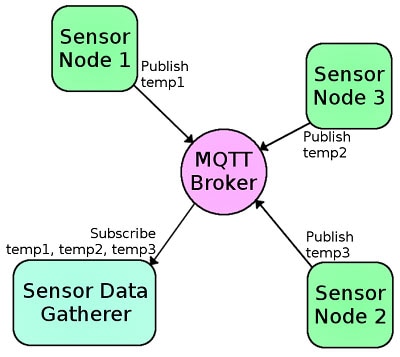
Here we are using MQTT (Message Queuing Telemetry Transport) to communicate to the Raspberry Pi which is connected to the XRP via USB. The Raspberry Pi connects with the flask webserver using MQTT via a cloud MQTT broker such as hiveMQ. So, when you send a command via the joystick interface on the webserver you created, it first sends an MQTT message to the Raspberry Pi. The RPi then sends these commands to the XRP through the USB interface. Now let's dive deep into the setup.
- XRP robot
- Raspberry Pi (model 3B+ or newer)
- USB cable for XRP-RPi connection
- Google Cloud Platform account
- HiveMQ broker account
- Thonny and Geany IDE installed on Raspberry Pi
Now that we have a clear idea of the requirements, let’s get started! First, we’ll configure an MQTT cloud broker, followed by setting up an Ubuntu Virtual Machine (VM) on GCP.
MQTT is a lightweight Publish-Subscribe (Pub-Sub) protocol developed by IBM. It allows communication over a topic name. Any device that needs to send a message can Publish it over a topic name and whichever device wishes to listen to that message can subscribe to that particular topic.

HiveMQ account creation page
Hivemq account creation page.
Hivemq account creation page.
Click on Manage cluster > Access management to set up login credentials.
Hivemq configuration page.
Hivemq configuration page.
1.141 Setup username and password
Grant publish and subscribe permissions, then click Save. The publish permission allows sending messages to a specified topic, while the subscribe permission enables receiving messages from that topic.
Hivemq configuration page.
Take note of the connection details such as URL, port, username and password you set above for future use.
We need to create an Ubuntu virtual machine, where we will be running the flask server. Use the Google cloud platform to create an Ubuntu virtual machine. At the website follow the following steps to reach the VM creation window.
Click on VM instances> enable compute engine API > enable billing> create billing account > manage billing account > create account.
Then continue with VM creation.
Google Cloud VM configuration page.

Google Cloud VM configuration page.
Google Cloud VM configuration page.
Google Cloud VM configuration page.
Go with the default setup elsewhere but enable HTTP and HTTPS under the firewall option.
Then press the create button to finish the VM creation.
Google Cloud VM configuration page.
Press the SSH button and then press Authorize, this will lead you to the Command Line interface of the Ubuntu instance created. Log into the instance using the credentials specified before.
VM access page
VM command line interface
Now that we have SSH access to the Ubuntu VM we can install the MQTT library for communications. Here we are using the paho mqtt library on the Google Cloud. Additionally, we also need to install the Flask web framework.
We require Python and Python package manager (pip) libraries for this project. Run the following commands on the VM to install them.
Enter the following commands to install Python and then pip. pip is the standard package manager for Python. We can use pip to install various Python libraries as shown below.
sudo apt-get update

sudo apt install python3 python3-pip -yEnter the following commands to install MQTT and Flask libraries
pip install paho-mqtt

sudo pip3 install flasknano flaskServer.pyCopy the below code to the file you created and then save it (press Ctrl+X )
Modify the following MQTT credentials in the code by looking at the hiveMQ connection you set up in step 1

MQTT credentials that need to be modified in the code.
Similar to our previous project on the XRP, we are using USB communication, again in this project as well. So, we need to program both the XRP robot as well as the Raspberry Pi which is connected to the XRP via USB. Raspberry Pi receives the control commands from the user via the Flask website and MQTT broker.
Control commands are published under a topic name from the flask server and the Raspberry Pi is subscribed to that topic. Thus, it receives the commands and then sends them to the XRP (RPi Pico) through the USB interface between them.
Follow step 3 of the first part of this project to see how you can set up the Raspberry Pi and access its Graphical User Interface (GUI ) using a VNC tool like MobaXterm. Once you have logged into the Pi by using Mobaxterm or any other VNC tool, use any programming IDE such as 'Geany' to create a Python file say ‘RPi.py’ and then then copy the below code and save the file.
Let’s look at the RPi side code.
The code is intended to:
Receive MQTT messages from a broker.
Forward commands via USB serial to the connected Raspberry Pi Pico.
Provide a bridge between an MQTT communication channel and a serially connected microcontroller (XRP).
Now we need to program our XRP. You can follow this link for assistance. You may use any method to program your XRP. Here we are using Thonny IDE to program XRP. Follow the link for more details. Programming XRP Robot Using Thonny. Let's create a file named XRP.py and copy the following code.
The code is designed to:
Control the movement of an XRP robot based on incoming commands (F, B, L, R).
Read commands from the RPi.
Execute robot motions by setting appropriate drive efforts for forward, backward, left, and right movements.
XRP Robot connected to Raspberry Pi via USB
As we have finished with the programming part, we can run the programs one by one.
Let's begin by running the flask server code on the Ubuntu VM. Follow step 2.2 to access the Ubuntu virtual machine and run the flask server code (flaskServer.py) we created in step 3.21. In order to do this, run the following command on the same path as the code file.
sudo python3 flaskServer.pyNote: To verify the folder path, you can type 'pwd' (print working directory) on the command line interface. Also 'ls' will list all the files in the current path.
To access the created web server, use the external IP address mentioned on the Google VM instance page.
Note: Try to use http instead of https. For instance, here it will be http://34.95.x.x/
VM instance selection page on Google Cloud Platform.
If everything is ok, you should be seeing a joystick interface as below.
Joystick interface created.
After making sure that the XRP is connected to the RPi, use Thonny IDE to run the XRP.py file we created in step 4.2.
Connect the XRP to the RPI and run the RPI.py file we created using the Geany IDE. You should be able to see messages indicating a USB connection with XRP.
We came to the final step in the project here. Now we can control our XRP from anywhere around the globe via the internet. Have fun playing with the joystick to remotely control your XRP. Happy Coding!