How to Use the New Raspberry PI Network Installation Feature
2022-03-03 | By Maker.io Staff
Most hobbyists know the headless setup feature that the Raspberry Pi Imager offers. However, until recently, you always needed to have a second computer with an SD card reader at hand for creating a bootable memory card image for a Raspberry Pi computer. Besides requiring you to own an SD card reader, the old method is also quite inconvenient and time-consuming. That’s all gone now, as the newest version of the Raspberry Pi Imager tool allows you to initiate the flashing process over your home network using a beta bootloader. In simple terms, all you need to do is connect your Pi to your home network and click a button in the imager app.
How the Process Works
Instead of using a second computer to download and flash a Raspberry Pi image, you can now perform the necessary steps directly on a compatible Raspberry Pi. At this point, you must use an Ethernet cable if you plan to use the network flash feature, and the process only works on the Raspberry Pi 4 and 400 models. In addition, you’ll have to flash the bootloader of your Raspberry Pi to use the new network flash feature. However, new Raspberry Pi computers will eventually include the updated bootloader that supports network flashing out of the box.
The new Raspberry Pi bootloader cycles through all supported boot - for example, the micro SD card. If it fails to detect a bootable device, the bootloader then looks for a keyboard. If it finds one, the bootloader runs the network flash utility and displays it on an external display that's connected to the Pi. This utility lets you download the Raspberry Pi Imager and execute it on the Pi without requiring you to install an OS first.
Updating the Bootloader on Existing Raspberry Pi Boards
You have to use the Raspberry Pi imager app either on a PC or the Raspberry Pi itself to download and write the beta version of the new bootloader to a micro SD card. Note that the imager app will delete all files on the card during this process.
Open the imager app to begin. There, you should see that it informs you about a new version that you have to install to use the new feature:
 Download the new version of the imager app if there’s one.
Restart the app once you download and install the new version. You’ll see that it looks very much like the old version at first glance. Click the leftmost button to open the OS selector window:
 Click the highlighted button to display a list of available OS and utility options.
Doing so opens the pop-up window where you’d typically select the OS version when flashing a new SD card. However, this time, scroll down until you see the "Misc Utility Images" option and select it:
 Select the highlighted option. You might need to scroll down in the list to find it.
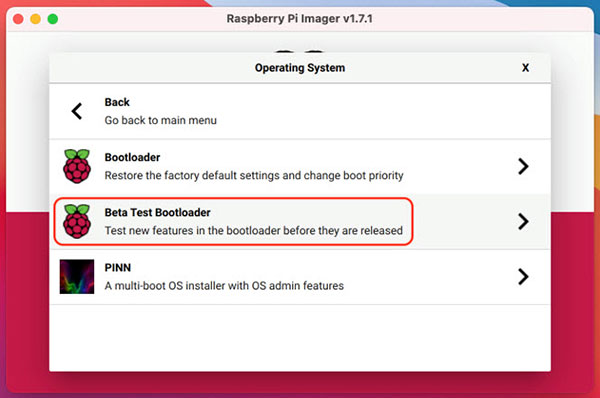
Then, select the beta bootloader from the list:
 You have to install the beta test version of the Raspberry Pi bootloader to use the new network install feature.
Lastly, confirm that you want to create a bootable SD card:
 Select the SD card as the boot option.
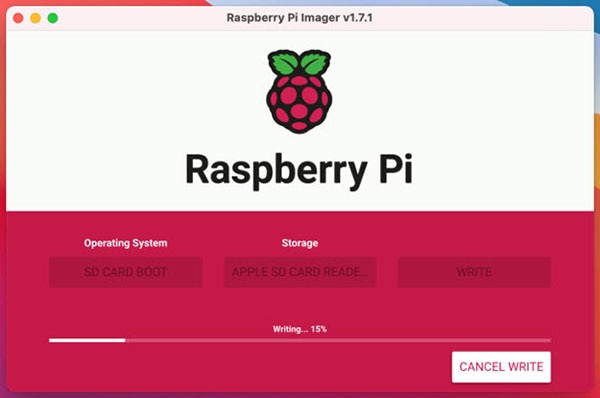
The imager app will then take you back to the main menu, where you can select the SD card you want to use for flashing the image. Select the device and then click the “Write” button to begin flashing the card:
 The imager then flashes the bootloader update files to the selected SD card. Note that this process erases all data on the SD card.
The process only takes a few moments. When it finishes, eject the SD card from your computer and insert it into the Raspberry Pi. Supply the SBC with power, and you should see that the green LED flashes periodically to indicate that the Pi is updating its bootloader. If you have an external monitor attached to the Raspberry Pi, the monitor image lets you know when the process finishes. Unfortunately, there’s no other way to tell whether the update was successful.
How to Use the Raspberry Pi Network Install Utility
Remove the SD card that contains the bootloader update files once the Raspberry Pi completes the update process. Then, insert an empty SD card into the Raspberry Pi and attach a USB keyboard and an external display. Then, turn on the SBC. After a few seconds, the external screen should come on and inform you that the computer failed to detect any bootable images:
 The beta version of the Raspberry Pi bootloader displays this screen when it fails to detect a bootable OS image. Image Source: https://www.raspberrypi.com/news/network-install-beta-test-your-help-required/
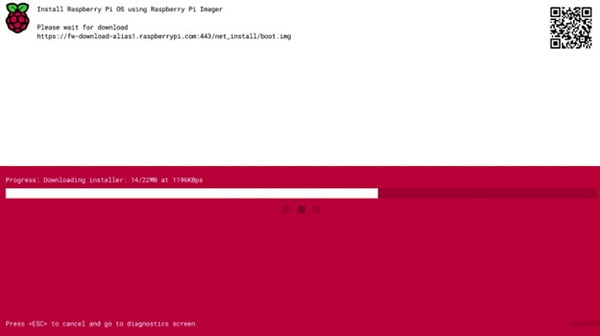
At this point, you can press and hold the shift key for a few seconds to start the network installation process. The bootloader will then ask you to confirm the network install option by pressing the spacebar on the keyboard. Then, you’ll have to insert an Ethernet cable. As mentioned, you can’t use Wi-Fi for this process at this point. Once the bootloader detects a network connection, it downloads the imager app, which it will then directly run on the Raspberry Pi:
 This screenshot shows how the bootloader downloads the Raspberry Pi imager app directly to the small single-board computer. Image Source: https://www.raspberrypi.com/news/network-install-beta-test-your-help-required/
Once the download finishes, the bootloader automatically executes the newly downloaded Raspberry Pi imager. From here, you can download an OS and flash it to the connected SD card as usual. You can follow this guide if you need a refresher on how to do this.
Conclusion
The new network install option for Raspberry Pi computers comes with a few limitations. First, you need to update the bootloader of your single-board computer to use the new feature. However, future board revisions will include the updated bootloader when buying the Raspberry Pi in a store or online. The new network install option is a fantastic alternative for people who don’t have a second computer or an SD card reader. However, the new process involves attaching an external keyboard, display, and Ethernet cable to the Raspberry Pi, which might make it necessary to buy an appropriate HDMI adapter cable.


 中国
中国