制造商零件编号 SC1176
SBC 1.0GHZ 4 CORE 512MB RAM
Raspberry Pi
The Raspberry Pi Zero 2 W is the newest addition to the popular Raspberry Pi family of single-board computers. The all-new RP3A0 system-in-package makes this small 15$ SBC the perfect fit for a wide array of DIY projects, and the additional connectivity features open up further possible applications in disciplines like machine vision, IoT, and robotics. This article takes a quick look at the Raspberry Pi Zero 2 W, its features, and how to get it up and running in almost an instant.
The first thing you’ll notice upon unboxing your new Raspberry Pi Zero 2 W is just how small it is. With a size just around 2.5” by 1”, or approximately 65mm by 30mm, it has the same form factor as the previous Raspberry Pi Zero. In addition, this model also comes equipped with the familiar 40-pin GPIO connector present on full-size Raspberry Pi SBCs. GPIO pin compatibility, in particular, allows you to use a large Raspberry Pi for easier prototyping. You can then swap out the large SBC with the smaller Raspberry Pi Zero 2 W in your finished project to reduce its overall size and power consumption.
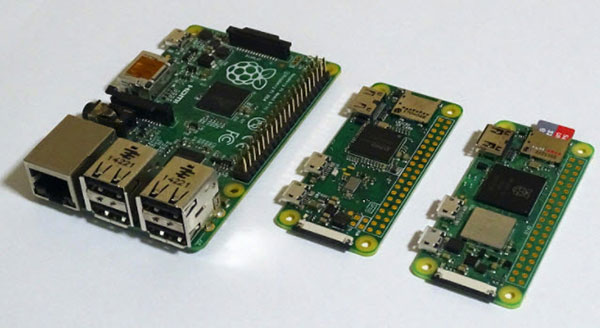 A full-size Raspberry Pi 2B sits next to the older Raspberry Pi Zero (in the middle) and the Raspberry Pi Zero 2 W.
The new Raspberry Pi board comes with the RP3A0 system-in-package, which features a quad-core 64-bit ARM Cortex-A53 processor clocked at 1Ghz, and the system contains 512MB SDRAM. These specifications make the new Raspberry Pi Zero 2 W five times as fast as its predecessor.
Furthermore, the Raspberry Pi Zero 2 W comes with built-in Wi-Fi capabilities that make connecting it to your home network easier than ever before. This means that you don’t need to add any external parts to your IoT projects to get them connected to a network. Besides the aforementioned 40-pin GPIO header, other connectivity options include a mini-HDMI socket, a single mini-USB connector, and the standard Raspberry Pi camera interface.
The minimum requirements for using the Raspberry Pi 2 W include a USB power supply and a micro SD card with at least 8GB of storage space. I used a standard iPhone power brick to supply the board with power. However, I noticed that some USB power supplies cause the Raspberry Pi to reboot constantly or not turn on at all. If you run into problems later, try using a different power supply. You can always resort to using the official Raspberry Pi micro-USB power supply if you’re unsure whether you have a supported 5V power supply.
Note that you’ll need a mini-HDMI to HDMI adapter to use an external display with the Raspberry Pi Zero 2 W. You’ll also need a micro-USB to full-size USB OTG adapter to plug in external USB devices such as a keyboard or a mouse.
Before you power on the SBC, download the Raspberry Pi imager to a computer of your choice. Then, run the imager program. In it, click the “Choose OS” button, then select “Raspberry Pi OS (other)” and then choose “Raspberry Pi OS Lite” from the list. Note that this version of the operating system doesn’t include a graphical desktop environment. Choose the "Full" version of the OS instead if you need a GUI.
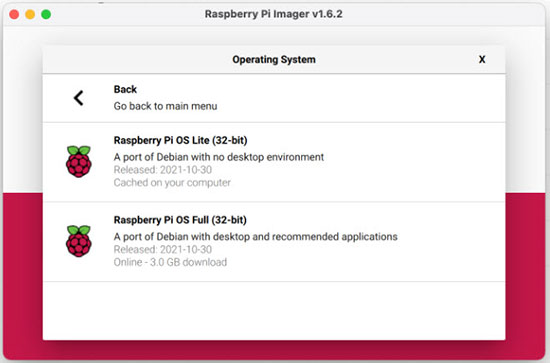 I recommend choosing the Lite-version of the Raspberry Pi OS for headless systems.
Next, plug your SD card into the computer and select it in the imager application. Next, use the Ctrl + Shift + X keys to bring up the advanced options menu. In that menu, enable SSH and set a password for the default user:
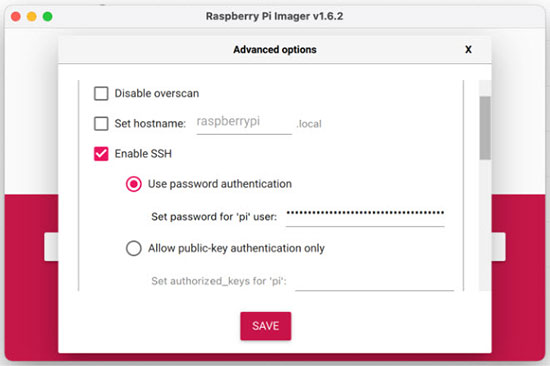 Enable the SSH option and set a password for the default user.
Next, scroll down and set your Wi-Fi SSID and password. Make sure you choose the correct Wifi country for regulatory reasons:
 This image shows the Wi-Fi options.
Last, tick the “Set locale settings” checkbox and choose the time zone and keyboard layout that works for you. Then, enable the “Skip first-run wizard” option to make sure that your headless Raspberry Pi setup works as intended when you first plug in the SBC:
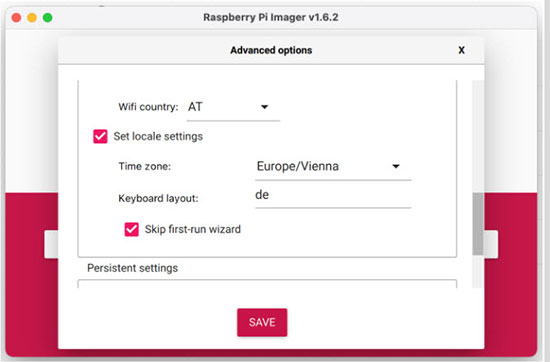 Make sure to instruct the Raspberry Pi to skip the first-run wizard.
Once done, hit the ‘Save’ button in the options pop-up window and then ‘Write’ in the main imager application. The program then downloads and flashes the latest Raspberry Pi OS version to the selected SD card, and it informs you when it finishes writing the data.
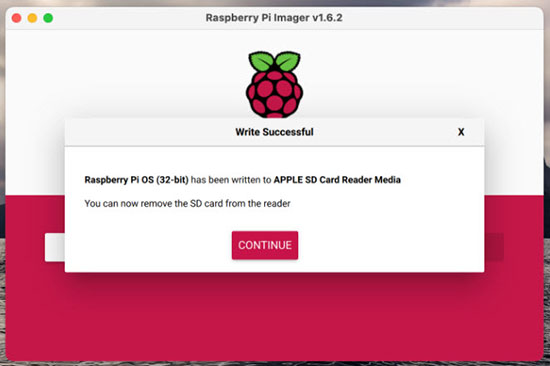 The Raspberry Pi imager notifies you when it’s safe to remove the SD card.
You can skip the advanced options if you plan on using the Raspberry Pi Zero 2 W with an external display, a USB keyboard, and a mouse. The Raspberry Pi will then ask you to configure these settings when it first boots up.
Once the imager finishes writing the OS to the SD card, eject the card from your computer and plug it into the Raspberry Pi Zero 2 W. Then, plug the power cable into the rightmost micro-USB socket:
 Use the rightmost micro-USB port to power the Raspberry Pi Zero 2 W.
Next, open a terminal window on the computer you used to flash the SD card. Make sure that it’s connected to the same Wi-Fi network as the Raspberry Pi Zero 2 W. Then, find the Raspberry Pi’s IP address in your local network and use SSH to establish a connection to the Raspberry Pi Zero 2 W. Here, input the password you supplied earlier:
 Make sure to install the latest updates when you first boot up the system.
I recommend you run the following two commands to update the Linux package lists and download OS and package updates:
sudo apt update
sudo apt upgrade
Once these processes finish, you can use the Raspberry Pi Zero 2 W just like every other Raspberry Pi SBC. The OS comes with a recent version of the Python interpreter and compilers for popular programming languages such as C.
The Raspberry Pi Zero 2 W is an impressive, tiny, $15 single-board computer perfect for IoT and robotics projects. It features an RP3A0 that includes a 64-bit quad-core CPU clocked at 1Ghz and 512MB RAM.
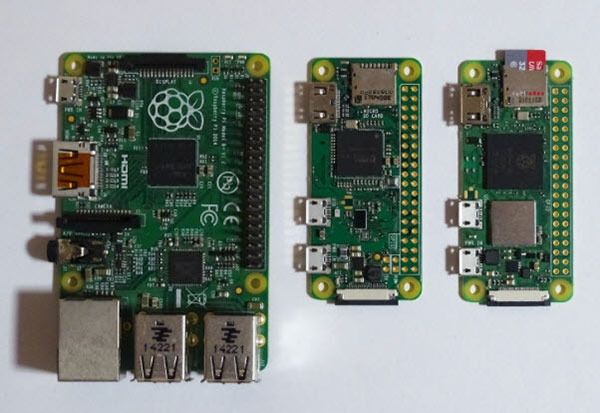 You can see how much more compact the Raspberry Pi Zero boards are compared to a full-size Raspberry Pi.
The full-size 40-pin GPIO header is pin-compatible with other 40-pin Raspberry Pi models. The standard camera connector allows you to use this little board in machine vision, home security, and robotics projects as an example. You only need to download the Raspberry Pi imager to get the SBC up and running, and the overall process takes less than five minutes. You can use the advanced options in the imager app to configure the Raspberry Pi Zero 2 W’s Wi-Fi interface, locale settings, and SSH.