How to Install Windows 10 IoT Apps on the Raspberry Pi
2016-04-28 | By Maker.io Staff
Hopefully by now you have your Raspberry Pi board loaded with Windows 10 IoT core and now you’re wondering how to load UWP apps to the Pi. If you haven’t setup the Pi yet with Windows 10 IoT Core, then head over to the following link before you proceed: Setting up Windows IoT Core on the Raspberry Pi.
Universal Windows Platform (UWP)
Before we get started, I thought I’d give you a good intro into what UWP apps are, and how good they are for a number of devices. UWP apps can only run on any windows-based devices, from your phone to your tablet or PC.
Designing an app that looks good on such a wide variety of devices can be a big challenge. So how do you go about designing an app that provides a great UX on devices with dramatically different screen sizes and input methods? Fortunately, the UWP provides a set of built-in features and universal building blocks that help you do just that.
Without going into too much detail, UWP apps have a multitude of features that allow them to be responsive on all devices using features such as effective pixel scaling, universal input and smart sensors, universal control and styling and responsive design.

Figure 1
Visual Studio 2015
1. First step, is to download and install Visual Studio 2015 to your Windows PC by going to the Visual Studio website, and head to the download section by selecting “Visual Studio Community”. The download should start to begin, if prompted select open application once downloaded.

Figure 2
The installation progress may take some time whilst it downloads all the necessary dependencies it requires to install. If you have Windows 10 IoT Core already installed, then you should also have the Windows IoT Core Dashboard installed, which you will need later.
2. Power up your Raspberry Pi board with the latest Windows IoT Core; the first time you power on the Pi, the activity LED will flash for a few seconds, then stop for a couple minutes. After Windows finishes its initial configuration, the LED should start flashing again.
3. Connect your Ethernet cable from your Raspberry Pi to your computer directly or connect the Ethernet cable from your Raspberry Pi to your Ethernet network switch.
4. Open up the Windows IoT core Dashboard and click devices, in here you should see your windows device and its network configuration details.

Figure 3
Blink an LED
5. Before we load our first windows application you will need to download all the samples from the MS-IOT Github repository. After you have downloaded them and un-packaged them on your hard drive, navigate to the Blinky->CS subdirectory to find the C# Blink example. Double-click Blinky.csproj to open it in Visual Studio. You may get a warning about opening projects from random places on the Internet, just click accept.
6. In the Solution window, open the Mainpage.xaml folder and double-click the Mainpage.xaml.cs file to open it. This is the main program shown in Figure 4.

Figure 4
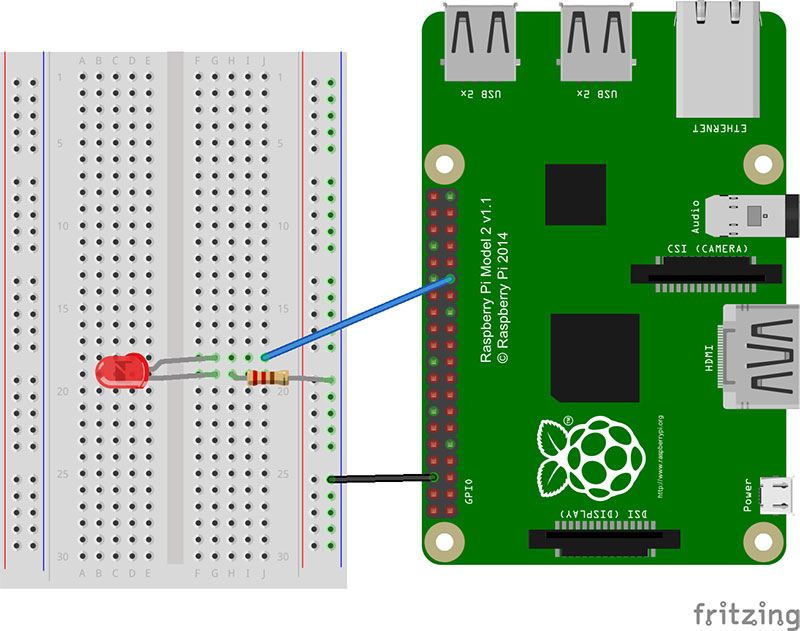
7. The example requires an LED to be connected to GPIO pin 5 on the Raspberry Pi as shown in Figure 5.

Figure 5
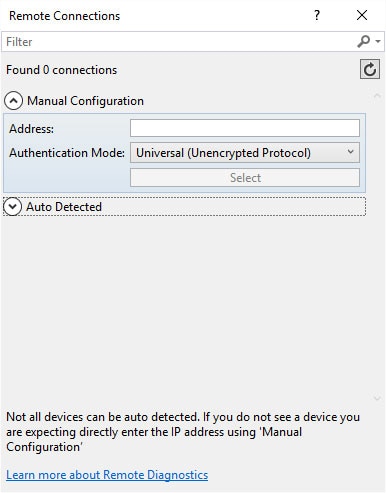
8. Go back to Visual Studio and look for the toolbar options to the right of Debug. Make sure that ARM is selected, and change Device to remote machine. If your Pi doesn’t appear in the list, paste in its IP address here and change authentication mode to None, then click Select. The IP address will be listed under devices in the Windows 10 IoT Core Dashboard.

Figure 6
9. Click the green play button to the left of “Remote Machine”, wait a bit, and your on-board LED should start blinking!


 中国
中国