How to Connect a BeagleBone Black to the Internet Using USB
2016-10-06 | By Maker.io Staff
Like most makers, the ability to connect your projects to the internet greatly expands its capabilities and whilst the BeagleBone Black development board has an Ethernet jack sometimes it is not always possibly physically to connect your board to the internet. Even with the single USB port taken up by other peripherals a wireless dongle also may not be an option for most users.
I found myself in this situation not too long ago and all I wanted to do was run a few updates and install some software, yet I spent far too long pondering the solution to this issue. However, I soon came across a solution in the beagleboard.org forums and it worked a treat. I was able to use my wireless internet on my laptop computer and share this with the BeagleBone with only a few steps.
Getting Started
The first thing you will need to do is connect your BeagleBone Black board to your computer using the USB port. This should power the board up and also provide communication between the board and your computer. The BeagleBone board should show up on your computer as a USB flash drive. If you haven’t done so already you will need to install the serial drivers for your operating system from this flash drive.
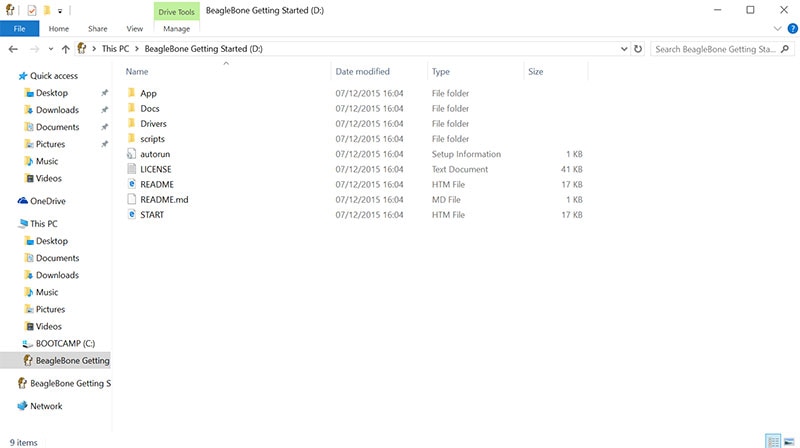
Figure 1: BeagleBone Flash Drive
Once the drivers have been installed a simple reboot may be required and you should be able to open up your web browser (Firefox or Chrome recommended) and navigate to the BeagleBone’s on board server at the following web address http://192.168.7.2 . You should see the BeagleBone home page and your device successfully connected.
Login via SSH
One of the best ways to connect to your BeagleBone board and start issuing commands from the command line it to use shell prompt. In order to use SSH on a Windows computer you will need to download an SSH client such as PuTTY. There are many other clients out there but PuTTY gives us a simple interface to work with and is most reliable when using the program. You can download PuTTY from the web link below:
http://www.chiark.greenend.org.uk/~sgtatham/putty/download.html
Once downloaded you should be able to run the executable file from the folder you downloaded it to. Once opened, in the “Host Name (or IP address)” box enter the local IP address of the BeagleBone Black, which is the same as what you typed into the web browser earlier. Also make sure the port number is 22 and the connection type is set to SSH. You can see the settings in the figure below.
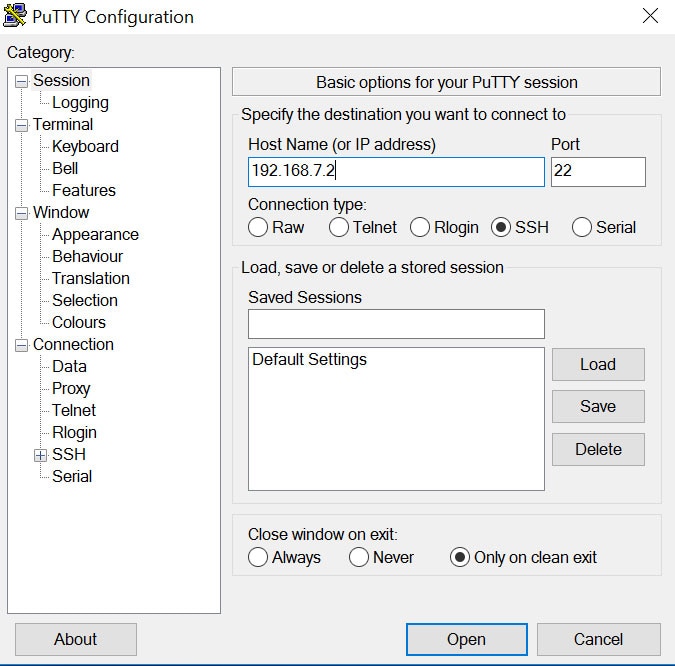
Figure 2: PuTTY SSH Configuration
Click “Open” and a new window will open with the BeagleBone shell terminal. Enter a default password if requested to login. Depending on which version of the Linux you are using on the BeagleBone you should see the window in the below figure.
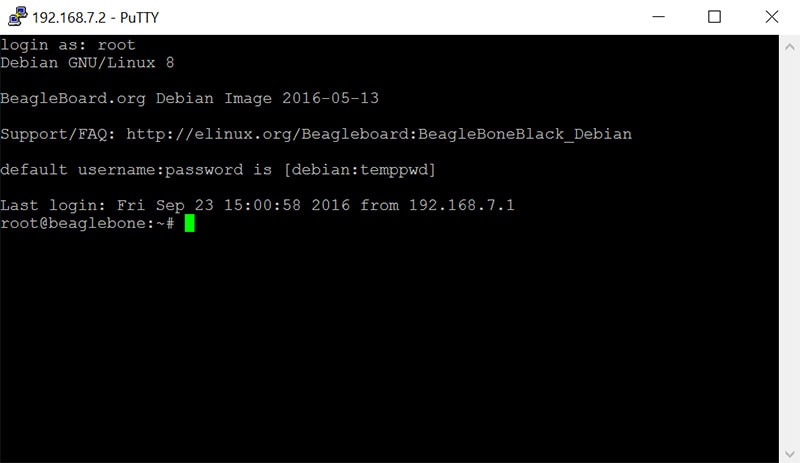
Figure 3: PuTTY Shell Window
Connecting the BeagleBone Black to the Internet via USB Port
The first step you will want to do is make sure the USB connection between the BeagleBone Black and your computer is working ok. The IP address or the Gateway for the virtual network connection over USB is 192.168.7.1 . To test this connection, you can simply issue a ping command from the shell prompt:
ping 192.168.7.1
The ping tool is essentially a debugging tool that tests the TCP/IP connections between devices. You should see an output on the screen, which is a response from your computer to say everything is ok.
Now that everything is setup ok, you now need to tell the BeagleBone Black how to connect to the internet. What you need to do is direct any data destined for the internet through a gateway, which is your computer at IP address 192.168.7.1. You can do this by typing the following command in the shell prompt on the BeagleBone Black:
sudo /sbin/route add default gw 192.168.7.1
This now adds the route to the BeagleBone Black’s IP address routing table. Now that you have configured the BeagleBone Black to handle the traffic that passes through you need to Windows how to handle the incoming traffic. This step can easily be done from the Network settings in Windows.
Open up the control panel in Windows and navigate to Network Connection Panel, you should see a list of network devices available such as the figure below.

Figure 4: A list of network devices on your computer
In my case, the internet is connected to my computer using the wireless adapter so I will want to change the setting for this adapter. If you have internet connected via Ethernet, then select your Ethernet network adapter. Either way you will want to select the network connection where you connect to the Internet.
Right Click on your computer Internet Network Connection and choose properties at the bottom of the menu. A window like the one below will pop up.
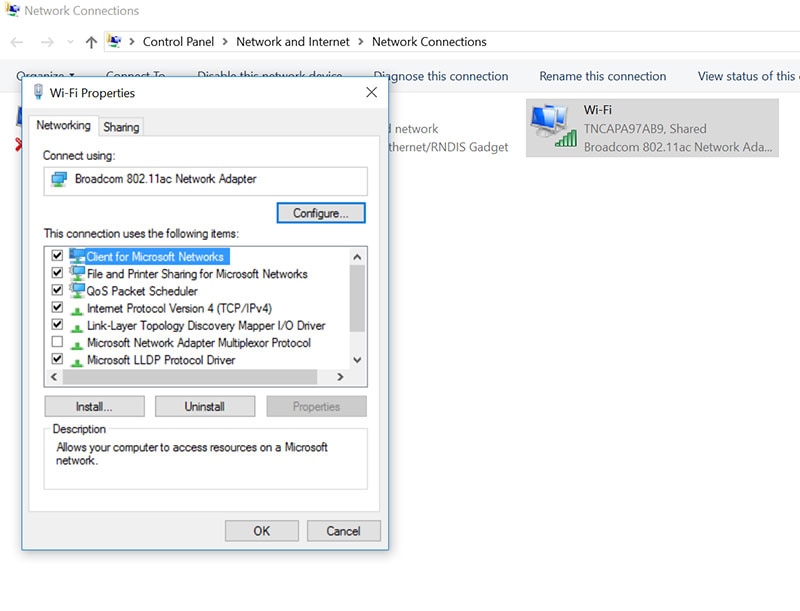
Figure 5: Wireless network adapter properties
You now need to share this connection with the BeagleBone Black. Click on the Sharing tab at the top and you will see the sharing options available. Click the check box that says “Allow other network users to connect through this computer internet connection”, then click ok.

Figure 6: Internet connection sharing options
Now that your Internet is shared on your wireless or wired network device you need to manually change the IP address and its settings on the BeagleBone USB network device, which you can see in the network connections window as shown in Figure 4. You should see a network adaptor labelled “Linux Ethernet/RNDIS Gadget” and you need to right click and go to properties.

Figure 7: USB Ethernet Properties
Click on the “Internet Protocol Version 4 (TCP/IPv4)” from the list and then click Properties. In this next window you will need to manually add the IP address of the gateway, which is your computer. We know that the IP address is 192.168.7.1 as we mentioned before. Add this into the IP address box along with the other network settings as shown in the figure below.
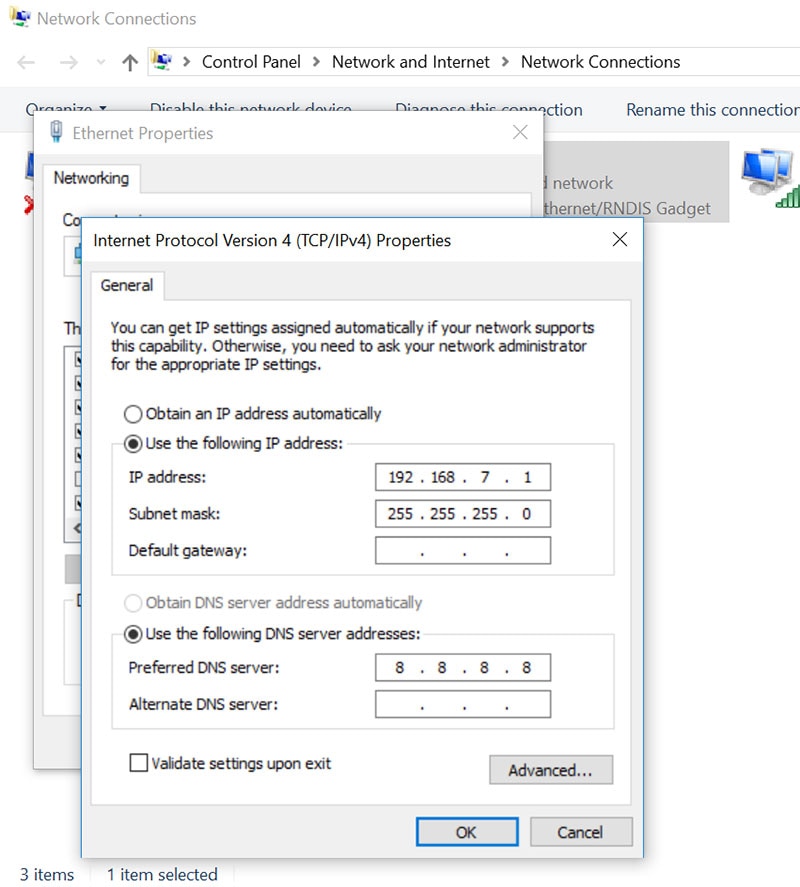
Figure 8: USB Ethernet IP Settings
At this point you should have noticed that the SSH connection has closed between the BeagleBone Black and your computer due to the network connection resetting. Just restart PuTTY and connect to the IP address 192.168.7.2 and login same as before. Now the internet is working but you still need to add a name server to translate the IP addresses into names and vice versa. You can do this by typing the following command on the BeagleBone:
echo "nameserver 8.8.8.8" >> /etc/resolv.conf
This command adds the google name server IP address to the config file. You can now test the internet connection using a simple ping test to a web URL such as google.com:
ping google.com
You should receive a positive response from the web URL server. Now that you are connected to the Internet you can run updates and install any software as required.
Summary
Connecting your BeagleBone Black to the Internet without any physical network device such as Ethernet or wireless dongle is definitely a very useful tool. It allows you to work more efficiently without the headache of being near a router or requiring any additional hardware. This solution isn’t without its issues such as slower speeds however; it works well for using basic internet tasks such as running updates.




 中国
中国