How to Install Libraries and Boards with the New Arduino IDE 2.0 RC
2022-01-03 | By Maker.io Staff
Another recent article investigated the new features and added improvements in the Arduino IDE 2.0 RC. There, I mentioned that the development team has completely overhauled the design and user experience of the IDE. The library manager and boards manager are two vital tools in the Arduino workflow. This article summarizes the differences between the new IDE and the classic Arduino IDE and how you can efficiently employ the updated tools in your projects.
Installing Libraries in the New Arduino IDE 2.0
One way to add external libraries to your Arduino installation is to use the library manager, just like you did with the classic Arduino IDE. However, instead of opening a new pop-up window, the most recent version of the Arduino IDE displays the library manager in its right-hand side toolbar. You can access the manager by clicking the following button in the IDE:
 Use the highlighted button to bring up the toolbar and make it show the library manager.
Doing so opens up the toolbar and instantaneously displays the library manager. Then, you can use the search bar to filter libraries and use the install button to download a selected library, just like in the classic IDE:
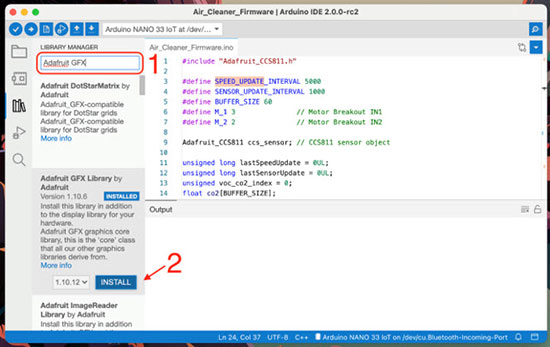 Use the toolbar’s search function to find libraries. Then, click the highlighted button to download and install a library.
And just like that, with only a few button clicks and without any long delays, the IDE downloads and installs the selected library. The new Arduino IDE 2.0 offers a significantly more user-friendly and streamlined process for installing external software packages. Thanks to these improvements, you’ll get your projects up and running in practically no time! Alternatively, you can also use the app’s top menu bar to access the library manager, like in the classic Arduino IDE.
Installing Board Support Files using the New Arduino IDE 2.0
Like the library manager, the boards manager is now also located in the right-hand side toolbar. This tool allows you to install additional board support files. Use the following button to access the boards manager:
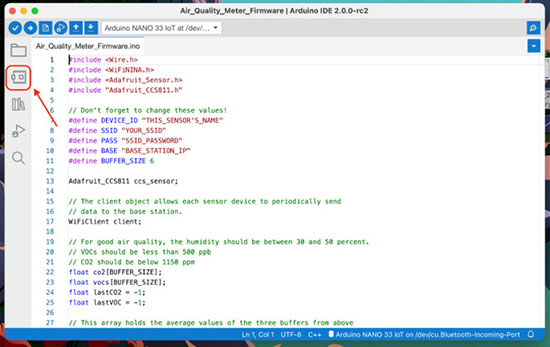 Use the highlighted button to bring up the boards manager.
Pushing the highlighted button reveals the toolbar and opens the boards manager. You can then use the search bar to find the board you’re looking for. Just like with the library manager, you can then install the board support files with the click of a single button:
 Use the search bar to find your board. Then, click the button to install the board support files.
Note that, just like in the classic IDE, the new Arduino IDE 2.0 doesn’t come with an exhaustive list of all supported development boards. Instead, you might need to add an external boards manager URL to the IDE to find the board you’re looking for in the boards manager. To accomplish this, copy the additional boards manager URL you want to install, and then open the settings view in the IDE using the program’s top menu bar:
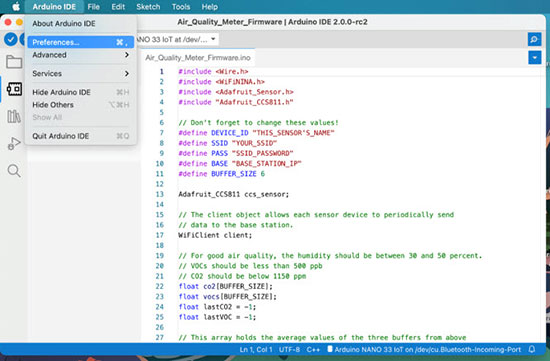 You can open the preferences window using the app’s top menu bar.
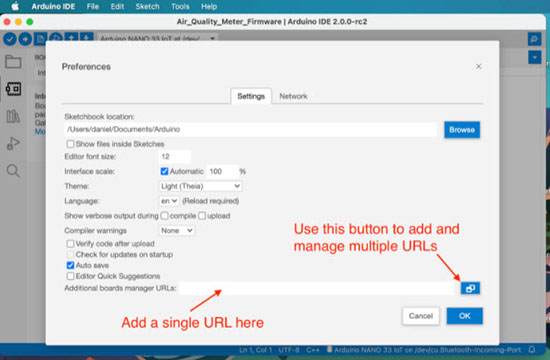 The preferences panel lets you add a board manager URL. Use the right-hand side button to access the advanced board manager URL settings.
Summary
The new Arduino IDE 2.0 offers a much more streamlined process for managing external libraries and board support files. Overall, user experience has significantly improved compared to the classic Arduino IDE. The new IDE integrates both tools into its right-hand side toolbar. Also, the new UI completely eliminates the need for additional pop-up windows. The new user interface is much more responsive and easier to use.


