制造商零件编号 2012414
MICRO:BIT V2 SBC-BOARD ONLY
OKdo
This article builds upon the concepts you learned in previous articles that introduced you to the micro:bit Python editor and how to write a simple Hello World application that uses multiple forms of output that the micro:bit offers. This article dives a bit deeper and discusses how to simulate various conditions using the editor’s built-in simulator to build and test a more advanced application.
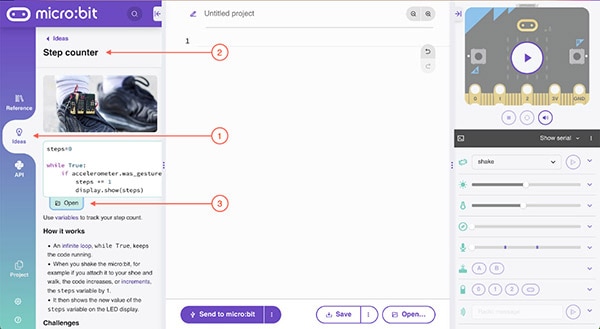
Just as in the previous example, start by deleting all code in the editor. However, instead of creating a project from scratch, you can use the simple pre-built projects in the ideas tab of the web editor. First, click the tab and then select the step counter starter project. Next, click the load button below the code snippet to start using this template:
 Perform the highlighted steps to load the step counter starter project.
The idea you just loaded only contains a simple program that updates a single variable whenever the user performs the shake gesture. In addition, the program displays the current number of steps on the onboard LEDs. Start expanding the program by adding a few variables that will come in handy later. You can either use the editor’s reference blocks or type in the following code:
steps = 0
target = 5
reached = False
reminded = False
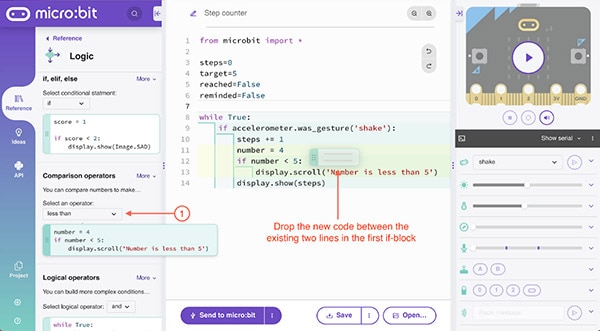
The program will use the target and reached variables to track whether the user has reached their daily step goal. Next, search for the if-block in the logic category in the editor's reference panel. Then, use the dropdown menu to select the "less than" option and drag the snippet into the code editor. Finally, place it between the two existing lines of code in the if-block that was already in the starter project:

Next, delete the line that declares the number variable and sets its value to four. Then, change the if-condition to steps less than ten. Finally, add an elif-block so that your while-loop looks as follows:
while True:
    if accelerometer.was_gesture('shake'):
        steps += 1
        if steps < 10:
            display.show(steps)
            sleep(500)
        elif steps % 10 == 0:
            display.scroll(steps)
This code advances the steps variable whenever the board detects the shake gesture. It then checks whether the steps variable is less than ten, in which case the program can display the whole number on the LED display. However, if the steps variable is greater than ten, the program has to scroll the resulting number over the display to make it easier to read. It does that in increments of ten.
Next, add another if-block below the one that detects the accelerometer gesture and checks whether the user exceeded their daily step target. Display a happy face and let the user know that they reached their goal if the reached variable is false:
if steps == (target+1) and reached == False:
        display.show(Image.HAPPY)
        speech.say("You have reached your goal!")
        reached = True
Next, the user needs a way to reset the step counter. You can implement this functionality using the physical buttons on the micro:bit board. Find the buttons section in the reference tab and drag the button A pressed snippet into the code editor panel:

Finally, the program checks whether the ambient temperature exceeds 28 degrees Celsius, and if it does, the micro:bit reminds the user to drink enough water while exercising. The finished program should look as follows:
from microbit import *
import speech

steps = 0
target = 5
reached = False
reminded = False

while True:
    if accelerometer.was_gesture('shake'):
        steps += 1
        if steps < 10:
            display.show(steps)
            sleep(500)
        elif steps % 10 == 0:
            display.scroll(steps)
    if steps == (target+1) and reached == False:
        display.show(Image.HAPPY)
        speech.say('You have reached your goal!')
        reached = True
    if button_a.was_pressed():
        steps = 0
        speech.say('Steps reset')
        reached = False
    if temperature() > 28:
        if not reminded:
            speech.say("It is hot. Don't forget to drink enough water")
            reminded = True
    else:
        reminded = False
    display.clear()
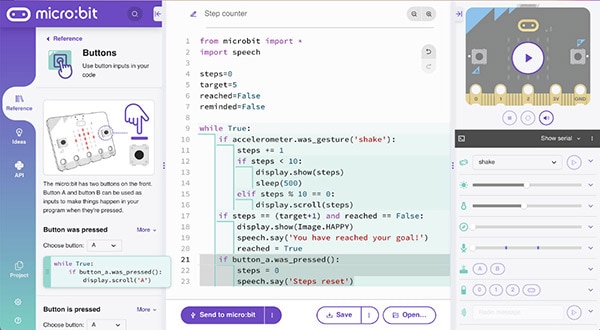
As in the previous articles, use the big play button in the top-right corner of the IDE to run your code on the built-in simulator. Once the program runs, you can use the motion gesture selection dropdown to choose the shake motion and press the play button next to the dropdown menu to play the selected gesture. Playing the shake gesture should advance the counter variable, and the count should appear on the simulated development board’s LED display. The board continues to show the step count until it reaches six, in which case the program congratulates you for reaching your target. Then, once the counter goes beyond ten, the board will only display the step count in increments of ten. You can also use the A-button on the simulated board to reset the count, and moving the temperature slider should trigger the board to let the user know to drink enough water:

In the image above, you can also see sliders for adjusting the ambient light, compass direction, and noise level, which this application doesn’t use. In addition, you can use the highlighted buttons along the bottom edge of the window to control the three touch buttons positioned along the bottom edge of the micro:bit board, as well as the golden logo touch button at the board’s top edge.
The micro:bit Python editor is well-equipped for writing more complicated programs, and the handy built-in simulator lets you test them without having to connect your physical micro:bit development board. The simulator enables you to adjust various environment variables, for example, the ambient temperature, which makes it easy to test your programs in different scenarios you might not be able to control in the real world. In addition, the board’s physical and touch buttons also function as on the actual hardware, and you can either directly press them on the mock device or use the UI buttons along the IDE’s bottom edge to send button press signals to the simulated program.