How to Send and Receive IR Signals with a Raspberry Pi
2021-01-20 | By Maker.io Staff
A previous article explored how IR communication works and how common IR communication protocols can send and receive infrared signals on an Arduino. This article investigates how the same can be achieved using a Raspberry Pi. The techniques presented in this article allow users to operate the Raspberry Pi with any conventional IR remote control.
BOM
The following parts were used to construct a universal infrared receiver and sender board:
Part/Qty.
- Perfboard - 1
- 38 kHz IR receiver - 1
- 39 Ohm resistor - 2
- IR LED - 1
- NPN transistor - 1
- CR2032 holder - 1
- CR2032 Lithium Battery - 1
- M/F Jumper Wires - 1
- Raspberry Pi 4 - 1
The details of how to choose the correct IR receiver and a matching infrared LED were discussed in the previous article. However, to summarize the key points, it’s best to match the wavelength of the LED and sensor as well as possible, and many choose 950 nm LEDs and sensors because those are the easiest to find. However, it’s not absolutely necessary to perfectly match the two parts.
Most IR sensors will work fine with LEDs that emit waves with a slightly different wavelength. The same goes for the carrier frequency.
The following schematic can be used to build a universal infrared sender and receiver module with the parts from the table above.
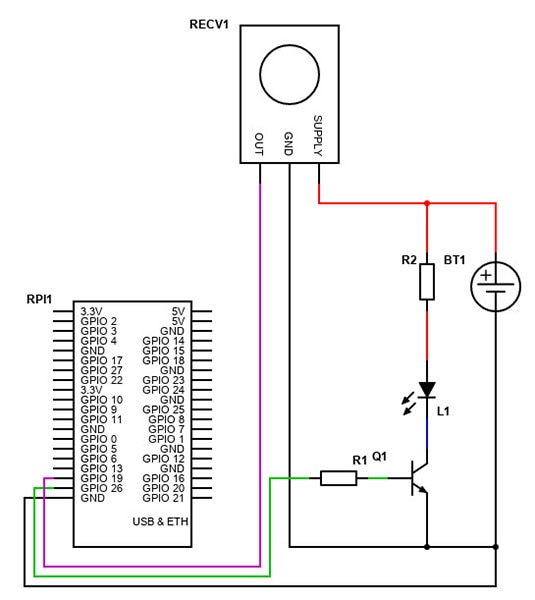
View the full Schematic here.
The Raspberry Pi can receive and send IR signals using any of its GPIO pins. In comparison, the Arduino can only send out data using an infrared LED when it’s connected to one of the Arduino’s PWM pins.
The completed circuit looks like this:
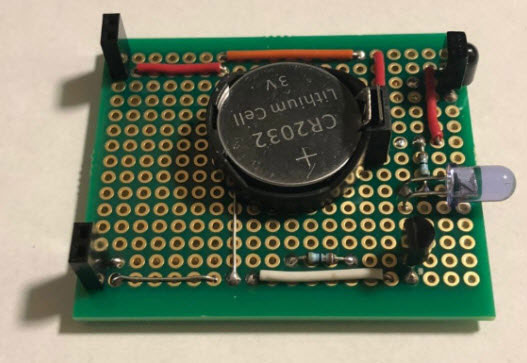
The pin-headers on the left-hand side of the board can be used to connect the IR receiver and the infrared LED to the Raspberry Pi.
Installing and configuring the necessary software.
The software setup is not as easy as it was with the Arduino. For the Raspberry Pi, it’s not sufficient to download and install a library that will do the heavy lifting, and there are quite a few installation and configuration steps involved.
First, start by opening the following file with a text editor of your choice:
sudo nano /boot/config.txt
Next, one of the following lines to enable infrared communication has to be uncommented (remove the #-symbol). The result should look like this:
dtoverlay=gpio-ir,gpio_pin=19 # for receiving data
dtoverlay=gpio-ir-tx,gpio_pin=26 # for sending commands
Note that the pin where the IR receiver is connected has to be supplied here. Pin 19 is the same pin that is shown in the schematic above. Furthermore, some people have reported that enabling both overlays at once causes problems. If you’re experiencing issues, try disabling one of them.
Adding this line to the configuration file will ensure that the appropriate infrared device overlay will be loaded when the system boots up, which will ensure that IR commands can be received by the Raspberry Pi. Therefore, the system can be rebooted right away:
sudo reboot now
Once that’s done, run the following commands to install a helper program that’ll handle the parsing of raw timings and map them to user-defined keys. This will enable you to define a few keys and what their raw data looks like. The system will then listen for these predefined series of timings and raise a system-wide event once they occur.
sudo apt update
sudo apt install ir-keytable
Once the installation finishes, it can be tested right away. Typing the following command will start a program that reads the IR receiver and outputs the parsed values to the console:
sudo ir-keytable -c -p all -t
The output should look similar to this:
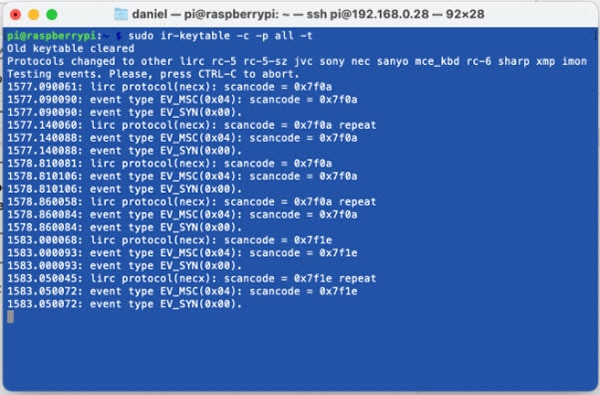
If this doesn’t work on your Raspberry Pi, double-check that the wiring is correct. If the program displays an error, try the steps above on a fresh installation of Raspbian to verify that the circuit and software are working correctly.
Older versions seem to have had a few bugs that prevented the IR communications driver and software from functioning correctly. At the time of writing this article, all those issues seem to have been resolved.
Next, it’s time to install LIRC, which stands for Linux Infrared Remote Control. This can be achieved with the following command:
sudo apt install lirc
As soon as the installation finishes, edit the following file:
sudo nano /etc/lirc/lirc_options.conf
In that file, two lines have to be changed. The result should look like this:
driver = default
device = /dev/lirc0
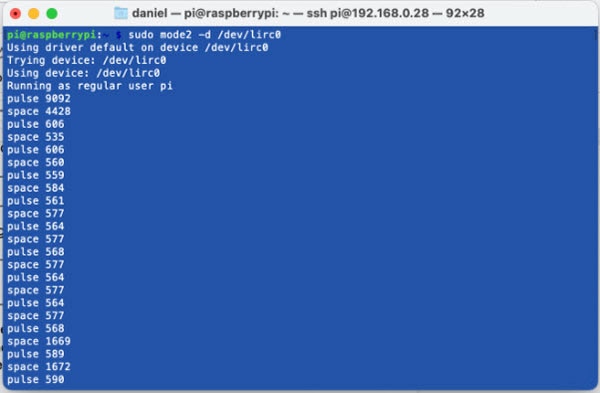
Leave the other parameters unchanged for now. Reboot the system again, and once that’s done, type the following two commands to stop the LIRC daemon and to start a program that outputs the raw timings of the received IR signal:
sudo systemctl stop lircd.service
sudo mode2 -d /dev/lirc0
When a button is pressed on the remote control, the Raspberry Pi should receive IR pulses and generate output similar to the following:
Next, it’s important to create or source a configuration file for the remote you want to use for controlling the Raspberry Pi. Such a configuration file maps certain raw binary values, transmitted by the remote control, to meaningful names. LIRC detects stored values in the config files when they get received by the IR receiver and translates them to their appropriate names.
To create such a file, the irrecord application can be used:
irrecord
Then, the on-screen instructions have to be followed carefully. This will generate a remote-control configuration file similar to mine:
begin remote

  name  fire-tv
  bits       	32
  flags SPACE_ENC|CONST_LENGTH
  eps        	30
  aeps      	100

  header   	9066  4453
  one       	594  1666
  zero      	594   546
  ptrail    	592
  repeat   	9066  2237
  gap      	108286
  toggle_bit_mask 0x0
  frequency	38000

  	begin codes
      	KEY_POWER            	0x00FE50AF 0x23BC3800
  	end codes

end remote
Note that it’s recommended to use names from this list. Once the configuration file has been created, rename it and move it to the following folder:
sudo mv <<name_of_your_config_file>> /etc/lirc/lircd.conf
After one last reboot, the system should be fully set up and configured. You can test whether the configured remote control is detected by LIRC by listing all configured devices:
irsend list "" ""
A small utility program, called irw, can check whether the decoding of the raw IR samples works as configured:
sudo irw
When pressing the power button on the remote, irw reports the following for every button press:
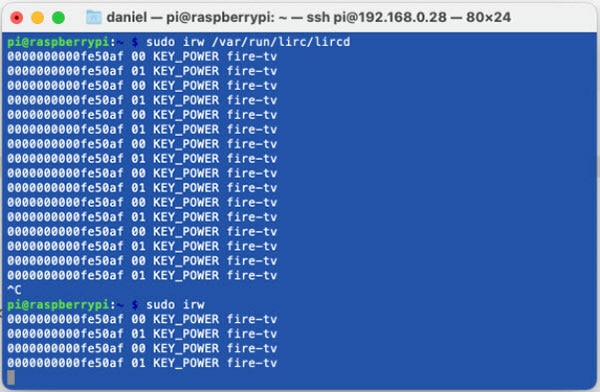
Receiving IR commands from remote controls
Now that it’s verified that the drivers and software work as intended, it’s time to utilize them to receive and send commands from user programs. There are several ways this can be accomplished. This article uses a simple Python script to demonstrate the basic principles. The script opens a new socket and connects to the LIRC daemon running in the background. The daemon listens for incoming IR signals and decodes them according to the aforementioned remote-control configuration files. The custom Python script then needs to split the message it receives from the LIRC daemon. The idea is based on a test script that can be downloaded here. Our custom Python script looks like this:
# This script is based on the following script: https://github.com/akkana/scripts/blob/master/rpi/pyirw.py
# It opens a socket connection to the lirc daemon and parses the commands that the daemon receives
# It then checks whether a specific command was received and generates output accordingly

import socket

SOCKPATH = "/var/run/lirc/lircd"

sock = None

# Establish a socket connection to the lirc daemon
def init_irw():
	global sock
	sock = socket.socket(socket.AF_UNIX, socket.SOCK_STREAM)
	sock.connect(SOCKPATH)
	print ('Socket connection established!')
	print ('Ready...')

# parse the output from the daemon socket
def getKey():
	while True:
    	data = sock.recv(128)
    	data = data.strip()

    	if (len(data) > 0):
        	break

	words = data.split()
	return words[2], words[1]

# Main entry point
# The try/except structures allows the users to exit out of the program
# with Ctrl + C. Doing so will close the socket gracefully.
if __name__ == '__main__':
	try:
    	init_irw()

    	while True:
        	key, dir = getKey()
        	key = key.decode() # This variable contains the name of the key
        	dir = dir.decode() # This variable contains the direction (pressed/released)
        	# Only print the name when the key is pressed (and not released)
        	if (dir == '01' and key == 'KEY_POWER'):
            	print ("POWER KEY PRESSED!")
	except KeyboardInterrupt:
    	print ("\nShutting down...")
    	# Close the socket (if it exists)
    	if (sock != None):
        	sock.close()
    	print ("Done!")
The script opens a socket and establishes a connection to an active LIRC daemon. As described above, LIRC does the heavy lifting of detecting and decoding IR signals. It then outputs the result to a socket. The Python script reads that output and parses it accordingly. Once that’s done, the parsed key name is checked. If it is the one for the power button, some output is generated. The user can exit out of the application with Ctrl + C. Doing so will gracefully close the socket connection.
Many other methods for decoding IR input signals exist. It’s also possible to read the output of irw, for example. Another alternative that can yield better results when the protocol is known is to directly sample and decode the raw timings from the IR receiver.
Sending IR commands with a Python script
Luckily, this step is simpler compared to reading an IR command. LIRC comes with a handy program that sends one of the pre-configured commands. Therefore, it’s possible to send IR commands from the command line by typing:
irsend SEND_ONCE fire-tv BTN_POWER
Note that the transmit overlay has to be loaded for the command to function. The first parameter is the name of the remote-control configuration file to use, and the second one corresponds to one of the pre-configured button names that were captured earlier with irrecord.
A custom Python script can now execute this command-line program from within the script:
import os

os.system("irsend SEND_ONCE fire-tv BTN_POWER")
Summary
Unfortunately, reading and sending IR signals from custom programs, such as Python scripts, is not as straightforward on the Raspberry Pi as it was on an Arduino. Many installation and configuration steps have to be done before LIRC is ready to receive and send data. Furthermore, the system is not as versatile and easy to work with. It, however, also comes with a few advantages. LIRC can, for example, be configured to execute commands and issue system-wide events when a certain button is pressed on a remote control. In this article, the stream of the LIRC daemon was used for reading data, and a tool that comes with LIRC was employed for sending data.
Recommended Reading
4WD Smart Car Kit for Raspberry Pi

Have questions or comments? Continue the conversation on TechForum, DigiKey's online community and technical resource.
Visit TechForum


 中国
中国