How to Get Started with Azure
2018-11-01 | By Maker.io Staff
As the world becomes increasingly interconnected, thanks to the internet and the rise of IoT devices, engineers and technical specialists are finding it difficult to manage the sheer amount of data. In this tutorial, we will learn how to sift through it all with Microsoft Azure.
What Is Azure?
This was a very difficult question for me, as many explanations and Azure advertisements use buzz words such as “load balancing” and “cloud computing” instead of a simpleton’s explanation. While this description of Azure may not be entirely accurate, this is the best explanation that I could come up with …

In the past, large computer systems called mainframes existed, which allowed businesses to run many different processes at the same time, collect and handle large amounts of data, and also provide time-sharing to users who needed either a more powerful computer or to offload processing from their computer. While these systems have proved to be invaluable, they also have some drawbacks. For one, only rich businesses can afford them, as they are very expensive. Secondly, they require a team of trained engineers and technicians to keep them working smoothly. Lastly, they are difficult to scale up, which can cause system downtime. It is these three points that Azure combats.
Azure, at its most basic level, can be thought of as a rentable mainframe system, whose power and capabilities can be scaled up and down very easily (flexible cost solution), and all the hardware changes are handled by Microsoft. You can use Azure to run a virtual machine, host web applications, gather IoT data, store databases, and much more. While many of the services provided by Azure may not benefit a hobbyist, they are definitely something that small business should consider if they cannot afford their own server, mainframe, or dedicated computer system.
What You Won’t Do with Azure
Before you get your hopes up, there are a few things you may need to realize about Azure. Unless you are willing to learn about complex transfer protocols such as MQTT and JSON, you will heavily struggle while using Azure with devices such as PIC microcontrollers (especially when creating device IDs and symmetric keys). Instead, devices such as the Raspberry Pi will be much easier to use with Azure, thanks to the premade libraries that already exist (especially since Python is supported).
Getting Azure
To use Azure and get to the dashboard, you will need to follow the following steps:
- 1. Register a Microsoft account.
- 2. Register an Azure account.
- 3. Login to Azure to see the dashboard.
Registering a Microsoft account is useful, as it will link with your Azure account. So, go ahead and create a Microsoft account by Microsoft’s website.
With your account made, you will then need to sign up for a free trial of Azure. Now, this step may make some users uncomfortable, as you need to provide debit/credit card details. However, so long as you select the free trial version, no money should be withdrawn from your account, and the card details are only there as a form of verification to prevent users from abusing the system (In other words, put your money where your mouth is!). I say should, but I cannot make a promise on behalf of Microsoft, but so far, I have not been charged for anything! To sign up for Azure, head to their website and CAREFULLY go through the sign-up pages.
Assuming that everything goes to plan, you should be able to login into Azure. You’ll then be presented with a dashboard similar to the one shown (I accidentally moved windows around, so there will be some slight differences).
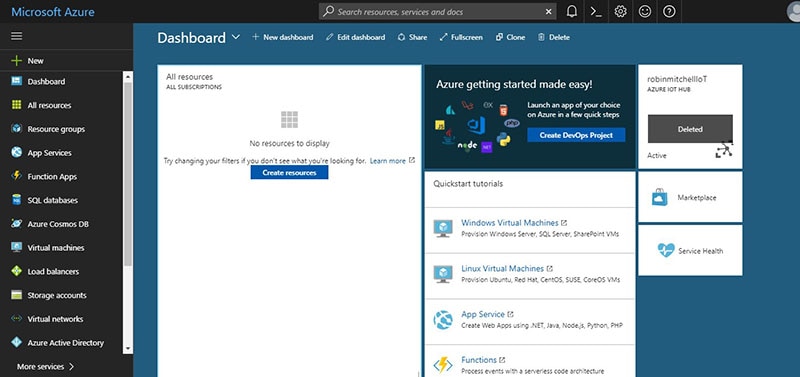
The Azure dashboard (Image source: -------Microsoft)
Creating a Resource: IoT Service
Azure offers so many different services, and covering them all in this article would be a mountainous challenge. Instead, we will learn how to create an IoT service, since this will be helpful for future tutorials. So, in the dashboard, click “New” and then type “IoT Hub” into the search bar. At this point, the IoT Hub service page should load. Then, click the blue “Create” button at the bottom of the page.

Clicking “New” will allow you to choose a new resource (Image source: -------Microsoft)

The IoT hub page (Image source: -------Microsoft)

The main create button (Image source: -------Microsoft)
When you create the service, you will need to provide some details, including its name and payment plans.
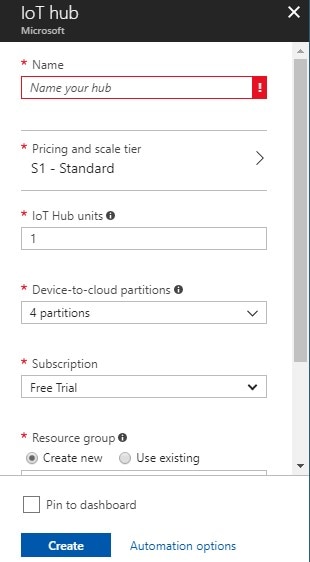
(Image source: -------Microsoft)
So, the first parameter will be its name. This name has to be unique! You will know if your name is valid if there is a green tick in the box.

Name (Image source: Microsoft-------)
The next option is the payment plan, and luckily for us, we can choose the free plan. This allows us to send 8,000 messages to the Azure system a day and have 1 unit. Select the free plan and then click the blue “Select” button.
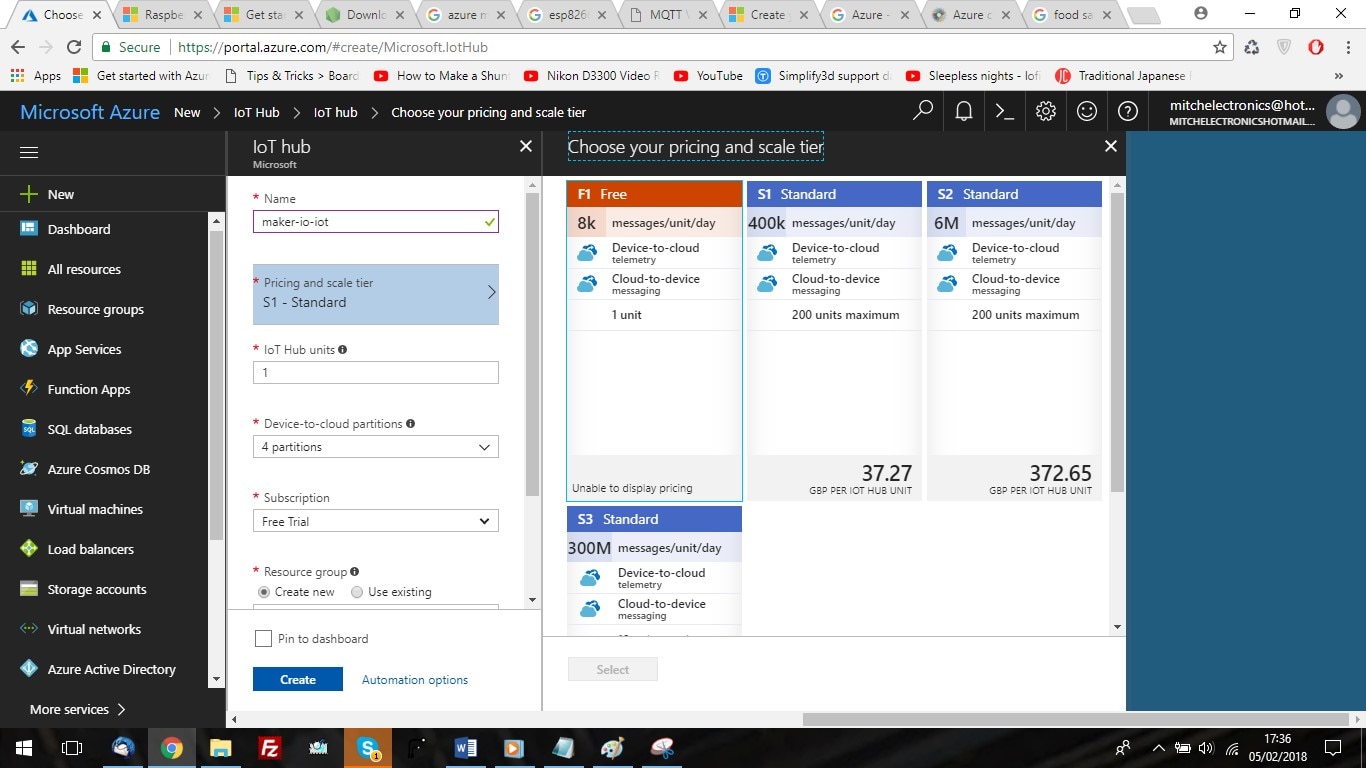
Selecting the free plan (Image source: Microsoft-------)
The last three options that we need to set are our subscription, the resource group, and our location. The subscription will be unchangeable (should be “Free Trial”), and we can call the resource group whatever we want. Try to get your location as accurate as possible. As I understand it, Microsoft will try to locate a data center close to you to limit ping and increase upload/download speeds. I live in Hampshire, so I just select “UK – South”.
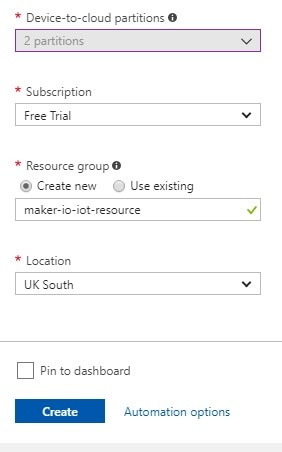
My final details (Image source: Microsoft-------)
With that done, select “Pin to dashboard” and then click “Create”. It may take a while for Azure to create the resource, and, according to Azure, some of the IoT features are not available due to my location. Once it has been created, you should be presented with the following page. At this point, you have just created your first IoT hub service with Azure!
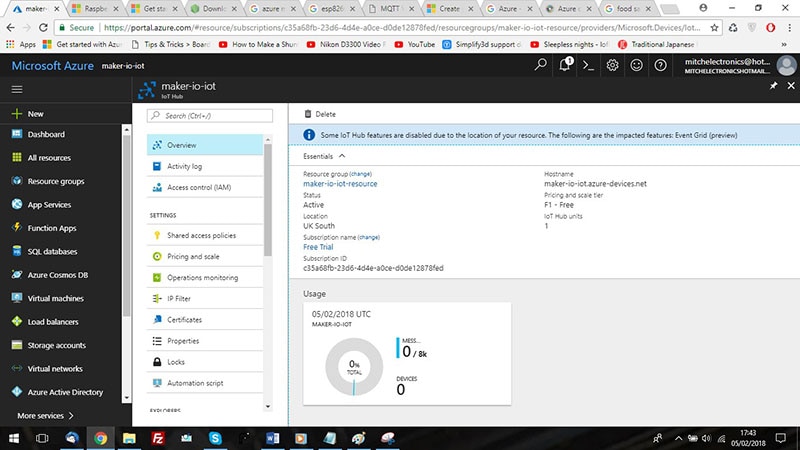
The created IoT hub resource (Image source: Microsoft-------)
Conclusion
In the past, home computers were very weak, and businesses used time-sharing systems to allow multiple users to have computer capabilities without giving a powerful computer to each employee. Then computers became powerful, and such mainframe systems became less important. Now, we find ourselves going back to the mainframe concept!
Azure has a stupendous amount of capability and power, and yet, it requires very little user interference for scaling, adjusting, and creation of services. While this is just the tip of the iceberg when it comes to Azure, this tutorial should help you find your sea legs when it comes to getting started with the program.


