Don’t Let ESD Give You a Shocking Experience!
2021-05-10 | By Clive Maxfield
When I was a junior engineer, I was schooled in the dangers of electrostatic discharge (ESD). Over the years, however, I must admit that I started to become a little blasé. I think part of this was due to my impression that the creators of modern electronic components had taken steps to protect them from ESD, which meant I no longer had to worry. I was wrong. Oh, so wrong.
We’re all aware of the concept of static electricity, of course: materials are made of atoms that are normally electrically neutral because they contain equal numbers of positively charged protons and negatively charged electrons. The phenomenon of static electricity involves a separation of these positive and negative charges. When two materials rub against each other—like when you walk across a carpeted floor—electrons may be transferred from one material to the other, thereby leaving an excess of positive charge on one material and a negative charge on the other. This is known as the triboelectric effect. Assuming an insulating medium between them—like rubber-soled shoes—the materials will retain this charge imbalance when they are separated.
This leads us to ESD, which occurs when you have accumulated a static charge, and inadvertently come too close to a conducting path connected to another potential, such as ground. It’s unfortunate if this conducting discharge path happens to involve the pin of an electrical component like a transistor, an integrated circuit (IC), or a light-emitting diode (LED) because it may easily transform that component into a non-functional version of its prior state.
The most spectacular ESD events involve a spark, accompanied by an audible “snap” or “zap”. However, a person can carry a relatively small electric charge that discharges without any sound or light effects and without them feeling it, but that can still be sufficient to damage sensitive electronic components.
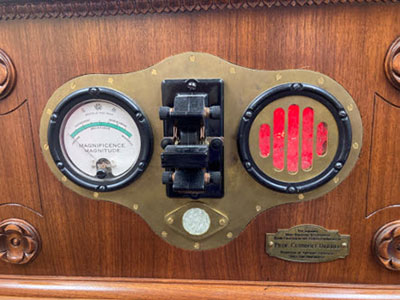
This brings us to one of my ongoing hobby projects: my Phantasmagorical and Pedagogical Prognostication Engine (don’t ask). This bodacious beauty purports to be powered by a small furnace, which is mounted on the right-hand side of the upper control panel (Figure 1).
 Figure 1: The upper control panel of the Prognostication Engine features a “Magnificence Magnitude” meter (left) and an LED-powered “furnace” (right). (Image source: Max Maxfield)
I implemented the heart of the furnace using 64 tricolored WS2818B LEDs in the form of NeoPixels cut from a 2970 strip containing 144 pixels per meter from Adafruit. I mounted these pixels in the metal case of a defunct analog meter, which matched the working “Magnificence Magnitude” meter mounted on the other side of the panel.
In hindsight (the one exact science), I should have created this furnace with the possibility of rework in mind. Sad to relate, once it was operating, thinking I would never need to open it again, I fixed everything inside the furnace using two-part epoxy.
The final effect with the LEDs flickering away accompanied by appropriate sound effects (see, How to Add Sophisticated Sound Effects to Your Hobby or DIY Projects) is really rather spectacular. I was so impressed, I bounced over to the next bay to invite my friend Ivan to come and bask in the glow of my fiery furnace. Unfortunately, this round trip was made over carpet. When we returned, Ivan had barely managed to utter his first “Ooh”, when I decided to touch the back of the furnace to see if the 64 LEDs were causing it to overheat (you’ll be happy to hear that this isn’t an issue because the brass panel acts as a giant heatsink).
If you’d asked me before if I’d even considered the possibility of ESD, I would have guessed that the metal meter case would have protected my LEDs. Sad to relate, I would have guessed incorrectly because—as I later realized—the case wasn’t connected to ground. As my finger approached the meter, there was an interesting “zap” and the furnace was no more. Did I mention that everything inside the furnace was attached using two-part epoxy? There was much gnashing of teeth and rending of garb that day, let me tell you.
As a result of all this, I quickly beefed up my personal antistatic protocols and precautions. I started by buying a large dissipative grounding mat like the 6672436 from ACL Staticide. I also purchased several antistatic wrist straps with associated cords, like the ECWS61M-1 combo from SCS, along with an equal number of ground plug adaptors, like the 09838 units from Desco. I thought it was obvious, but a friend who visited my office recently was surprised to learn that the alligator clips on the ends of the wrist strap cables can be pulled off to reveal banana connectors that can be inserted into the ground plug adaptors.
One point is that you can have all the antistatic pads and straps and ground plug adapters in the world, but they won’t do you any good if they aren’t grounded properly. In my case, I use power strips, whose LEDs provide a comforting glow, but you never know when the wall socket is faulty. So, I also splashed the cash for a power receptacle tester, like the RT210 from Klein Tools.
With regard to the Prognostication Engine, while wearing one of my new antistatic wrist straps, I immediately added a wire connecting the meter case and the brass panel to which it is attached to ground (Figure 2).
 Figure 2: The black wire on the right-hand side connects the meter case and the brass panel to ground. Also, the power and signal wires to the meter are now wrapped in conductive copper tape, which is also connected to ground. (Image source: Max Maxfield)
I also invested in a roll of sticky-backed copper tape like the 1181 X 1" offering from 3M. I used this tape to wrap around the power wires to the microcontroller development board, and also the power and signal wires to the meter case. In both instances, I added wires connecting the copper foil to ground.
Conclusion
On one hand, it’s easy to fall into bad habits, like becoming nonchalant about one’s antistatic protection procedures and protocols. On the other hand, it’s not overly onerous to learn from others’ bad experiences (always the best way), return to the fold, and start doing things properly again. You could, of course, wait until you’ve had to spend an inordinate amount of time fixing a problem that would never have occurred if you had employed sensible precautions in the first place.
I now keep all of my components in electrostatic pouches, and they only ever see the light of day if I’m wearing my wrist strap and they are on my antistatic mat. Also, I ensure that all parts of the system I’m building are grounded and that all of my cables are protected. Some may say I’m taking things to extremes, and this may indeed be the case, but—if so—I’m doing so with the satisfied smirk of someone who is no longer living in fear of another ESD event.


