Nightlight Using Common Household Items and an Optional Circuit Playground Express
2020-03-30 | By ASHLEY
Looking for a fun, simple project that integrates multiple STEAM objects? This is a good place to get started. I am going to lay out a project that could easily be done at two different skill levels. First, we will look at how to create a nightlight using a Circuit Playground Express (CPX) from Adafruit and a few other common household items. Then I will go over things you could swap the CPX out with if you are working with really young kids who may not understand the programming, OR if you are under lockdown like a majority of the country and just don’t have the capability of sourcing one.
Things you’ll need:
- Circuit Playground Express
- Jar (A clean plastic peanut butter jar would work great!)
- USB A to Micro (For programming and power to the CPX)
- A variety of fillers for diffusing the light (cotton balls, bubble wrap, wrapping tissue, tinsel, quilt batting, marbles, etc.)
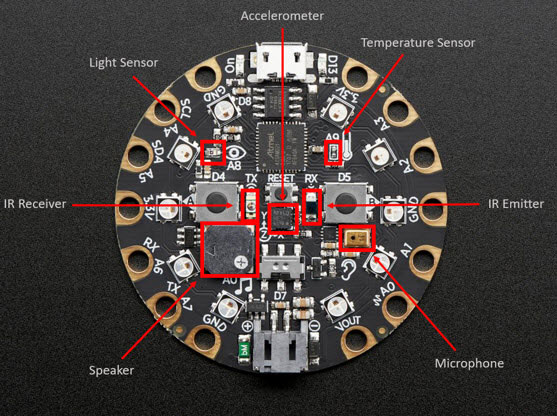
First, let’s go over a few basics of this board. The image below shows some of the sensors on this board that can be utilized while making the nightlight (or any other awesome project you have).
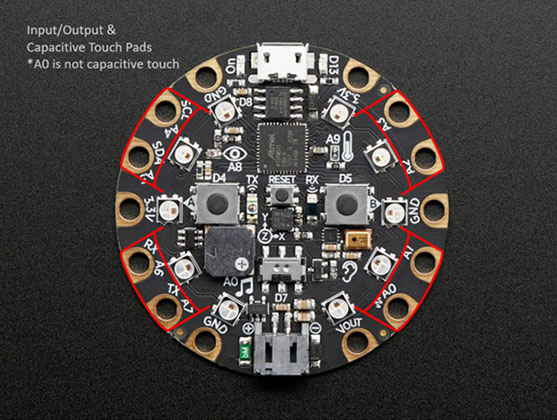
This second image highlights all of the GPIO and capacitive touch pads available for use. It’s important to note that A0 does not function as a capacitive touch input. It is reserved as a true analog output but can be used as a digital I/O or analog I/O.
For a full write-up of all the capabilities of this board and more of the technical specifications, please click here.
Now as far as programming, this board is quite versatile. For beginners or anyone familiar with a visual platform, it’s best to start with block programming: https://makecode.adafruit.com/. This is the platform we will be using in this demonstration. However, for more advanced users, this board can also be programmed using JavaScript, CircuitPython, or the Arduino IDE.
Once you have opened MakeCode, select “new project” and your screen should look like this:
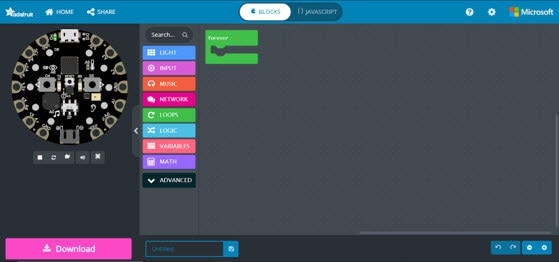
A few things to point out on here. The image of the CPX on the left is an emulator, so whatever you plug into your program will be displayed there. This will help you to know if the code you created functions before taking the time to download it to the actual board.
Second, all of the colorful buttons you see to the right of the emulator are the commands you can select to put out into the workspace where you will build your program. This is called the blocks toolbox. Please note that they are all color-coded. The forever block that’s currently shown in the workspace is green, which means it came from the “Loops” button.
If you have placed something into the workspace you no longer want, simply drag it over the blocks toolbox. You will see a garbage icon pop up, at which point you can drop it and it will be removed from the workspace.
You’ll notice at the top of the screen it says blocks, if you drag that over to JavaScript, the program automatically updates between languages for you. This provides an easy way for users to learn JavaScript.
Now, the key to this project is just to dive in and play with the code. Using the emulator, throw some random blocks in. Kids are typically easier to teach using this programming language than adults, simply because as adults we tend to wait for the next instruction and need to be driven to the final result. Kids, however, will just start and learn as they go.
The final code we used for this project is below, BUT there are so many things you could do with this. If you have a CPX at home, just experiment to see if you can come up with a final program that you like better than ours.
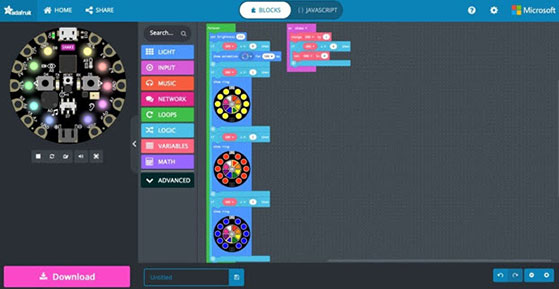
Once the code is complete, select the Download button in the lower-left corner of the screen. This places the code into the computer’s download folder. If you haven’t already, plug the CPX into the USB cable connected to the computer, then press the small, center reset button and all the neopixels should turn green. This places the CPX into programming mode and brings up a drive on the computer called CPlayBoot. Find the downloaded file and drag it into this new drive. It’s as easy as that to program the CPX.
Now that the CPX is programmed, let’s move on to the next piece of the project. To implement a thought-provoking science element, it is good to have multiple light-diffusing mediums to try. Each one will cause the light to look just a little different, and some don’t diffuse as well as the others. This would be a good time to think about why each medium affects the light in the way that it does. Is it too dense? Is there not enough in there? Is it diffracting the light instead of just diffusing it?
After the final medium is chosen and placed inside the jar, it’s time to decorate! Grab some craft paper, jewels, glitter, whatever you’d like and customize the outside of the jar. Then place the CPX at the opening and watch the nightlight glow!
One thing we did to make these more “permanent”, was to drill a hole through the lid and jar (while the lid is screwed on), then place the CPX on the inside of the lid using hook and loop with the USB connector facing the hole. This allows for the jar to be closed while still being able to plug in the CPX to power it on.
Now, I promised at the beginning of this guide that I would offer other options if you don’t have access to a CPX. Look around your house and find any light (that won’t get overly hot to the touch) that you could easily set the clear, sealed end of the peanut butter jar on. This could even just be your cell phone flashlight. A flat work light, a standard flashlight, honestly any light that you can place the jar over and still shut the room lights off. Using the resources available still helps to learn about light diffusion and the added benefit of art class, too.
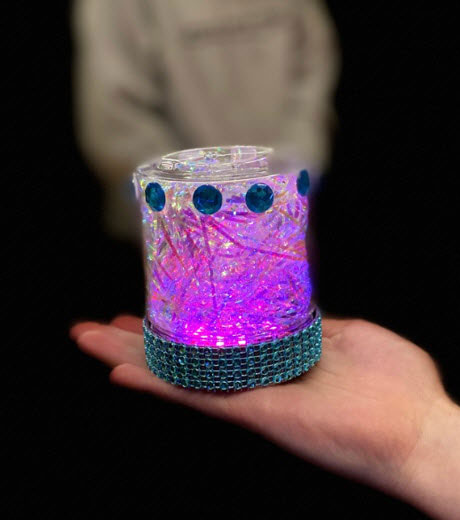
As a final note, I’d like to point out that even without a physical CPX you can easily teach yourself to program just using the emulator on the screen. While not the same as having the physical board in your hands, the functionality is all there. This project can be modified for multiple age levels with just a few simple tweaks. If you do recreate this or make it your own, please post it on social media, tag DigiKey, and use #MakeWithDigiKey so we can see what you’ve come up with!


