How To Establish a Wi-Fi Connection Using Atmosphere's IoT Studio
2019-07-25 | By Maker.io Staff
In the previous How-To, we learned the basics of getting an LED to blink on the Huzzah32 using Atmosphere’s IoT Studio. In this How-To, we will learn how to establish a Wi-Fi connection using the Huzzah32 and make a light turn on when this connection has been established.
BOM
Scheme-It

Wi-Fi
Wi-fi is one of the core technologies that enables the entire IoT industry. While other technologies such as Bluetooth are being used, Wi-Fi remains one of the best ways for a simple, low-powered device to access online resources. The Adafruit Huzzah32 integrates the ESP32 SoC, which is a Wi-Fi- and Bluetooth-enabled device, making it an ideal candidate for IoT-related projects. Therefore, it would make sense that we get the Huzzah32 connected to the internet so that we can start to use cloud functions such as storing data and retrieving commands. This How-To will not look at how to perform cloud functions but instead how to connect a device to the internet as a prerequisite for future work.
Create a New Project in the IoT Studio
The first step in using the Wi-Fi connection is to create a new project, which is done by first clicking the net symbol on the left panel on the Atmosphere IoT Studio and then New Project. Also, make sure that you select the Huzzah32 as the device, but this time also make sure to change the name of the project to something memorable, since we will come back to this project later. In this case, we will call this project “Our First IoT.”

Insert Wi-Fi Element
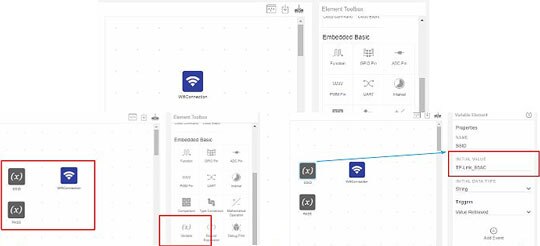
The first element that we will add to our program is the Wi-Fi Connection element. This allows us to connect to a Wi-Fi network as well as perform actions depending on the status of the connection. This is very useful in situations where an IoT device could be made to alert a user if the internet connection has been broken (such as flashing an LED or sounding a buzzer). When the element is created, drag it to the middle of the canvas.

The Wi-Fi element cannot connect to a Wi-Fi network itself and requires some information including the name of the network and the password. Therefore, we need to place two Variable elements to the left of the Wi-Fi Connection element. One of these elements will be called SSID and the other will be called PASS. Select the SSID element and set its value to the SSID of your Wi-Fi network (for example, mine is TP-Link_B5AC). Select the PASS element and set its value to the password of your Wi-Fi network (for example, mine is 93080422).
Connect the Elements
The next step is to connect the two Variable elements to the Wi-Fi Connection element. When this is done, you will need to select each of these arrows and make sure that the SSID arrow has the “Set SSID” ability while the PASS arrow has the “Set Password” Ability.

Blink the LED on the Huzzah32
As soon as the Huzzah32 turns on, it will establish a Wi-Fi connection, but how do we perform actions once this connection has been established? This can easily be done with another connecting arrow from the Wi-Fi Connection block to any other element, but we can also check for no connection too! For now, we will create a blink example with an interval and GPIO block (as seen in the previous How-To), but this time the interval will be triggered by the Wi-Fi Connection element.

If we select the arrow that connects the Wi-Fi Connection to the interval element, we must ensure that the Triggers property is set to Connected.

Compile, Program, and Test
Now that the program has been designed, it’s time to test it! The first step of testing is to make sure that your Huzzah32 is connected to your computer via a micro USB B cable and that it is a recognized device. You will also need to check that the Atmosphere IoT agent is working in the background (check your icon tray for the Atmosphere IoT Agent icon); otherwise, Atmosphere IoT Studio will just give you a ZIP file instead of downloading the program to the device. Save your project by clicking the save icon (next to the compile icon), and click compile. Once compiled, click the Download Firmware button and select your device as well as your download speed. If all goes to plan, after a brief time you should see your Huzzah32’s LED flashing, indicating that it has successfully connected to your local network!


 中国
中国