What low calorie dessert includes an array of white sprinkles on the side?
2017-10-18 | By John LeDuc
Wireless Wifi Displays Raspberry Pi SBC
The answer – the Raspberry Pi Zero W (W = WiFi and Bluetooth on board) coupled with Pimoroni’s Scroll Bot hat which displays a 7 x 17 row of white LEDs. By the way, if you have never used a Raspberry Pi, there are a few things you will need to set up first before being able to proceed to play with it. First there is a general guide to getting started with the Raspberry PI. Also, another good article is "10 Things to Know Before Starting a Raspberry Pi Project".

Scroll pHAT HD has several white LEDs in a 7 X 17 array - Part No.1778-1107-ND
Anyway... we displayed this at Maker Faire New York 2017 scrolling a message "#Make with DigiKey!!!"
The Pimoroni website has good instructions to assemble the physical aspects of the Scroll Bot.
My overall experience of soldering, getting the Linux operating system installed and creating a few lines of Python code to scroll a message, goes like this:
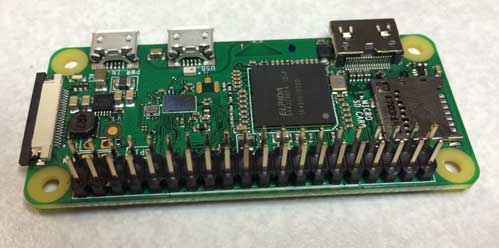
First I soldered the dual row header onto the PI as shown below:

Next the female header was soldered onto the Scroll PHAT HD as shown below:

After that I had to get Raspbian (Raspberry Pi’s Linux operating system software) put onto an 8G or 16G micro sd memory card. You can download it from the Raspberry Pi site (which is what I did). Another option for beginners is to either download NOOBS or purchase it already on a 16G micro sd card (DigiKey’s part number is 2648-SC0252L-ND). NOOBS stands for New Out Of the Box software and it contains Raspbian and other operating systems you can choose to have installed onto an sd card - which will go into the Raspberry Pi Zero W once installed. Helpful tib-bits I used to make things go faster when installing the software.
- I downloaded SD Memory Card Formatter – Sometimes it is necessary to format a new unused SD card (like to the FAT32 format) to make it compatible for use. I used this to format my sd card (note that this will erase everything on your SD card if you use it, which for me, was ok).
- I downloaded a handy tool to put the Raspbian image properly onto my SD card called Etcher.io. After Etcher is installed and you have your SD Card formatted and in the card slot ready for programming, simply click the Etcher icon, select the desired image (most likely the newest one under your downloads folder), then click the select drive (to make sure it’s targeting the SD Card you are using for your PI), and finally click Flash. It will take a while and go through some verification and after a few minutes it should be completed. It doesn't get any simpler than this. Properly eject the SD card from your computer and insert into your Raspberry Pi Zero W.
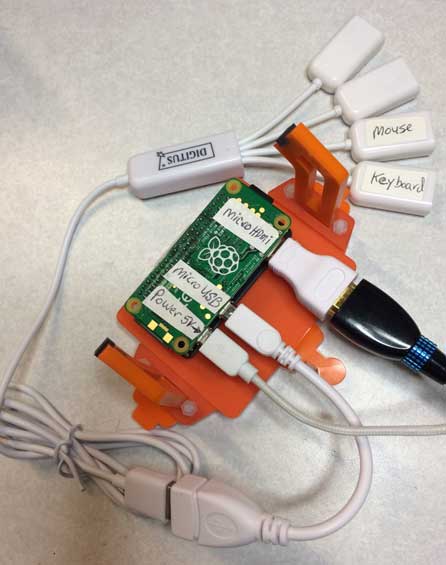
- There are adapters included with the kit, so next I used the micro HDMI to connect to a standard HDMI for connecting to a monitor. We used the micro USB adapter to connect to a standard USB hub (multiple standard USB slots, DigiKey Part No. AE10699-ND) for hooking up a mouse and keyboard (see figure below).

Next I powered up the Pi Zero using a micro USB 5 Volt wall transformer. The monitor revealed a Raspberry PI logo in the upper left of the screen and after a few moments the Raspbian operating system came up (looking something like a Windows type of environment). From there I clicked on the terminal icon at the top of the screen and typed in “python”. You should see the terminal screen showing 3 greater than symbols (i.e., >>>). Then I typed in the following code:
import scrollphathd as sphd
This basically imports the code for controlling the LED matrix with python.
Try typing in the following code:
import time
sphd.rotate(180)
sphd.write_string(‘#make with DigiKey!!!...’)
while True:
sphd.show()
sphd.scroll(1)
time.sleep(0.05)
and press the return key twice. You should see the words #make with DigiKey!!!... scrolling to the left.
To stop the scrolling, press the CTRL and C keys. If you want to simply clear the display to show nothing, type:
sphd.clear()
sphd.show()
To exit python press CTRL D.
I found the assembly and loading of software was an easy and fun experience.
The Pimoroni site has a lot more showing how you can control the scroll display with python code.
Check it out at learn.pimoroni.com/scrollbot.

Scroll Bot Pi Zero W Project Kit part number 1778-1121-ND


 中国
中国