Using Bluetooth Low Energy Wireless to Control a Robot Car
投稿人:DigiKey 欧洲编辑
2016-07-28
The latest Bluetooth 4.2 Low Energy (BLE), also called Bluetooth Smart, is built for the Internet of Things (IoT). The native support for Bluetooth technology on every major operating system enables easy mobile application development.
Using PSoC Creator 3.2, Xcode 6 and the Swift app development environment, an app can be developed to handle a simple remote control car using an iPhone, demonstrating the use of GATT profiles and GAP peripherals in embedded BLE system development. The car is built from two motors and an H-bridge with quadrature encoders and the PSoC4200 BLE device from Cypress Semiconductor.

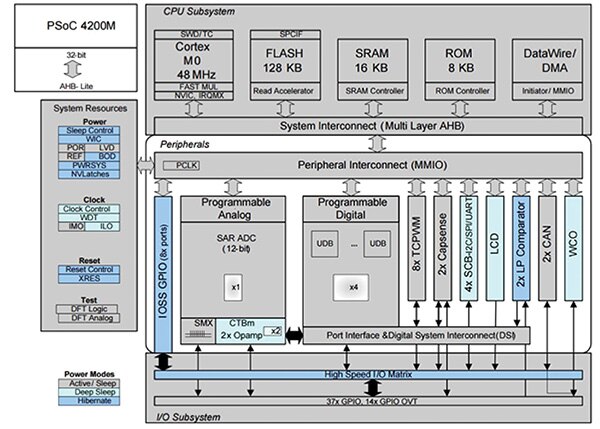
Figure 1: The PSoC4200 from Cypress Semiconductor can be used to control a robot car using Bluetooth Low Energy 4.2.
The project starts with a simple LED and touch pad control that indicates the state of the connection. The initial CAPSense slider is used to control a red LED, with a blue LED for when the board is not connected.
Creating a new project for the PSoC4100 BLE, the components can be added to a simple schematic. The BLE component is added to the graphics design tool and linked to the CapSense component. A PWM is needed to drive the LEDs and because the blue LED is active low the PWM needs to be inverted, so a NOT gate is used from the library.
The PWM configuration needs to be single output and needs a clock component from the library. The clock is configured to 1 kHz for a blinking LED. The reset is attached to a logic low (as it is an active high), and changing the name of the PWM makes it easier to interface to. The project adds a linear slider to handle the five sensors on the evaluation board.
Configuring the BLE component in the schematic requires a custom profile, and the board acts as a GATT server with a GAP (Generic Access profile) peripheral. The iPhone is the GAP Central talking to the board as the GAP peripheral to make the connection.
The GATT server is a database on the BLE that stores the information that is shared with the iPhone as a GATT client.
Customizing the profiles is essentially creating the GATT database, creating a custom service for the LED and the CapSense; and these have UUID (Universally Unique ID) so that the iPhone can find this service. This gives the ability in the firmware to talk to that service. The 1-byte LED characteristic represents the state of the LED that can be written and read remotely so both read and write flags need to be activated. The CapSense characteristic (in an unsigned 16 2-byte format) is only readable, not writable remotely. In order to be notified when there are changes the notify flag is activated. Custom human-readable notifications can be added at this point.
Each characteristic needs a 128-bit UUID, and the Creator tool gives it a default value that can be modified at the least significant bit.
The GAP settings include the name of the device and the advertising settings. In this example, it advertises all the time by switching off the timeout. Inside the advertising packet that is sent out every 20 to 30 ms there is information to help identify the device, such as the name of the device and the service it has available.
With the BLE, CapSense, PWM and LED set up, the pins need to be set up. The first pin to set up is the modulation capacitor for CapSense at port 4, pin0. The CapSense slider is then attached to the P21 to P25 pins on the board. The Blue LED is connected to Port3 pin7 and the RED LED to port2, pin6. The tool then automatically generates the application ready for the firmware.
Firmware
Using Xcode to implement the firmware in the Github project, the first variable is an unsigned global variable that represents the state of the LED, while the second is the CapSense notification.
The update_LED function updates the GATT database with the current state of the LED. If the BLE is connected (from the GetState function) then the CYBLE_LEDCAPSENSE_LED_CHAR_HANDLE reads the value of the pin and inverts it as the LED is low. The 1-byte is written into the database with the GATT WriteAttribute function. This can be called anywhere in the source code to read the state of the LED.
The next function is the same thing for CapSense. This uses the CYBLE_LEDCAPSENSE_CAPSESNE_CHAR_HANDLE and a 2-byte value into the GATT database. This also uses the notify function in BLE, so when the CapSenseNotify variable changes, a notification is automatically sent.
The next thing is a BLE event handler. This handles all the events that come from the BLE such as the stack turning on or disconnected. This uses the blue LED to show that the connection is occurring or shutting down, so these calls trigger the PWM and update the GATT database with the state of the LED and the CapSense value. That is handled automatically by the stack firmware.
The next event is a write event, which is called when the remote side wants to write into the GATT database. Here, the stack gives the characteristics that need to be written.
All this can then be compiled using Xcode for the device.
Robot
Building the car itself is relatively simple as the two motors are connected to an H-bridge that is mapped onto contiguous pins on the board. Switches on the device show up in the app, and the speed of each motor can be controlled from the app to steer the car.

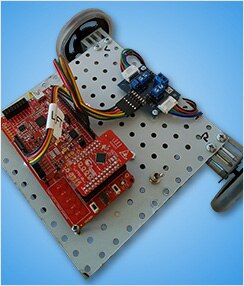
Figure 2: The robot car board combines a BLE chip with two wheels and an H-bridge.
There are four key characteristics, the tachometer for left and right motors using the quadrature encoder, and two PWMs to drive the two motors. There are two switches on the iPhone to switch the characteristics quickly to zero.
The schematic has similar elements to the initial LED project. The PWM is simple with a period of 100 and a compare of 50 with a duty cycle of 100 to map the 0 to 100 scale on the iPhone. The quadrature encoder uses the TCPWM, which can decode quadrature signals from each of the left and right pulses in 1X mode so that it counts the pulse rather than the leading and falling edges.
The PSoC pins are sufficient to power the H-bridge directly, and the other pin is the software-controlled switch to control the direction of the motor via the software. The last thing is a PWM for the LED connection.
The quadrature encoders count 64 pulses per revolution, and every 187 ms an interrupt is triggered to find how many pulses have occurred and scaled to give the RPM number.
The custom MOTOR_SERVICE profile has four characteristics as 8-bit integers that are writable and readable, from -100 to +100 for speed left and speed right. This also includes a human-readable form and notifications. This updates the GATT database and sends out the notification.
The BLE is the peripheral with the name of the robot and motor service UUID. This simplifies the connection process.
The firmware is generated from the tool, with the notify flags, left and right tachometer values, and the left and right speed. An ISR is triggered every time the button to the board is pressed to switch off the motors, and the speeds are stored in the GATT database.
The next stage is to link the firmware to the smartphone app.
Building the app
Building the iOS app in Swift has two view controllers that are explained in the Cypress Academy. The first is a table view controller, which displays all the devices that the phone can see. When that class starts, it relays all the devices that match the services it has heard. In this case there’s only one remote control car so there’s only one thing in the table, but this can be used to control a number of peripherals.
The second view controller is the remote control itself. This uses two labels for the left and right tachometers and two switches for all stop on the left and right motors. There’s a picker view that goes from -100 to +100 for the left and right motors.
The model has three classes:
- RCcar.swift, which keeps track of the connection and the speed of the left and right motors;
- BT.neighborhood class that keeps track of devices.
- The BLE connection class handles the connection so that the RC object will have a neighborhood that it is associated with and the connection. The class registers the fact that it is interested in changes, and sets the picker to the two sliders.
The last thing that happens is if the tachometer is updated, then it updates the left and right text values on the screen. Before the view disappears you need to disable the device and the connection when the back button is pressed. These are all connected to the firmware via the Application Programming Interface (API) in Swift.
Conclusion
The combination of the latest Bluetooth Low Energy 4.2 technology in the PSoC 4100 device with a simple H-bridge, motors and encoders enables a simple iPhone app to be easily developed. Using the latest versions of the PSoC Creator, Xcode and Swift development tools allows developers to create the schematic, the firmware and the app for the robot.
References

免责声明:各个作者和/或论坛参与者在本网站发表的观点、看法和意见不代表 DigiKey 的观点、看法和意见,也不代表 DigiKey 官方政策。


 中国
中国