制造商零件编号 3801
GEARMOTOR 120 RPM 3-6V BI-METAL
Adafruit Industries LLC
License: Attribution
Motivation to relax
When it comes to Zen gardens, I have never really played with them much or thought much of using them. Recently, I was scrolling through social media and saw a project where someone had an automatic Zen garden that used a 3d printer to draw in sand. After some Google searching, I saw some other makers who made similar ones that were rotational. That is where I got the idea that I could practice basic motor control and create this project that goes through my whole design process from beginning to end.
What I ordered from DigiKey
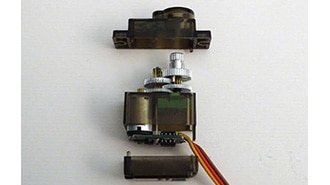
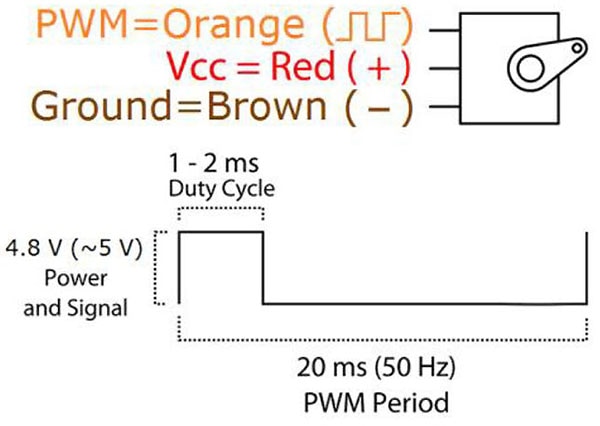
I included a parts list at the bottom of this post, but the key to this project is the 555 timer, the potentiometer, and the motor.
The 555 timer allows me to generate a signal that could control the motor without writing ANY software or programming ANY controllers.
The potentiometer serves as a way to adjust the speed of the motor in real-time.
The motor is ideal for this use since it is a 90-degree output from the original input shaft, and it is geared down to spin at much lower speeds.
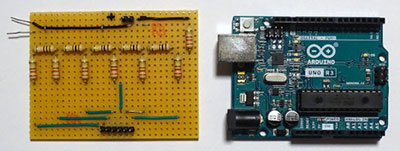
The schematic! Featuring DigiKey's Scheme-it design software:
Here is the schematic I am following for this project. As you can see, it is pretty simple and can be made on a simple breadboard or Digikey Solderful breadboard like I will be doing. The key here is adding the diode across the motor facing the positive connection. As a motor spins, it builds up magnetic energy and electrical energy in the form of a magnetic field. Under normal conditions, this isn't a problem, in fact, it's necessary. Unfortunately, when the power is removed from the motor, it creates a large changing electric field and thus a large change in current. This change of current builds up and results in a large voltage spike that almost always damages the control electronics. From there, this schematic is pretty straightforward and can be made on any small breadboard. Feel free to give it a shot yourself.
Once I assembled the circuit, I used the oscilloscope and power supply to measure the circuit. In my video above, I encourage you to take a look at my explanation of the circuit. In the video, I discuss how the circuit works and give a visual!
Designing the enclosure:
The next step of the project is to design the controller. Since I have a 3d printer, I am able to print off iterations of the design and change things as I go. This is the part of the project I encourage you to make your own little twist to; here are some examples!
I made my rake have 2 different patterns that offset each other in the video; can you make yours flat on one side?
What other patterns can you make with your rake?
I thought it could be fun to design a rake that wasn't flat, maybe it would be cool to have an S-shaped one! Could you use a different motor to make the sand garden spin even slower?
How else can you be creative?
My overall design process is as follows for the enclosure:
Design the motor so I have something to work off of.
Design the upper part of the enclosure that will hold the sand.
Design a way for the sand to not fall down into the motor.
Design a way to hold the circuit board and to hold the power cord.
The beauty of this project is its simplicity. I encourage you to make it your own if you decide to make it yourself. You could even use the circuit to control a motor for different projects!
I hope this project inspired you to start a weekend project of your own. All in all, it took about 3 days of work for me to finish this project, so I would say it's doable for someone to complete in a pretty short time. If you decide to make this or something similar, I would recommend you use it as a project where you design it mostly yourself. It's great to work through your design process sometimes and challenge yourself in new ways.
Until next time, my name is Will, and I hope you have a great time making.