制造商零件编号 PTS-00154-211
NRF24L01+ SHIELD FOR UNO KIT
PTSolns
License: Attribution Microcontrollers Other RF Wireless Arduino
In this project, we will be making a simple communication network using the Nordic nRF24L01+ set of RF modules. We will be making two nodes: a transmitter node (TxN), and a receiver node (RxN). The TxN consists of an Uno (more on that below), with the NRF-Shield. Also connected to it is the Sparkfun BME280 module via QWIIC to gather temperature data. The RxN also consists of an Uno with an NRF-Shield. However, it has an LCD connected to print out the transmitted temperature data.
To keep this project fairly simple we will impose the following restriction:
The communication is purely one-way, meaning the TxN blindly sends the temperature data without regard to whether the RxN got it or not. The RxN does not communicate back with the TxN. In fact, it does not even send an acknowledgment (ACK). This simplification does come at the expense of the robustness of the RF communication. We'd expect some packet loss or intermittent reception. Note that the nRF24L01+ modules are capable of sending ACK messages. We are just omitting this here to make the code simpler.
Below we will outline in detail the hardware setup of the TxN and the RxN, and then the software. As with most things, the software is (in our opinion) more difficult than the hardware, and so we will use ChatGPT to write the scripts for us.
The job of the TxN is to gather data and send it out at regular intervals.
The hardware connections for this node are very simple. In fact, because we are using the NRF-Shield, most of the connections are done for us. We simply have to set the hardware configuration settings on the shield. For this project we only need to worry about three such settings on the shield:
The VCC Pin
The CSN Pin
The CE Pin
The VCC Pin determines how the nRF24L01+ modules get power. We set it to "3V3" by simply soldering across the respective jumper pads. The CSN Pin can either be D10 or D9, we choose D10 for no reason other than to demonstrate its use in the code. Similarly, the CE Pin can either be D8 or D7 and we choose D7. The reason the NRF-Shield has these hardware configuration pins available is in case, for example, pin D10 is used elsewhere in the project, maybe another shield in the stack. This provides more flexibility and compatibility.
Soldering the respective jumper pads is easy. A short video on how to solder such pads can be found here.
Note also that we've made a full tutorial on the NRF-Shield, which can be found here.
Finally, we recommend that first-time users check out the NRF-Shield datasheet, which can be found here.
The Nordic RF modules (well the ICs are by Nordic, and the modules are from various other makers) are fantastic. They are low-cost, easy-to-use, there exists a ton of online resources, and are just great. Perfect application for any home and hobby setting, or quick prototyping. These modules come in three common form factors: The mini, the standard, and the +PA+LNA.
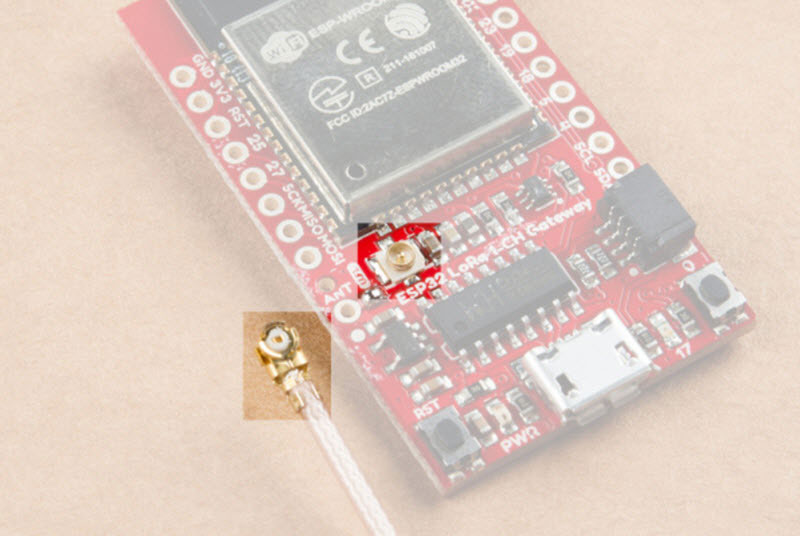
For the TxN, for no other reason than to demonstrate the usage, we picked the nRF24L01+PA+LNA. It has the long SMA-connected antenna and looks pretty neat. We are not using the amplification part of this module, and in fact are setting the power output to minimum. What we want to show is that on the NRF-Shield is an "NRF Interface" footprint that can accommodate any of these three common footprints. What's even neater, for the larger one, the +PA+LNA, we have included two small 1x2 Pin female header pins to give the module a better mechanical hold onto the board. Otherwise, the antenna end would float in mid-air and be wobbly.
We picked this module for one reason, and one reason alone. It was laying closest to us on our desk when we made this project. Well, not quite. Sparkfun's BME280 module is a great module and they made an easy-to-use library for it. What we particularly like about this module is that it uses the Qwiic connect system. We simply plugged in the modules with the Qwiic cables and that's it. What's not to love!
For more information on Sparkfun's Qwiic system, the user is encouraged to check out this link.
The NRF-Shield is compatible with a range of microcontroller boards that have the Uno form factor. We could choose the original Arduino branded one, or any other that fits the bill. However, particularly for this transmitter node we wanted to use the Qwiic connector system, and so the PTSolns Uno R3+ was ideal as it has such a connector onboard. We simply plugged the BME280 sensor into the Uno R3+ and the hardware setup was done!
The job of the RxN is to listen to the TxN, and when it gets data display it on the LCD.
Again, we are using the NRF-Shield. We could keep all the exact same hardware configuration settings as was done in the TxN. But for demonstration purposes we went with CSN on Pin D9 and CE on Pin D8. Any combination would have been fine as long as it is reflected in the software later.
Note that we also needed to include a 4-Pin 2.54mm screw terminal to connect the LCD to.
For the RxN we picked the standard form factor of the nRF24L01+ modules. Again, this was done only for demonstration purposes and any other would have worked equally well. Note that since we are not using the +PA+LNA package that has the antenna, we do not need to install the 1x2 Pin female headers to provide that additional mechanical support. The single 2x4 Pin female header does the trick.
To display the temperature data, we went with the common and popular 2004 LCD. The 1602 would have also worked fine, but we had a 2004 laying around. Note that we connected the LCD via I2C to reduce complexity in wires. This was done using the PTSolns I2C Backpack. What's great about this I2C Backpack is not just that it works for both 1602 and 2004 LCDs, it also works for both 3.3V and 5V input. So, it is very flexible (think connecting the LCD to a 3.3V microcontroller...). The I2C Backpack has several unique features, and we recommend first time users to check out the datasheet, which can be found here.
Finally note that the I2C Backpack comes with a custom library, which can be found here, or simply type in "PTSolns_I2CBackpack" into the Arduino IDE Library manager and install it from there.
Here, we chose to use the original Arduino Uno R3 simply to demonstrate that the NRF-Shield also is compatible with this very popular development board. Nothing else to say about that... just stack the shield and go.
With the hardware set up, we now focus on the software. We are too lazy to write code all day, so we used ChatGPT to write the following script for us. We made use to use the following key points when prompting it to write the script:
For the TxN set CSN to Pin D10 and CE to Pin D7. Also tell it what sensor module you're using (BME280) and what data you want to send (temperature).
For the RxN set CSN to Pin D 9 and CE to Pin D8. Also tell it about the I2C Backpack (the library) and how to display it.
For both nodes set the power to minimum.
Add debugging messages via the Serial Monitor.
Put all the user-defined variables at the very top of the code (just because we like it this way).
Transmitter Node (TxN)#include <SPI.h>
#include <RF24.h>
#include <Wire.h>
#include <SparkFunBME280.h>
// NRF24L01+ Configuration
#define CE_PIN 7 // Chip Enable
#define CSN_PIN 10 // Chip Select Not
#define CHANNEL 76 // Default channel
// Create NRF24L01+ instance
RF24 radio(CE_PIN, CSN_PIN);
const byte address[6] = "00001";
// Create BME280 sensor instance
BME280 sensor;
void setup() {
Serial.begin(115200);
Wire.begin();
Serial.println("Initializing NRF24L01+");
if (!radio.begin()) {
Serial.println("NRF24L01+ initialization failed!");
while (1);
}
radio.setChannel(CHANNEL);
radio.setPALevel(RF24_PA_MIN); // Low power mode
radio.openWritingPipe(address);
radio.stopListening();
Serial.println("NRF24L01+ initialized");
// Initialize BME280 sensor
Serial.println("Initializing BME280 sensor");
if (sensor.beginI2C() == false) {
Serial.println("BME280 not detected!");
while (1);
}
Serial.println("BME280 sensor initialized");
}
void loop() {
float temperature = sensor.readTempC();
Serial.print("Sending Temp: ");
Serial.println(temperature);
bool success = radio.write(&temperature, sizeof(temperature));
if (success) {
Serial.println("Transmission successful");
} else {
Serial.println("Transmission failed");
}
delay(1000); // Send every second
}Receiver Node (RxN)#include <SPI.h>
#include <RF24.h>
#include <Wire.h>
#include <PTSolns_I2CBackpack.h>
// NRF24L01+ Configuration
#define CE_PIN 8 // Chip Enable
#define CSN_PIN 9 // Chip Select Not (corrected)
#define CHANNEL 76 // Default channel
// Create NRF24L01+ instance
RF24 radio(CE_PIN, CSN_PIN);
const byte address[6] = "00001";
// Create LCD instance
I2C_LCD LCD;
// Buffer to store last 4 temperatures
float tempBuffer[4] = {0, 0, 0, 0};
void setup() {
Serial.begin(115200);
Wire.begin();
Serial.println("Initializing NRF24L01+");
if (!radio.begin()) {
Serial.println("NRF24L01+ initialization failed!");
while (1);
}
radio.setChannel(CHANNEL);
radio.setPALevel(RF24_PA_MIN); // Low power mode
radio.openReadingPipe(0, address);
radio.startListening();
Serial.println("NRF24L01+ initialized and listening");
// Initialize LCD
Serial.println("Initializing LCD");
LCD.begin(0x3F);
LCD.print("Waiting for data...");
Serial.println("LCD initialized");
}
void loop() {
if (radio.available()) {
Serial.println("Data available");
float temperature;
radio.read(&temperature, sizeof(temperature));
Serial.print("Received Temp: ");
Serial.println(temperature);
// Shift old data down
tempBuffer[3] = tempBuffer[2];
tempBuffer[2] = tempBuffer[1];
tempBuffer[1] = tempBuffer[0];
tempBuffer[0] = temperature;
// Display on LCD
LCD.clear();
for (int i = 0; i < 4; i++) {
LCD.setCursor(0, i);
LCD.print("Temp: ");
LCD.print(tempBuffer[i]);
LCD.print(" C");
}
} else {
Serial.println("No data available");
}
delay(500);
}
This project was intended to show the basics of how to get a simple RF communication network going. It only included two nodes arranged in a one-way communication direction. This makes things simpler, but less robust. The user is encouraged to add acknowledgements so that no data packets are potentially lost. The user can also make this two-way communication so to add logic such that when a certain temperature is reached the node containing the LCD (no longer just a "Receiver Node") flashes an LED, or maybe alerts the user in some way. This would be useful in applications such as greenhouses, for example.
There are many ways to expand on this project. Only the imagination is the limit! For any questions or comments please contact us. All documentation and supporting materials are available on our Documentation Subdomain: docs.PTSolns.com.