Introduction to Zephyr Part 2: CMake Tutorial
2025-03-13 | By ShawnHymel
If you’ve done any C or C++ development, you’ve likely come across CMake. CMake is a powerful, open-source, cross-platform build system generator. Instead of forcing you to learn a specific build system like make or ninja in detail, CMake allows you to write a single set of configuration files that can generate the appropriate build system files for your environment. This approach simplifies your build process, helps keep your project structure organized, and makes your code more portable across different operating systems and platforms.
Previously, we installed Zephyr and ran a simple blinking LED demo. In this post, we’ll dive into the basics of CMake: why it’s useful, a simple “hello, world” sample application, and how to use it with Zephyr. By the end, you should feel comfortable setting up and building your own CMake-based project.
All example code and solutions for this series can be found in this repository: https://github.com/ShawnHymel/introduction-to-zephyr/
What Is CMake and Why Use It?
CMake is often described as a “meta” build system tool. Instead of building your project directly, CMake uses your configuration files (called CMakeLists.txt) to produce build system files. These output files can then be read by common build tools (like make, ninja, or even IDEs like Visual Studio or Xcode) to compile and link your project.
CMake is cross-platform, providing true portability, and it works with a wide array of build systems, like make and ninja. It is also scalable to large projects (like Zephyr), and it is widely used in industry for software and firmware projects.
CMake Example
You can install CMake on your local machine (use your OS’s package manager or one of the installers here), or you can run the Docker image from the Zephyr course’s GitHub repo (we showed how to run the image in the previous tutorial).
CMake configurations revolve around a file named CMakeLists.txt. Every directory with source files you want to compile typically has one. The top-level CMakeLists.txt file describes minimum CMake versions, project names, and the targets (executables, libraries) you’d like to build.
Note that we will demonstrate CMake 3.20 in this tutorial. You can reference the API documentation here: https://cmake.org/documentation/
We will start with a simple “Hello, World!” application to demonstrate the bare minimum for using CMake. Here is our directory structure:
02_demo_cmake/
├─ include/
│  └─ my_lib.h
├─ src/
│  ├─ my_lib.c
│  └─ main.c
└─ CMakeLists.txt
The Header File: my_lib.h
We’ll start by creating a simple header file that declares a single function say_hello().
File: 02_demo_cmake/include/my_lib.h
#ifndef MY_LIB_H
#define MY_LIB_H
void say_hello();
#endif
What’s happening here?
- We define a header guard #ifndef MY_LIB_H / #define MY_LIB_H to prevent multiple inclusions of this file.
- We declare a single function say_hello() that we will implement in our library’s source file.
The Library Source File: my_lib.c
Next, we define say_hello() in our library source file. This function will print a line of text to the console.
File: 02_demo_cmake/src/my_lib.c
#include <stdio.h>
#include "my_lib.h"


void say_hello() {
    printf("Hello, world!\r\n");
}
Key points:
- We include <stdio.h> for the printf() function.</stdio.h>
- We include "my_lib.h" so the compiler knows the function signature.
- say_hello() prints “Hello, world!” followed by a carriage return and newline.
The Main Executable Source File: main.c
Our main() function calls say_hello().
File: 02_demo_cmake/src/main.c
#include "my_lib.h"


int main() {
   say_hello();
   return 0;
}
What’s happening here?
- We include "my_lib.h" which gives us access to say_hello().
- main() simply calls say_hello(), and then returns 0, indicating successful execution.
The CMake Configuration: CMakeLists.txt
This is where the magic happens. Our CMakeLists.txt ties it all together.
File: 02_demo_cmake/CMakeLists.txt
# Specify a minimum CMake version
cmake_minimum_required(VERSION 3.20.0)

# Name the project
project(
    hello_world
    VERSION 1.0
    DESCRIPTION "The classic"
    LANGUAGES C
)

# Create a static library target named "my_lib"
add_library(my_lib
    STATIC
    src/my_lib.c
)

# Set the include directories for the library. PUBLIC adds the directory
# to the search path for any targets that link to this library.
target_include_directories(
    my_lib
    PUBLIC
    ${CMAKE_CURRENT_SOURCE_DIR}/include
)

# Create an executable target with the same name as the project name
add_executable(
    ${PROJECT_NAME}
    src/main.c
)

# Link the library to the executable. PRIVATE means that the library is not
# exposed to targets that depend on this target.
target_link_libraries(
    ${PROJECT_NAME}
    PRIVATE
    my_lib
)
Line-by-line explanation:
1. cmake_minimum_required(VERSION 3.20.0): We tell CMake we need at least version 3.20. This ensures commands work as expected.
2. project(hello_world VERSION 1.0 DESCRIPTION "The classic" LANGUAGES C):
- The project() command sets the project name (hello_world), version, a short description, and the language used (C).
- Specifying the language helps CMake choose the right compilers and handle source files correctly.
3. add_library(my_lib STATIC src/my_lib.c):
- We create a static library named my_lib.
- The STATIC keyword means this library will be compiled into the final binary rather than being dynamically loaded at runtime.
- We specify the library’s source file, my_lib.c.
4. target_include_directories(my_lib PUBLIC ${CMAKE_CURRENT_SOURCE_DIR}/include):
- We tell CMake where to find header files for my_lib.
- PUBLIC means that not only does my_lib use this directory, but any targets linking to my_lib will also inherit this include directory.
- ${CMAKE_CURRENT_SOURCE_DIR} is a built-in variable that points to the current directory (where this CMakeLists.txt is located).
5. add_executable(${PROJECT_NAME} src/main.c):
- We create an executable target using the project’s name (hello_world).
- The executable’s source file is main.c.
6. target_link_libraries(${PROJECT_NAME} PRIVATE my_lib):
- We link our library my_lib to the hello_world executable.
- PRIVATE means only hello_world can use my_lib. Other targets that depend on hello_world won’t automatically see my_lib.
Building Your Project
Start from your project’s root directory (02_demo_cmake in our example):
Generate the build files:
You can use the -S and -B options with cmake to specify the source directory (current dir .) and build directory (build). For example:
cmake -S . -B build
This command runs CMake in the current directory’s context and writes the generated build system (like Makefiles) into a build directory. If you haven’t created build yet, it will be created automatically.
Build the Project:
Once generation is complete, you can build your project:
cmake --build build
By default, CMake tries to use make on Unix-like systems.
Run the Executable:
./build/hello_world
This should print:
Hello, world!
Congratulations! You’ve just successfully built and run a simple project using CMake.
Using Different Generators
One of CMake’s strengths is its ability to generate different build systems. By default, CMake uses make, but you can use any one of the supported build systems. To view the supported generators, enter:
cmake -h
You should see the list of generators:
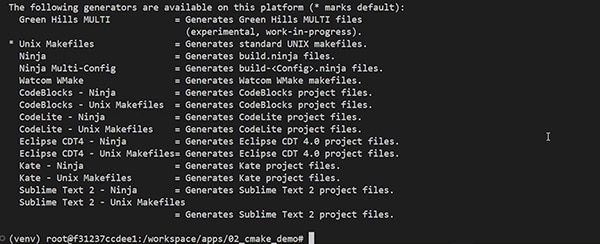
To explicitly use the make system, enter the following to generate a Makefile and build your project:
cmake -S . -B build -G "Unix Makefiles"
cmake --build build
You can also use Ninja (assuming you have it installed–it should come installed with Zephyr if you are using the Docker image):
cmake -S . -B build -G "Ninja"
cmake --build build
CMake takes care of generating the appropriate files. You don’t have to modify your CMake configuration—just specify the generator you want.
Integrating Libraries and Larger Projects
Our example was simple, but CMake shines as your project grows. Here are a few ways to organize bigger projects:
- Modularization: Split your code into separate libraries (static or shared) for different functionalities. For each library, you’ll have its own add_library() call and a target_include_directories() command to specify headers.
- Nested CMakeLists.txt: Subdirectories can have their own CMakeLists.txt. Your top-level CMake file can use add_subdirectory() to include them. This approach keeps your project more maintainable and logical.
- Target Properties: CMake encourages modern “target-based” usage. Instead of setting global compiler flags or include paths, you can attach properties to targets. This makes configuration more predictable and less error prone.
Common CMake Reference Materials
Here are some great resources if you want to dive deeper into CMake:
- Official CMake Documentation: The official CMake Reference Documentation is an excellent place to start. It lists all commands, variables, and properties comprehensively.
- Modern CMake Book: There’s a free online resource called “Modern CMake” that guides you in writing more maintainable and modern CMakeLists.txt files.
CMake with Zephyr
CMake excels at building projects for embedded devices or integrating with frameworks like Zephyr for IoT development. If you look at our blinky example from the previous tutorial, you can see how CMakeLists.txt is configured to use Zephyr. A few things to note:
- find_package(Zephyr …) is required to load the Zephyr CMake extensions. These are custom functions and variables that Zephyr uses to build projects. At the time of writing, the Zephyr-specific CMake functions are not available on the official documentation, but you can see the well-documented source code here.
- The Zephyr CMake extension automatically defines the target app. When you call CMake functions (e.g., target_sources(...)), you should use that target to add/link to the application target.
Zephyr encourages you to use the west meta-tool to build your projects, which, admittedly, does make the process easier. However, west relies on CMake under the hood. Understanding CMake independently, as we did in this tutorial, helps clarify what’s going on behind the scenes.
Challenge
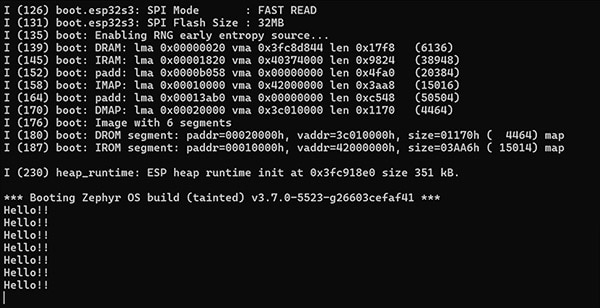
Each video/tutorial going forward will issue you a challenge to test your understanding of the concepts covered. For CMake, your challenge is to combine the “Hello, World!” example presented here and the blinky example from the previous episode. Create a header and source file to simply call printf(“Hello!!!\r\n”); (as a library) in the blinky example. Modify your main.c application to call your say_hello(); function each time the LED toggles. Modify the CMakeLists.txt to include and link to your library.
When you compile, flash, and run your modified blink application, you should see “Hello!!” printed to the console (in addition to the LED state, if you left that print statement in the code):
If you run into any errors or just want to check your code, you can find my solution here: https://github.com/ShawnHymel/introduction-to-zephyr/tree/main/workspace/apps/02_solution_hello_blink
Troubleshooting
- Missing Compilers: Ensure that the language compilers (e.g., gcc for C, g++ for C++) are installed. CMake checks for them during configuration.
- Incorrect Paths: Double-check target_include_directories() and add_library() paths if your headers or source files aren’t found.
- Case Sensitivity: The file CMakeLists.txt is case-sensitive. Always ensure it is spelled exactly as required (C capitalized, M capitalized, etc.).
- Version Mismatch: If you use advanced CMake commands that your current version doesn’t recognize, either install a newer CMake version or use features compatible with your installed version.
Conclusion
CMake is a powerful tool for any C or C++ developer aiming for cross-platform portability and maintainable build configurations.
As your projects grow, you’ll appreciate CMake’s flexibility even more. You can easily add tests using add_test(), integrate third-party dependencies with find_package(), and apply sophisticated configuration management. The fundamentals shown here form the bedrock upon which you can build more complex software.


