制造商零件编号 ESP32-S3-DEVKITC-1-N32R8V
ESP32-S3-WROOM-2-N32R8V DEV BRD
Espressif Systems
The Zephyr Project is an ecosystem designed to simplify and professionalize embedded development, especially for Internet of Things (IoT) devices. At its core, Zephyr is a powerful, open-source real-time operating system (RTOS), similar to NuttX, RT-Thread, and VxWorks (closed-source). While Zephyr offers a scheduler and multithreading, like FreeRTOS, it contains many more libraries (e.g., Bluetooth and WiFi stacks), multiple board-support packages, build system meta-tools (e.g., west), and unique tooling (e.g., Devicetree, Kconfig) that abstracts hardware drivers to enable cross-platform application development.
This 12-part video series walks you through the process of setting up Zephyr, using Kconfig, Devicetree, and bindings to create cross-platform embedded firmware, debugging with OpenOCD and GDB, and creating several example applications that demonstrate multithreading, interrupts, WiFi, and graphics.
All example code and solutions for this series can be found in this repository: https://github.com/ShawnHymel/introduction-to-zephyr/
Zephyr’s capabilities make it an excellent choice for professional-grade projects that require networking, advanced peripheral support, or multi-threading. However, the learning curve is steep, especially if you’re unfamiliar with Linux-based systems like Devicetree or Kconfig. However, its extensive feature set and growing industry adoption make it a compelling choice for embedded development. Here’s why you should consider using it:
To get the most out of this series, you should be proficient in the following:
If you’ve worked with Linux kernel modules or device drivers, you’ll find some concepts familiar. Otherwise, be prepared to spend time mastering Zephyr’s tools and workflows, such as CMake, Kconfig, and the Devicetree.
If you have successfully completed the Introduction to RTOS series, then you are likely ready to tackle this Zephyr course.
To follow along with this series, you will need the following hardware:
We use the ESP32-S3-DevKitC because of its onboard debugger and compatibility with Zephyr. If you’re using a different board, ensure that it is officially supported by Zephyr so that you can start working with the examples right away. We will explore creating a custom board configuration for Zephyr at the end of the series.
Using a full-sized breadboard or two half-sized breadboards, connect the ESP32 dev kit to the various hardware components as follows:
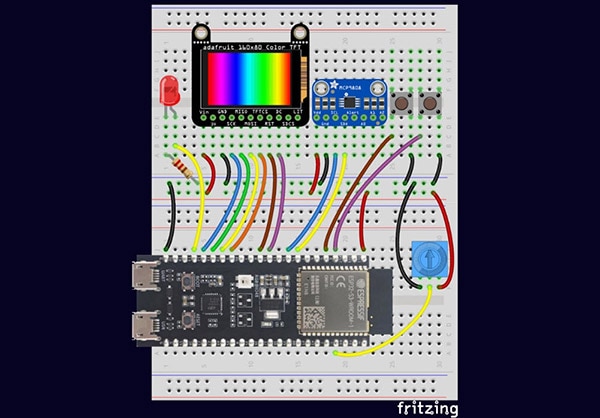
All of the course software, including the Docker file for creating the Docker image, demo code from the episodes, and challenge solutions can be found in this repository:
https://github.com/ShawnHymel/introduction-to-zephyr
Setting up Zephyr manually can be challenging. The installation process often involves configuring Linux tools and managing dependencies that may differ across systems. Using Docker simplifies this process by providing a pre-configured environment that works consistently across Windows, macOS, and Linux. It also ensures that the versions for Zephyr and various support packages match mine in the series so that everything is guaranteed to work (Zephyr has a habit of changing its API between versions).
Important! We use Zephyr version 3.7 throughout this series. Version 4.0 was released in late 2024 during filming. If you upgrade to 4.0 (or later), I cannot guarantee that the function calls, Devicetree configuration, etc. will be the same between the versions.
If you would like to install Zephyr manually (without using the course’s Docker image), please refer to these instructions.
Before you start, install the following programs on your computer:
Clone the course repository (alternatively, you can download the repo here) and navigate inside the repository directory:
git clone https://github.com/ShawnHymel/introduction-to-zephyr
cd introduction-to-zephyr
Finally, install the required dependencies:
Linux/macOS:
python -m venv venv
source venv/bin/activate
python -m pip install pyserial==3.5 esptool==4.8.1
Windows (PowerShell):
Set-ExecutionPolicy -Scope CurrentUser -ExecutionPolicy Unrestricted -Force
python -m venv venv
venv\Scripts\activate
python -m pip install pyserial==3.5 esptool==4.8.1
Use the provided Dockerfile to create the development environment image:
docker build -t env-zephyr-espressif -f Dockerfile.espressif .
You can ignore the warning about setting the password as an ARG in the Dockerfile. The container is not particularly secure anyway—I only recommend running it locally when you need it. You will need to change the password and configure code-server and sshd to be more secure if you want to use it remotely.
Run the image—note that it mounts the local workspace/ directory into the container! We also expose ports 3333 (OpenOCD), 2222 (mapped from 22 within the container for SSH), and 8800 (code-server).
Linux/macOS:
docker run --rm -it -p 3333:3333 -p 2222:22 -p 8800:8800 -v "$(pwd)"/workspace:/workspace -w /workspace env-zephyr-espressif
Windows (PowerShell):
docker run --rm -it -p 3333:3333 -p 2222:22 -p 8800:8800 -v "${PWD}\workspace:/workspace" -w /workspace env-zephyr-espressif
Alternatively, you can run the image in interactive mode by adding the --entrypoint /bin/bash argument. This will allow you to skip running the VS Code server in the background.
Note that we added the --rm tag to the docker command in the previous step. This tells Docker to remove the container when you shut it down, which will delete anything you save in the filesystem (except for the /workspace directory, which is mapped to your host system). If you wish to save any settings or extensions in the container, do not use the --rm tag to keep the container.
With the Docker image built, you have two options to connect to the premade development environment: browser or SSH.
Open a browser and navigate to http://localhost:8800/.
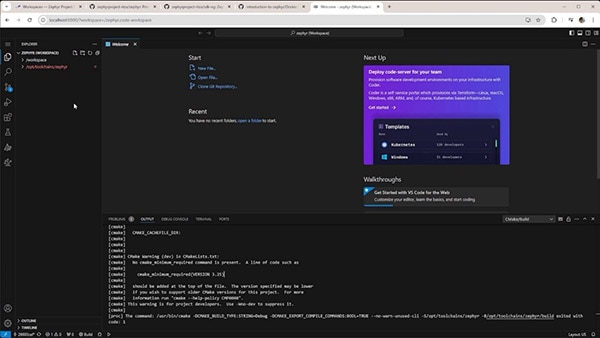
If you want to develop Zephyr applications using your local instance of VS Code, you can connect to the running container using SSH. This will allow you to use your custom themes, extensions, settings, etc.
In your local VS Code, install the Remote - SSH extension.
Open the extension in VS Code and create a new connection: root@localhost:2222.
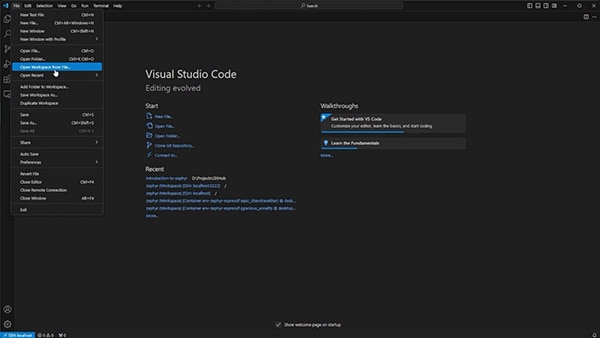
Connect and log in using the password in the Dockerfile (default: zephyr). Go to File > Open Workspace from File... and select the /zephyr.code-workspace file when prompted. Enter the password again if requested. This should configure your VS Code workspace with the /workspace directory mapped from the host and /opt/toolchains/zephyr so you can browse the Zephyr RTOS source files.
Note that the zephyr.code-workspace file recommends several extensions. I recommend installing those when prompted. They need to be installed on the remote server (rather than locally).
The recommended extensions:
If you like AI assistance while writing code, I have found that GitHub Copilot also works very well.
Take note of the three directories in your VS Code instance:
Code examples for this series can be found in /workspace/apps. To build the blinky example, navigate to 01_blink/ and build using the west meta-tool:
cd /workspace/apps/01_blink
west build -p always -b esp32s3_devkitc/esp32s3/procpu -- -DDTC_OVERLAY_FILE=boards/esp32s3_devkitc.overlay
This should build without any errors:
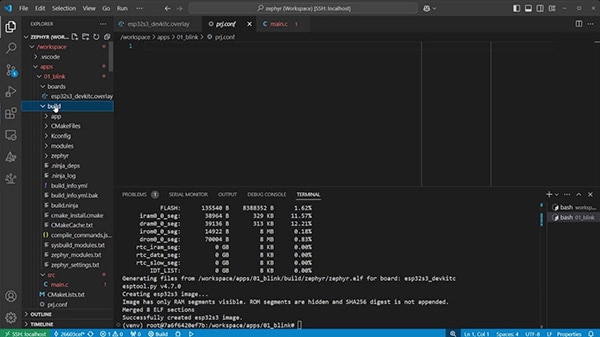
The binary files will be in /workspace/apps/blink/build/zephyr, which we can flash from our host computer.
Connect a USB cable from your computer to the UART port on the development board. If you do not see the serial/COM port on your host OS, you might need to install the necessary SiLabs VCP driver. In a new terminal on your host computer, activate the Python virtual environment if you have not done so already:
Linux/macOS:
source venv/bin/activate
Windows:
venv\Scripts\activate
Flash the binary to your board. For some ESP32 boards, you need to put it into the bootloader by holding the BOOTSEL button and pressing the RESET button (or cycling power). Change <PORT> to the serial port for your ESP32 board (e.g., /dev/ttyS0 for Linux, /dev/tty.usbserial-1420 for macOS, COM7 for Windows).
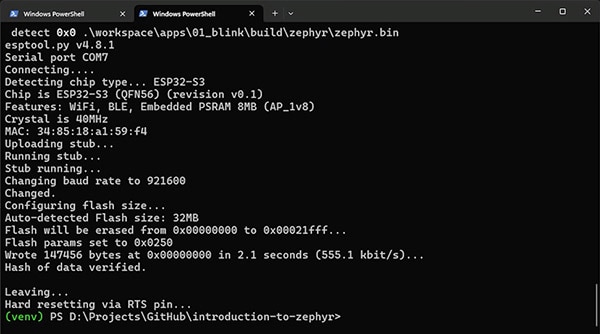
python -m esptool --port "<PORT>" --chip auto --baud 921600 --before default_reset --after hard_reset write_flash -u --flash_mode keep --flash_freq 40m --flash_size detect 0x0 workspace/apps/01_blink/build/zephyr/zephyr.bin
Important: If you are using Linux and get a Permission denied or Port doesn't exist error when flashing, you likely need to add your user to the dialout group with the following command: sudo usermod -a -G dialout $USER. Log out and log back in (or restart). You should then be able to call the esptool command again to flash the firmware.
The application should flash to your board without any error:
Open a serial port for debugging. Change <PORT> to the serial port for your ESP32 board.
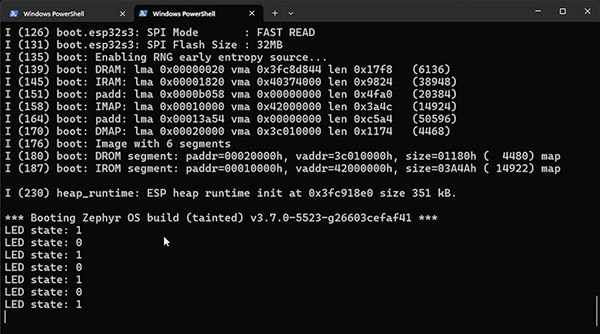
python -m serial.tools.miniterm "<PORT>" 115200
You should see the LED state printed to the console. To exit, press ctrl+] (or cmd+] for macOS).
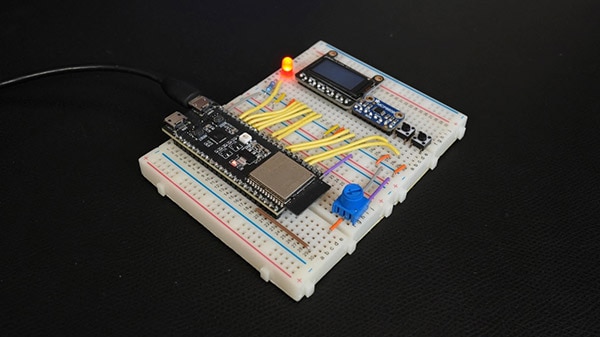
Check your board, and you should see the LED flashing:
If you would like to learn more about Zephyr, I recommend checking out the following resources.
Over the course of the next few episodes, we’ll dive into CMake, Kconfig, and the Devicetree before writing our own device driver.