How To Configure Static IP Addresses on a Raspberry Pi
2023-03-27 | By Maker.io Staff
Many applications require a Raspberry Pi to always have the same IP address in a local network. However, there’s no guarantee that a home network router will always assign the same IP address to a computer in the network. Unfortunately, that problem makes tasks such as port forwarding to allow external network traffic to reach the Raspberry Pi more troublesome than they should be. However, there’s a simple - yet effective - way to set up a static IP address so the Pi will always use the same IP address when it boots up.
Finding the Relevant IP Addresses in the Network
Before getting started, you need to know three IP addresses. First, the IP address that the Pi should use. It should always be available because when another device in the network already uses the IP address that the Raspberry Pi wants to use, it might end up without an IP address or fall back to an alternative one, depending on the configuration. Next, you need the router’s IP and the DNS server, which will most likely be the same as the router’s address. You can either use your router’s management software to obtain this information or the command line of the Raspberry Pi.
Use the following command to find the Raspberry Pi’s address in the local network:
hostname -I
Next, find the router’s address by typing:
ip r
Finally, you can obtain the DNS server address using:
cat /etc/resolv.conf
Note that some of the commands produce additional output. Refer to the following image if you’re not sure which values to write down:
 This image highlights where you can find the necessary information using the three commands from above.
Using the GUI to Set a Static IP
When using the Raspberry Pi with a keyboard, mouse, and display, setting up a static IP address for the computer only consists of a few clicks. Start by opening the network settings using the dropdown menu in the top-right corner of the desktop environment:
 Follow the outlined steps to access the networking settings program.
Then, select the interface that should be affected by the changes. For example, Eth0 is the wired interface, and wlan0 denotes wireless connections. You can change just one of these, or you can change both. Either way, fill in the static IP address for the Pi, the router’s IP address, and the DNS server address. Make sure to check the option to fill in the missing values automatically:
 Using the GUI, enter the previously obtained values.
Configure a Static IP on a Headless Raspberry Pi
You can also set a static IP if you’re not using the Raspberry Pi with a monitor. For that purpose, Linux uses a file that contains network settings for all available adapters. In addition to the previous IP addresses, you’ll have to find the exact name of the networking interface to configure. You can obtain a list of available interfaces using the ifconfig command:
 Use the ifconfig command to find the names of the available networking adapters.
Next, use nano (or any other text editor of your choice) to open the following file:
nano /etc/dhcpcd.conf
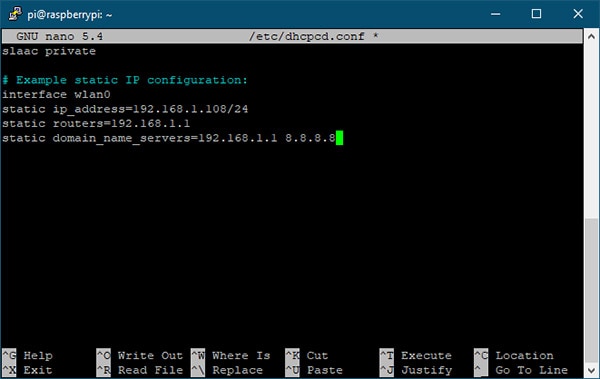
In that file, add the values you obtained so far:
 Add the previously obtained values to the config file as shown in this image.
As you can see in the image above, I set the interface parameter to use the WiFi interface of the Raspberry Pi. Then, I set the static IP address to the desired value and added a subnet mask of 24 bits. Finally, the router and DNS address are the same in my case. However, I decided to add a Google DNS server as a fallback option. As mentioned above, in this configuration, the Raspberry Pi will never obtain an alternative IP address should the static one not be available anymore. However, you could change this behavior by substituting the second line with the following:
inform ip_address=192.168.1.108/24
However, make sure to enter an IP address that works in your network. Using this altered line, the Raspberry Pi will try to use the static IP. If that fails, it obtains a new one from the router (or DHCP server, if configured).
Either way, once you’re done configuring the values, use Ctrl + O and then the enter key to save the changes to the configuration file. Then, exit nano by using Ctrl + X.
Summary
Setting a custom IP address can be helpful in many situations, for example, when the Raspberry Pi provides services that should be accessible outside the bounds of its local network. To set a custom IP address, you’ll need four values: the interface name, the desired IP address, the router’s IP, and a DNS address. Then, either use a practical GUI utility or a configuration file on a headless setup.


