How To Connect an Arduino to Node-RED
2022-09-14 | By Maker.io Staff
Another article introduced Node-RED, a NodeJS-based block editor optimized for working with a dataset, APIs, and IoT applications. However, that tutorial only introduced the basics of getting started with the development environment, namely installing the necessary software, and creating a simple hello world example. Since most IoT projects contain a microcontroller of some sort, this article explains how to connect a development board (e.g., an Arduino Uno) to Node-RED to transmit data between the board and the computer running Node-RED. The environment can then process the data from the Arduino and, for example, display it using a dashboard.
Install the Necessary Palette Extension
One of the more advanced features not discussed in the previous article is Node-RED's ability to download and install external modules to extend the app's functionality. You can add additional nodes to your flows by doing so. The serial module is one example of such an external node, and you'll have to install it to communicate with external devices over a serial connection. Start by clicking the menu button in the top-right corner of Node-RED and then select the "Manage Palette" option:
 Use the steps illustrated in the image above to open the palette manager.
Doing so opens up a pop-up window that contains the palette manager. First, click the install tab and then use the search bar to find the "node-red-node-serialport" package. Then, click the small install button next to the package name:
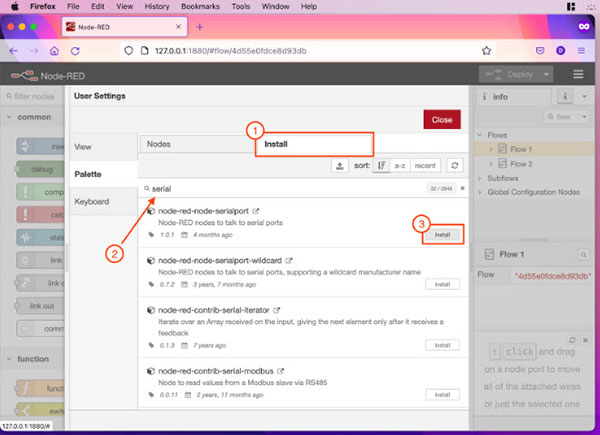 Use the search bar to find the package, and then click the install button to download it.
Finally, use the close button to hide the palette manager. You can then see that the app added a few new nodes to the palette on the left-hand side of the main window:
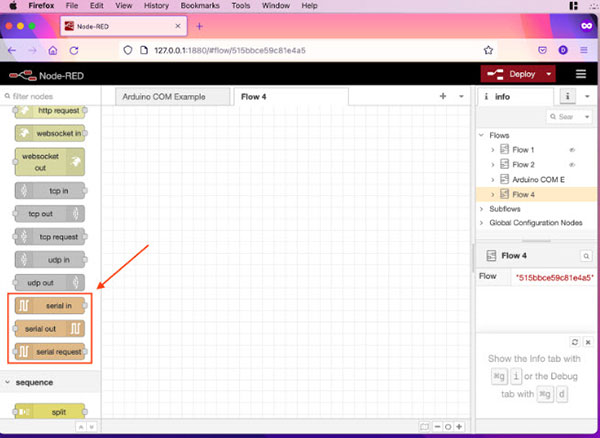 You can find the newly installed nodes in the palette on the left-hand side of the window.
Configuring a Serial Port in Node-RED
Next, drag and drop a serial-in and a debug node into the main working area and then connect the two nodes. Then, set the debug node to output the complete message it receives. You can also name the nodes to keep the project tidy. You can refer to the previous article if you're unsure how to perform these steps.
Double-click the serial-in node to start setting up a serial link. Doing so opens up the node's options panel, where you can either select an existing serial port or create a new connection. In this case, you'll have to create a new one by clicking the pencil icon next to the dropdown menu:
 Click the highlighted button to create a new serial connection.
In the next window, you can either manually enter the serial port to use or select the correct one from a list of available ports by clicking the magnifying glass icon. Once done, set the baud rate you want to use. Make sure this value matches the one you'll use in the Arduino sketch that sends data to Node-RED. Finally, click the "Add" button to save the settings:
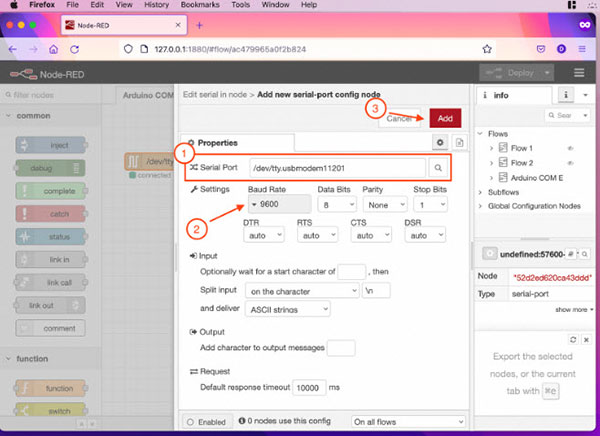 Follow the illustrated steps to create a new serial connection.
You can use the Arduino IDE to find the serial port that your board is connected to. First, however, close all applications that use the serial connection (e.g., the serial monitor) before returning to Node-RED:
 You can use the Arduino IDE to find the serial port your Arduino uses.
Testing the Serial Port
The image above shows the following short test script that periodically writes a single number to the serial port every second. As mentioned above, use the same baud rate to avoid errors and data glitches:
unsigned long cnt = 0;

void setup() {
  Serial.begin(9600);
}

void loop() {
  Serial.println(cnt++);
  delay(1000);
}
Use the Arduino IDE to upload the test sketch to an Arduino, and then close the IDE and all open serial connections. Finally, click on the deploy button in Node-RED and open the serial monitor. You can see that Node-RED displays the value sent by the Arduino approximately once every second in the serial monitor:
 Once the app deploys, you can see that Node-RED outputs the serial input once every second. Note how the serial input node’s state changes to connected when Node-RED detects the Arduino.
Summary
Node-RED is an exciting development environment that lets you quickly get started with developing flows for working with data in IoT applications. Employing a serial connection is one way to get data transferred from an Arduino to Node-RED without using the Internet. Use Node-RED's palette manager to install the serial node package.
Next, drag and drop a serial-in node into your project and set up a serial connection by double-clicking the newly placed node. Here, you either select a previously created serial connection or create a new one. When creating a new connection, select the correct port using the search function, then double-check the baud rate. Make sure this value matches the one used in the Arduino script to avoid data-transmission errors.
Finally, upload a sketch that sends data over the serial port to the Arduino. Then, close the IDE and all programs that might use the Arduino's serial port before deploying the flow in Node-RED.


