制造商零件编号 SC0193(9)
RASPBERRY PI 4 B 2GB
Raspberry Pi
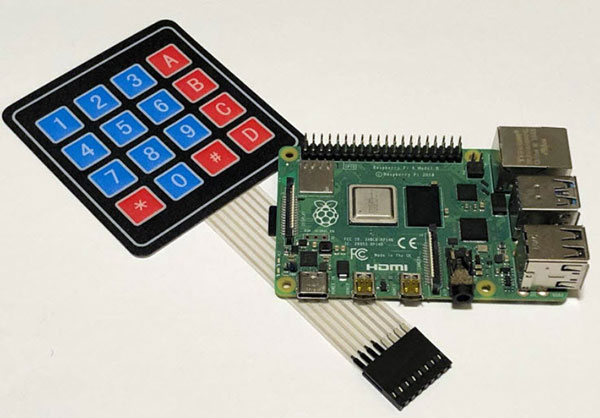
The Raspberry Pi is a well-established development platform, and many people employ it in their custom projects. However, finding a convenient way for users to make inputs in Raspberry Pi based projects often turns out to be a big problem. Many methods are complicated or too expensive to use, or they are prone to errors. A small keypad is a convenient way of providing users of your custom projects with a way to interact with the system, and this article discusses how you can add a keypad to your Raspberry Pi projects.
Part/Link to buy:
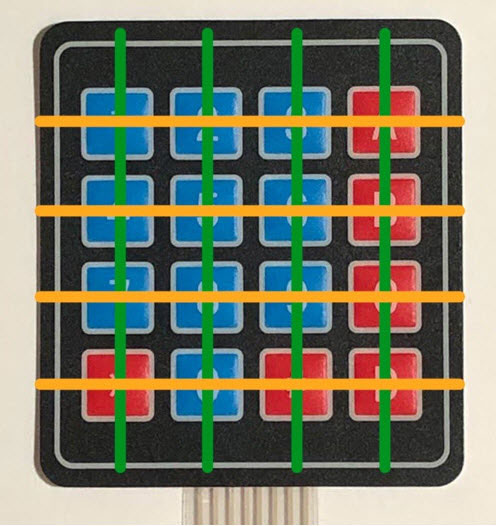
We covered this in the Arduino article, but it’s worth highlighting again: simple keypads contain several switches organized in a grid. Internal wires connect the individual rows and columns of switches so that when a user presses one of the switches, that switch electrically connects a single row to a column.

If a device, like the Raspberry Pi or an Arduino, wants to detect keypresses, it sends a quick pulse to each of the lines of the switch grid. When a user presses a button, that button connects a single line to a single row, and the Raspberry Pi can detect a change in one of the rows. The CPU can then decode the result to determine which of the buttons the user pressed.
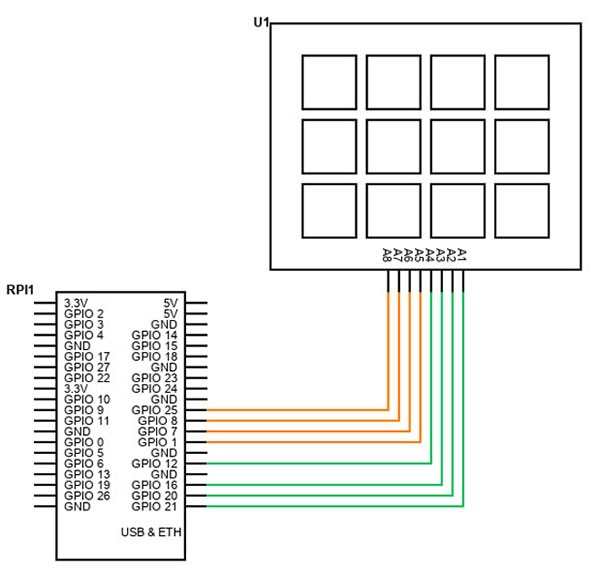
As discussed, I treat each row of the keypad as an input and each column of the keypad as an output. The Raspberry Pi sends pulses to the lines and listens for changes on the columns. Therefore, you need to connect each of the four rows and columns of the keypad to any eight digital I/O pins on the Raspberry Pi:

Note that the software that runs on the Raspberry Pi enables the Raspberry Pi’s internal pull-down resistors, so there’s no need for external pull-up or pull-down resistors. Furthermore, the keypad doesn’t require power to operate, as it is a simple array of switches. This results in the simple circuit you can see above.
The following code implements the previously discussed procedure in a short Python program:
# import required libraries
import RPi.GPIO as GPIO
import time

# these GPIO pins are connected to the keypad
# change these according to your connections!
L1 = 25
L2 = 8
L3 = 7
L4 = 1

C1 = 12
C2 = 16
C3 = 20
C4 = 21

# Initialize the GPIO pins

GPIO.setwarnings(False)
GPIO.setmode(GPIO.BCM)

GPIO.setup(L1, GPIO.OUT)
GPIO.setup(L2, GPIO.OUT)
GPIO.setup(L3, GPIO.OUT)
GPIO.setup(L4, GPIO.OUT)

# Make sure to configure the input pins to use the internal pull-down resistors

GPIO.setup(C1, GPIO.IN, pull_up_down=GPIO.PUD_DOWN)
GPIO.setup(C2, GPIO.IN, pull_up_down=GPIO.PUD_DOWN)
GPIO.setup(C3, GPIO.IN, pull_up_down=GPIO.PUD_DOWN)
GPIO.setup(C4, GPIO.IN, pull_up_down=GPIO.PUD_DOWN)

# The readLine function implements the procedure discussed in the article
# It sends out a single pulse to one of the rows of the keypad
# and then checks each column for changes
# If it detects a change, the user pressed the button that connects the given line
# to the detected column

def readLine(line, characters):
    GPIO.output(line, GPIO.HIGH)
    if(GPIO.input(C1) == 1):
        print(characters[0])
    if(GPIO.input(C2) == 1):
        print(characters[1])
    if(GPIO.input(C3) == 1):
        print(characters[2])
    if(GPIO.input(C4) == 1):
        print(characters[3])
    GPIO.output(line, GPIO.LOW)

try:
    while True:
        # call the readLine function for each row of the keypad
        readLine(L1, ["1","2","3","A"])
        readLine(L2, ["4","5","6","B"])
        readLine(L3, ["7","8","9","C"])
        readLine(L4, ["*","0","#","D"])
        time.sleep(0.1)
except KeyboardInterrupt:
    print("\nApplication stopped!")
As you can see, the Python code for this project is pretty straight-forward. First, the script initializes the GPIO driver and I/O pins. Note that it enables the internal pull-down resistors on the input lines. Doing so means that you can connect the keypad straight to the Raspberry Pi’s GPIO pins without the need for external pull-down or pull-up resistors. Using pull-down resistors ensures that the input lines report a low voltage level while no one presses the buttons. Once a user presses a button, a single input line gets pulled high, and the Raspberry Pi can reliably detect user inputs.
The detection of button presses is implemented in the readLine function. This function sends out a single short pulse to a given row of the keypad matrix. After pulling the appropriate output line high, the method checks each column input pin for changes. Note that this program serves as a bare-bones example to get you up and running quickly. It omits more advanced features, such as a de-bounce mechanism for the sake of simplicity.
The last while-loop runs endlessly until the user ends the program. It repeatedly calls the readLine function for every row of the keyboard.

As this article demonstrated, it’s easy to connect a simple keypad to a Raspberry Pi and provide users with a convenient way to input data and interact with your custom Raspberry Pi based projects. The keypad only requires a few digital I/O pins to operate. The Raspberry Pi doesn’t need to supply the keypad with a power source, as the key-matrix solely consists of simple push buttons. The Raspberry Pi sends pulses to each row of the keypad’s internal matrix, and when a user pushes down on a button, the button closes a contact that connects a single row to a single column. The Raspberry Pi listens to changes in the column signals, and when it detects one, the software can decode which button the user pressed. This procedure is easy to implement in any programming language supported by the Raspberry Pi.