How to Use Ultrasonic Modules for Object Avoidance with the Arduino Leonardo
2019-07-10 | By Maker.io Staff
In this How-To Article, we will learn how to use ultrasonic modules for basic object avoidance with an Arduino Uno.
BOM
- Ultrasonic Module - 1778-1202-ND
- Arduino Leonardo (UNO Form Factor) - 1050-1040-ND
Scheme-It

Ultrasonic Systems as Detectors
We have previously looked to a form of basic object detection: the simple contact antenna. This produces an electrical signal when the antenna is pushed against an object. While this form of object detection is useful for basic scenarios and demonstrates how to construct simple sensors, it does have its drawbacks.
First, these contact sensors are required to make contact with their surrounding environments, which means they can easily pick up potentially damaging electric charge from objects. Second, mechanical sensors can fail over time, making them impractical for harsh environments.
People will always want fully electronic sensors with no moving parts, but this can also be impractical either through ability, price, or complexity. One sensor that combines the best of both worlds is the ultrasonic range finder. This sensor includes both an ultrasonic transmitter and the ultrasonic receiver, which work together in a manner that’s nearly identical to sonar.
The transmitter, which is a mechanical device (having a moving diaphragm), sends out short ultrasonic pulses of sound. When these sound waves hit objects, they reflect back towards the ultrasonic module, which also includes a receiver. When the receiver detects the reflection, it outputs a digital pulse, which can be used to determine the distance of that object from the module. We can determine the distance because we know the speed of sound in air (approximately 330m/s) and the time between sending the pulse and receiving the reflection.
Object Avoidance
Object avoidance can be done using ultrasonic modules, but one module alone can be tricky to incorporate. If only one module is available, then the robot in question can mount its ultrasonic module on top of a servo and move the ultrasonic module around (similar to RADAR), taking repeated measurements. These measurements give the robot an idea of its surroundings and therefore can use this information to avoid objects.
However, if two modules are available, then each module can be placed at angles to each other similar to car headlights. Of course, the modules cannot be used at the same time; otherwise, the modules may interfere with each other. Therefore, each ultrasonic module should be made to produce a pulse separately, so that two distance measurements can be made without interference. It is not a bad idea to partly shield the receivers on each side so that they can ignore reflections from other areas not immediately around them.
Both distance measurements can be used to perform routines that may cause specific motors to rotate and steer the robot away from that direction, and they can also be used in a PID controller to keep a particular distance from a side (such as keeping a car next to the pavement).
The Ultrasonic Sensor Module
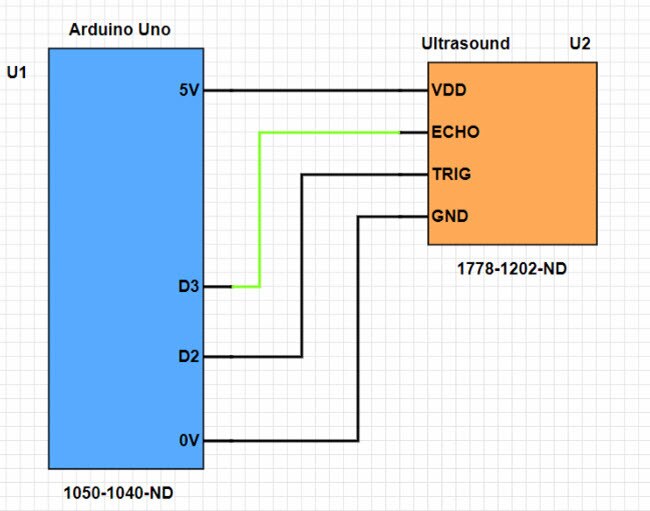
Ultrasonic modules are straightforward, having four wires:
- VIN – Power supply to the module
- GND – Ground supply to the module
- TRIG – Causes a measurement to be made
- ECHO – Output of the system
When TRIG is set high, the module outputs a burst of eight square waves, which causes an ultrasonic wave to be emitted. At the same time, the ECHO pin goes high and remains high until the ultrasonic burst reflection is detected. Since the ultrasonic burst must travel to and from a distant object, the final distance result needs to be divided by two.
Arduino Code
Using ultrasonic modules with the Arduino is very trivial and only requires a handful of code. The example below shows how to read the distance between the ultrasonic module and an external object in cm.
#define ECHO_PIN 3        // Echo pin of the ultrasonic module
#define TRIG_PIN 2        // Trigger pin of the ultrasonic module


void setup()
{
  Serial.begin(9600); 		// We will use the serial output for printing distance measurements
  pinMode(ECHO_PIN, INPUT); 	// Configure the echo pin as an input
  pinMode(TRIG_PIN, OUTPUT); 	// Configure the trigger pin as an output
}

void loop()
{
  digitalWrite(TRIGPIN, LOW); 	// Create a signal pulse that will cause the ultrasonic module to generate a sound wave
  delayMicroseconds(2);
  digitalWrite(TRIGPIN, HIGH);
  delayMicroseconds(10);
  digitalWrite(TRIGPIN, LOW);

  // Use the pulseIn function to time how long the ECHO pin was high for
  float distance = pulseIn(ECHOPIN, HIGH);

  // The speed of sound in air is 340 m/s
  // 340 m/s = 34000 cm/s
  // In 1us sound travels 0.00034m = 0.034cm
  // For sound to travel 1cm = 29.4us
  // Since we are going there AND back we use 29.4 * 2 = 58 (as an integer)
  distance= distance/58;

  Serial.print(distance);
  Serial.println(" cm");

  delay(500);
}
Taking it further
From here, the code can be placed inside a function of its own and called to produce a distance reading. These readings can then be processed further using comparisons and arrays to tell the Arduino if a motor should be turned to move away from (or even go closer to) an object. That is another issue for another day, however -- for now, go ahead and see if you can implement a basic avoidance routine using the Arduino Leonardo, an ultrasonic module, and a two-wheeled robot!

Have questions or comments? Continue the conversation on TechForum, DigiKey's online community and technical resource.
Visit TechForum


 中国
中国