Unboxing and setup of the Cellular BeagleBone Black IoT Kit
2016-11-18 | By Initial State Technologies
The Beaglebone Black is a fantastic piece of hardware that is extremely powerful. And now it's easier than ever to work with because it comes pre-loaded with Debian!
If you're looking to get started with Beaglebone or are trying to create an Internet of Things device that doesn't have to be dependent on a WiFi connection, then DigiKey's Connected Cellular BeagleBone IoT Development Kit is for you! It comes with everything you need to establish a cellular internet connection, easily connect sensors, and then view your data in a real-time dashboard.
This tutorial goes over assembling the kit and getting started with a dashboard of your own. Specifically, you will:
- Assemble the Beaglebone Black, Nimbelink cellular cape with Aeris SIM card, and Seeed Grove Cape
- Setup an Aeris cellular plan
- Establish a reliable cellular connection
- Read from Grove plug-and-play sensors
- Send collected data to a real-time, web-based dashboard via the cellular connection
Let's get started!
Getting Started
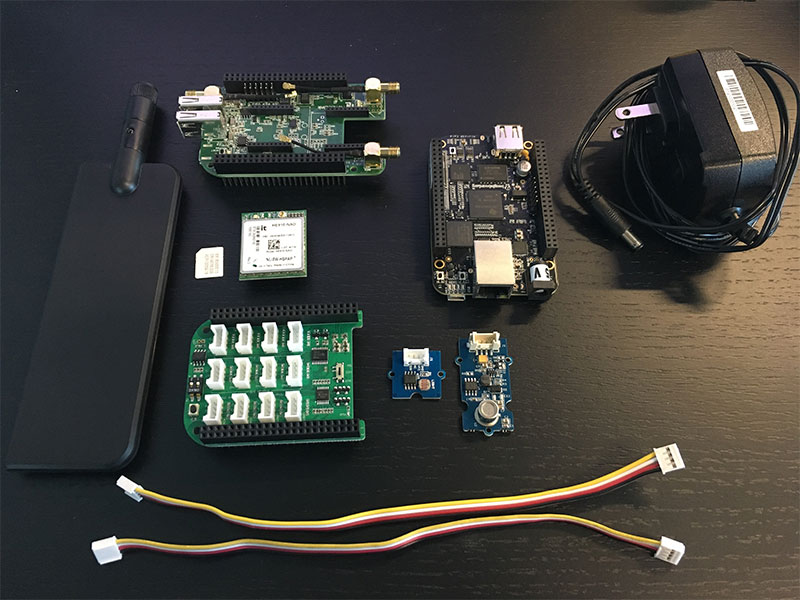
To create this project, you're going to need the Connected Cellular BeagleBone IoT Development Kit from DigiKey. The kit includes:
- A Beaglebone Black
- The Seeed Grove Cape
- The NimbeLink Cellular Cape
- The NimbeLink Skywire Cellular Module
- An Aeris Neo SIM card
- A Cellular Antenna
- A power supply and USB cable
You may also want a micro-HDMI to HDMI cable for troubleshooting and testing your cellular connection directly (you'll need a monitor/tv and a bluetooth keyboard and mouse, too, but you most likely already own those!).
You'll also want some sensors for the Grove cape. There are a lot of different sensors and most of them are compatible with the cape. The two used in this project are the light sensor and the air quality sensor.
All of these pieces, including the sensors, just plug into each other, so putting everything together is a piece of cake.
Part 1. Connecting the Nimbelink Cellular Module
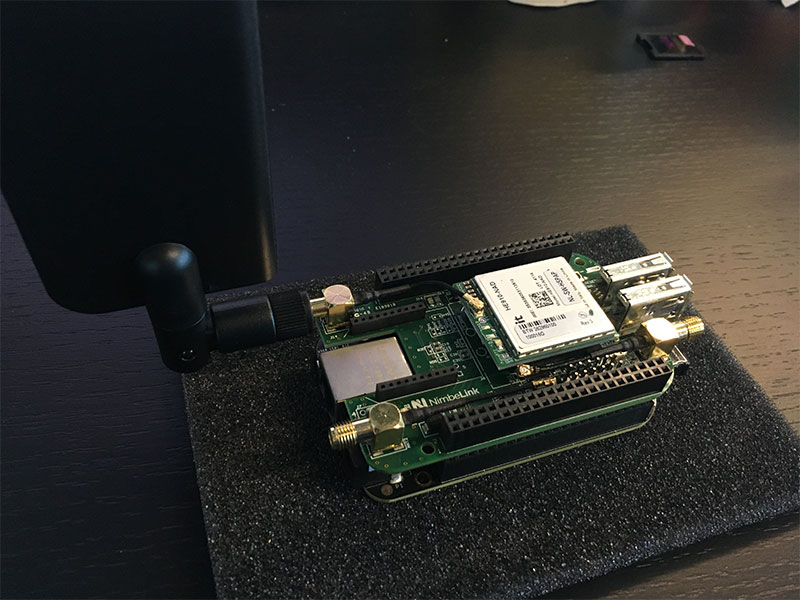
Before you even power on your Beaglebone, we can attach the Nimbelink cellular cape. This requires a bit of assembly - the SIM card, modem, and antenna all need to be connected to the cape which can then be connected to the Beaglebone.
We'll go over each of those steps in detail in this section.
Note: For detailed PDF instructions, see here.
Part 1. Attaching the Skywire Modem and Antenna
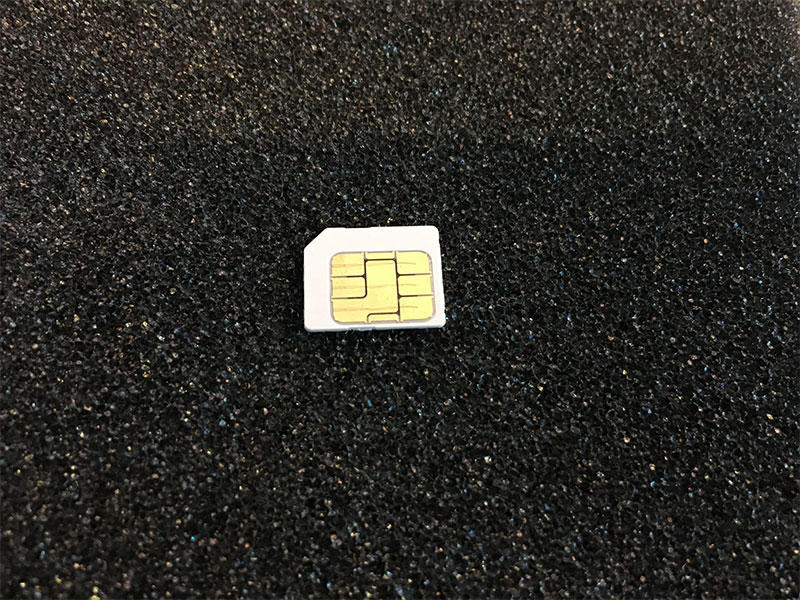
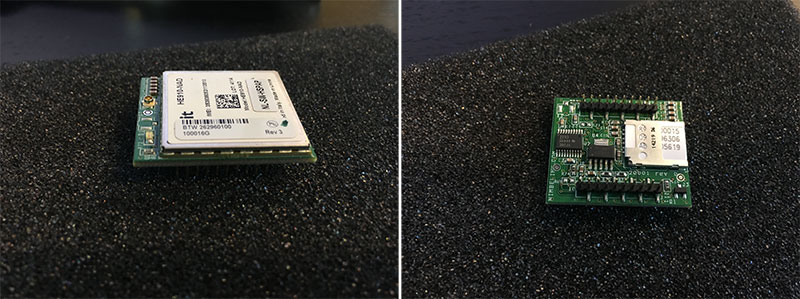
First things first, make sure you've found and popped out your Aeris SIM card. Go ahead and insert that into the Skywire modem (we'll activate the SIM card later).
Now to attach the NimbeLink cape - you'll notice a notch on one end and a curved edge on the other. The notch fits perfectly over the Beaglebone's ethernet port, so make sure you orient the cape correctly before gently pressing the cape's pins into the Beaglebone's P8 and P9 headers.
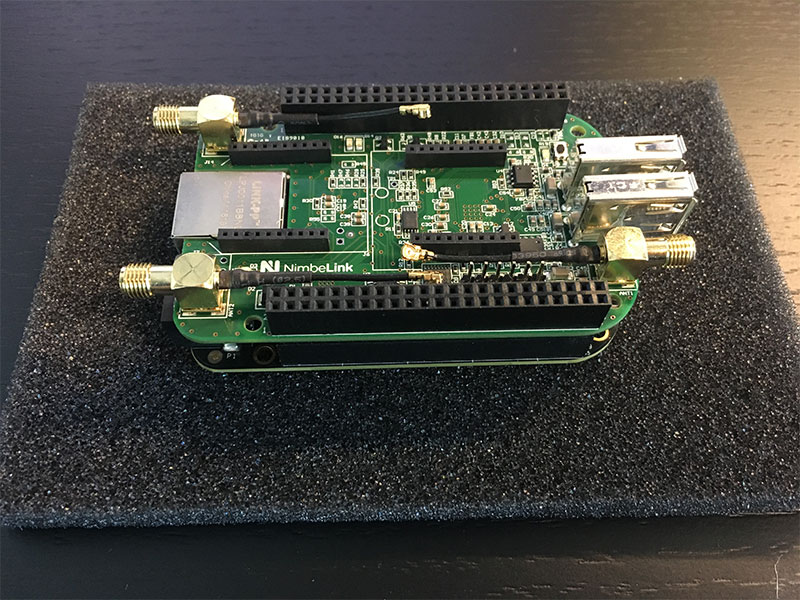
The Skywire modem goes where the two single header rows sit on top of the cape. There should be little circles on the cape - line up the modem with these for the correct orientation.
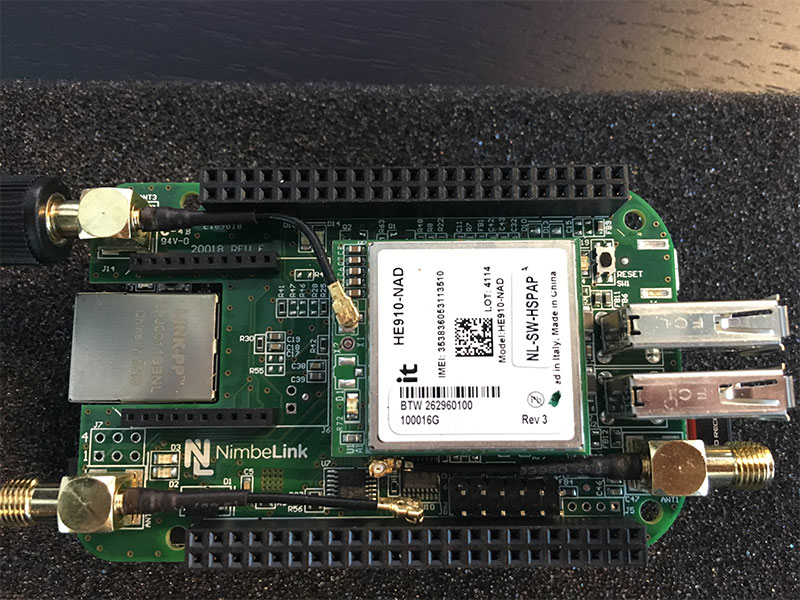
The antenna connects the ANT3 port. It's corresponding U.FL cable should be attached to the U.FL connector on top of the Skywire.

Part 1. SIM Card Setup
Your Neo Aeris SIM card should have come with some paper instructions on where to create an Aeris account and provision your card.
These instructions should also have an activation code inside.
Current steps for provisioning your SIM card are as follows: 1. Create an Aeris Neo account by going to https://digikey-neo.aeris.com and entering your billing information. 2. Assign your SIM card using your six digit activation code by clicking on Quicklinks -> Assign new SIMs. 3. Provision your SIM card by going to Devices -> SIM Inventory, checking the box next to your SIM card, and clicking the Provision button. 4. Select your rate plan.
Now your SIM card is ready to be used!
Part 2: Using the Cellular Connection
Even though the SIM card is up and running, we need to tell the cellular cape how to communicate through the Aeris Neo network.
First we'll update the Beaglebone's software and kernel; then we can establish a serial connection with the cellular cape. The serial connection will allow us to initialize and ping using the cellular network, but in order to send data we'll configure a Point-to-Point Protocol (PPP).
Let's get started!
Note: For detailed PDF instructions, see here.
Part 2. Cellular Setup
In my opinion, SSHing into the Beaglebone Black over an ethernet connection is the easiest way to deal with it. I just plug in an ethernet cord, power on the Beaglebone, and then scan my network for it to get it's IP address. If you'd rather SSH over a USB connection to your laptop, Adafruit has a great tutorial. Note: You'll still need to plug in an ethernet cord to give your Beaglebone an internet connection!
Update the Software
When you're in, update your software:
apt-get update
apt-get upgrade
Now update your kernel (you should be running Debian by default) and reboot:
cd /opt/scripts/tools/
./update_kernel.sh
reboot
Your SSH connection should drop, but you can pull it back up as soon as the Beaglebone finishes rebooting.
Note: These commands should all work if you are SSHed in as the root user. If you're working as the debian user, you may need to add "sudo" to the front of the commands. The default password for the Beaglebone is "temppwd".
Test Over a Serial Connection
The cellular cape will automatically load a device tree overlay that initiates UART2, UART4, CAN1, and 2 GPIOs. To talk to the cellular cape we are going to use picocom:
apt-get install picocom
Start picocom at a baud rate of 115200:
picocom -b 115200 /dev/ttyO4
You should see some text and notice that the terminal prompt has disappeared. You are now talking directly to the cellular modem.
Type AT and hit return. You should receive the response "OK". Next we are going to program the APN: AT+CGDCONT=1,"IP","neo.iot.net". You should see another "OK" response.
Now we're going to try pinging a network. Commands in bold should be entered - the text following them is what you should see in response:
#MWI: 1,1,0
AT+CREG?
+CREG: 0,5
OK
AT#SGACT=1,1
#SGACT: 10.134.190.225
OK
AT#PING="www.aeris.net"
#PING: 01,"174.120.146.146",23,50
#PING: 01,"174.120.146.146",23,50
#PING: 01,"174.120.146.146",23,50
#PING: 01,"174.120.146.146",23,50
OK
Exit picocom with Ctl-A followed by Ctl-X.
Hooray! We can reach a website! But what we really want to do is transmit data over a cellular connection, so let's set up a service to allow that.
Setting up the PPP Connection
We're going to use Adafruit's Fona tutorial as a base for our PPP configuration.
First we'll download a PPP configuration file inside of the /etc/ppp/peers/ directory:
cd /etc/ppp/peers/
wget https://raw.githubusercontent.com/adafruit/FONA_PPP/master/fona
There are some parts of this file that we need to edit:
nano fona
On the sixth line we need to add our APN. For the Neo Aeris SIM card, this is neo.iot.net. So your line should look like this:
connect "/usr/sbin/chat -v -f /etc/chatscripts/gprs -T neo.iot.net"
In the next section we just need to uncomment the line for the Beaglebone - remove the "#" in front of "/dev/ttyO4".
There are also a couple settings to add to the bottom of the file:
debug
updetach
You can see what the entire file should look like once you're done editing here.
Save this with Ctl-X, Y.
You'll notice that the line we added our APN to references another file - we also need to edit this:
nano /etc/chatscripts/gprs
Towards the bottom of the file you'll see the line: OK AT+CGDCONT=1,"IP","\T","",0,0
Change this to: OK AT+CGDCONT=1,"IP","\T"
You can also see what this file should look like in its entirety here.
Save and exit the file.
Part 2. Cellular Testing
Time to test out our new way to access the internet!
For this part you'll need to unplug the ethernet cord so that you aren't accidentally seeing internet traffic from something other than the cellular connection. I personally ran into a bit of difficulty connecting to the Beaglebone via USB, so for this you might need to hook your Beaglebone up to a screen or monitor and use a bluetooth keyboard/mouse.
To turn on the PPPD connection, run:
pon fona
You should see some text scroll by ending with "Connect: ppp0 <--> /dev/ttyAMA0", "PAP authentication succeeded", and a list of IP addresses. If instead you get "Connect script failed", you can further debug with cat /var/log/syslog | grep chat. Reasons for a failed connection might be bad cell reception (if you're inside a building) or a communication error with the module.
If there were no errors, you are connected to the internet! You can try another ping test, but this time from the command line:
ping google.com
You can also check for the ppp network interface with:
ifconfig
You should see a ppp0 interface. If you don't, check on PPPD again.
The PPP connection can be turned off with:
poff fona
Part 3. Connecting the Grove Cape

An internet connection is only as great as what you do with it! The Grove cape gives us a plug-and-play interface for connecting sensors to the Beaglebone so that we can read their values and turn right around and stream them.
Attaching the Grove cape is super easy - just line up the curved side of the cape with the curved side of the Beaglebone/cellular cape, make sure the P8 and P9 headers are aligned with the cape's pins and gently press down. The Grove cape works best on top of the cellular cape as this keeps the sensor ports accessible.

In this example, I'm going to use a Light sensor and an Air Quality sensor.
Part 3. Light Sensor
For this part I used this Grove Light sensor. The beauty of these sensors is that, to connect them to the Beaglebone, you just need to plug one end of the included wire into the sensor and the other end into the correct type of port on the cape.
I connected mine to the Analog 2 port (clearly marked on the Grove cape itself).

To test your light sensor, run the light.py script:
python light.py
Be sure to change the pin number if you used a different one. If everything's working correctly, you should see the exact reading and a relative brightness level print out!
Note: The Adafruit BBIO library should already be installed on your Beaglebone, but if you get an error that it's not found run the script with sudo.
Further note: The light sensor does not measure in lumen or any unit in particular - it's measurements simply reflect the trend of light intensity.
Part 3. Air Quality Sensor
For this part I used this Grove Air Quality sensor. Like the light sensor, just plug one end of the included wire into the sensor and the other end into the correct type of port on the cape.
I connected mine to the Analog 0 port (clearly marked on the Grove cape itself).
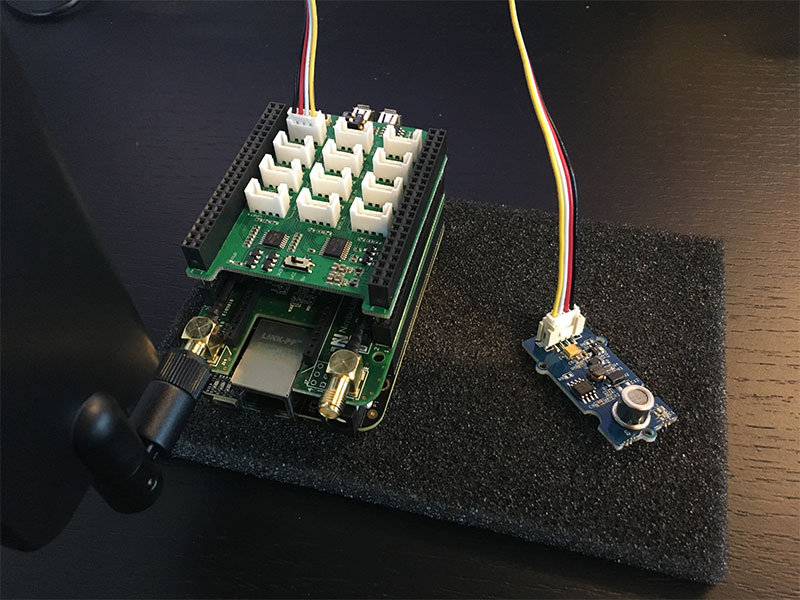
To test your air quality sensor, run the airquality.py script:
python airquality.py
Be sure to change the pin number if you used a different one. If everything's working correctly, you should see the exact reading and a relative air quality level print out!
Note: The Adafruit BBIO library should already be installed on your Beaglebone, but if you get an error that it's not found run the script with sudo.
Part 4. Streaming
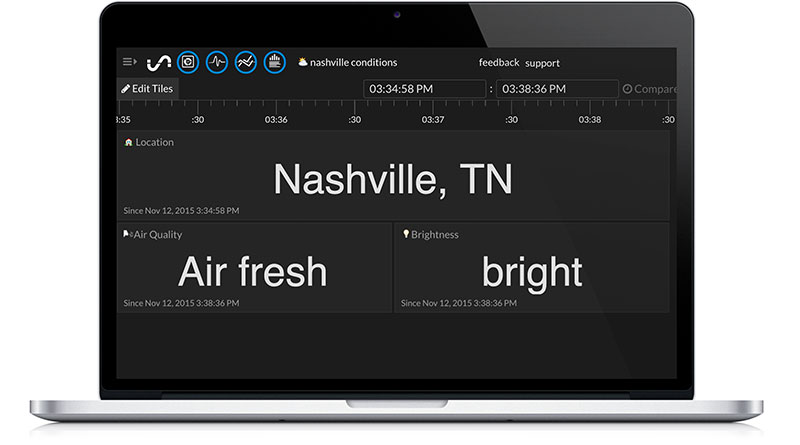
A network connection lets our Beaglebone communicate with the outside world. So why don't we move some of that sensor data to a dashboard that's accessible from a web browser anywhere? Above you can see a sample of a dashboard just showing the light and air quality sensor readings.
Part 4. Initial State
To get data off of the Beaglebone we want to stream to a cloud service and have that service turn our data into a nice dashboard that we can access from our laptop or mobile device.
Step 1: Register for Initial State Account
Go to https://app.initialstate.com/#/register/ and create a new account.
Step 2: Install the ISStreamer
Install the Initial State Python module onto your Beaglebone:
At a command prompt (don’t forget to SSH into your BBB first), run the following command:
$ \curl -sSL https://get.initialstate.com/python -o - | sudo bash
Security Note: The above command has some important anatomy that the user should be aware of. 1) There is a preceding\beforecurl. This is important to ensure no alias ofcurlgets run if one was created. This helps mitigate risk of the command doing more than intended. 2) The command is a piped command, so when running, you are piping the output of a script that is being retrieved fromhttps://get.initialstate.com/pythoninto the commandsudo bash. This is done to simplify installation, however, it should be noted thathttpsis important here for helping ensure no man-in-the-middle manipulation of the install script, especially since the script is being run with elevated privileges. This is a common way to simplify install and setup, but if you are a little more wary there are some slightly less convenient alternatives: you can break the command out into two steps and investigate the bash script being downloaded from the curl command yourself to insure it's fidelity OR you can follow the pip instructions, you just wont get an automatically generated example script.
Step 3: Make some Automagic
After Step 2 you will see something similar to the following output to the screen:

(the output may be different and take longer if you have never installed the Initial State Python streaming module before)
When prompted to automatically get an example script, type y. This will create a test script that we can run to ensure that we can stream data to Initial State from our BBB. You will be prompted:
Where do you want to save the example? [default: ./is_example.py]:
You can either type a custom local path or hit enter to accept the default.
You will be prompted for your username and password that you just created when you registered your Initial State account. Enter both and the installation will complete.
Step 4: Access Keys
Let’s take a look at the example script that was created.
On line 15, you will see a line that starts with streamer = Streamer(bucket_ .... This lines creates a new data bucket named “Python Stream Example” and is associated with your account. This association happens because of the access_key=”...” parameter on that same line. That long series of letters and numbers is your Initial State account access key. If you go to your Initial State account in your web browser, click on your username in the top right, then go to “my account”, you will find that same access key at the bottom of the page under “Streaming Access Keys”.
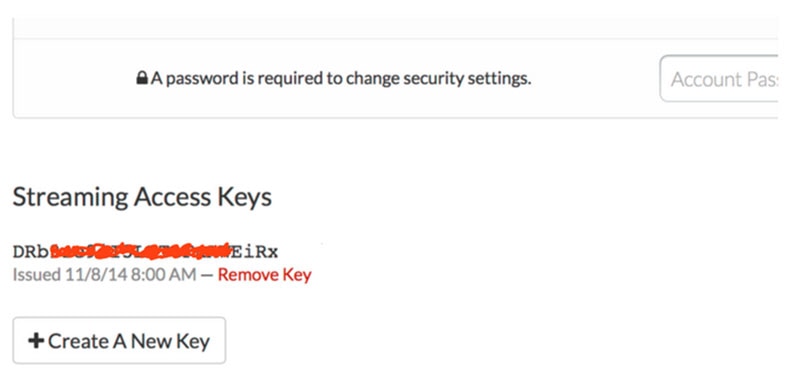
Every time you create a data stream, that access key will direct that data stream to your account (so don’t share your key with anyone).
Step 5: Run the Example
Run the test script to make sure we can create a data stream to your Initial State account. Run the following:
$ python is_example.py
Step 6: Profit
Go back to your Initial State account in your web browser. A new data bucket called “Python Stream Example” should have shown up on the left in your log shelf (you may have to refresh the page). Click on this bucket and then click on the Waves icon to view the test data.
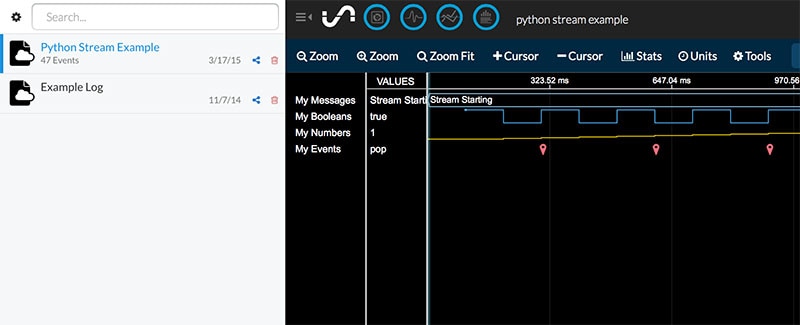
You will want to step through the Waves tutorial to familiarize yourself with how to use this data visualization tool. Next, view the data in Tiles to see this same data in dashboard form.

You are now ready to start streaming real data from your Beaglebone! We need to test streaming over our new cellular connection.
Part 4. The Code
If streaming while SSH'd in to the Beaglebone worked earlier, then it's time to try streaming over our cellular connection.
With a few minor tweaks to the sensor code from before, we can easily stream our brightness and air quality levels to Initial State. You can also just try running the example script again.
Make sure you are directly connected to your Beaglebone and are not using any other form of internet connection.
Turn on the cellular connection (remember to use sudo if you're using a user other than "root"):
pon fona
Run the example script again:
python is_example.py
OR try a modified version of the light sensor reading script. Be sure to add your Access Key on line 7!
python streamlight.py
And the air quality script. Be sure to add your Access Key on line 7!
python streamairquality.py
Check your Initial State dashboard to see your new buckets pop up. If they don't appear, you may need to check your cell connection.
If you want any of these scripts to run uninterrupted once you start them, just add "nohup" to the beginning and "&" to the end, like so:
nohup python streamlight.py &
Note: Being able to start the PPP connection on boot and then run whatever script you'd like would be ideal. I don't go over how to do that here, but Adafruit has a helpful tutorial, and, since the Beaglebone runs Debian, you can also use crontab.
Part 4. Your Personal Dashboard
Streaming the light level and air quality is cool, and seeing it update in real-time on a web-based dashboard is cooler, but the dashboard is a bit plain.

Adding some weather data from Wunderground definitely jazzes it up.
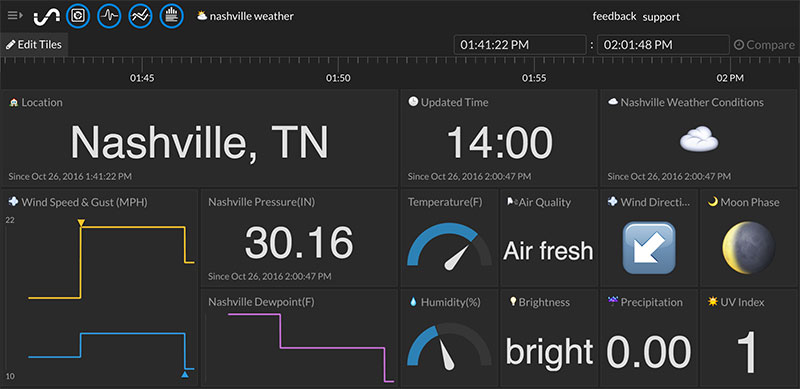
Actually, you can add as much data from as many sources as you'd like - so long as you keep the bucket key the same across all of your streamer calls.
This means that your bucket can show data from the BBB, an IFTTT applet, Google Sheets, a Raspberry Pi, and even more!
Part 5. Adding Weather Data

I mentioned add Weather Underground data to your bucket in the previous section - here's a quick overview of how to do that:
1. Setup a Wunderground account according to the instructions here.
2. Run the streamweather.py script, being sure to replace line 17 with your Access Key and line 14 with your Wunderground API key.
python streamweather.py
Checkout your dashboard! It should update every 15 minutes.
Note: This can eat up whatever cellular data plan you're on pretty quickly, so you may want to increase the time between reads or only stream exactly what you want to see.

Have questions or comments? Continue the conversation on TechForum, DigiKey's online community and technical resource.
Visit TechForum


 中国
中国