Little Microcontrollers Offer High Performance at Lower Cost
投稿人:Convergence Promotions LLC
2013-04-17
While the press gushes over the latest high-end processor, most of the real computation being done in the world is on smaller CPUs. Even eight-bitters are thriving, since control applications frequently do not need much horsepower. But what sort of development environments are out there for these parts? This article looks at three different (8-, 16- and 32-bit) evaluation boards and their development tools.
About 12 billion microprocessors are sold every year. Of those, only a few percent are for PCs, Macs, or other products conventionally thought of as “computers.” All of the rest go into embedded systems.
Some devices – like smart phones – demand a tremendous amount of computational horsepower. The magic of Moore’s Law gives us faster processors every year at a steadily decreasing price, so we can continue to deliver the new, cool features customers demand.
However, there is another side to the shrinking cost of silicon – Moore’s Law helps at the low end as well. Yes, that massive Pentium is now half the price and twice as fast as last year’s model, but the little microcontrollers are getting cheaper, too. The first commercially successful, 8-bit microprocessor cost $650 in today’s dollars when it came out in 1972. Today, the processor in an electronic greeting card, a knockoff of the 6502 that powered the Apple II, costs about three cents.
For at least two decades, pundits have been predicting the death of 8-bit microcontrollers (MCUs), but that market not only survives, it thrives. Small CPUs will probably always have price advantages over their beefier cousins. Many 16- and 32-bit devices are very small processors at heart, aimed directly at this huge market for small systems. Here is a look at one of each and the development environments associated with them.
PIC
The 8-bit Microchip PIC has hundreds of variants. Over one billion per year are shipped, and these parts are found in the very smallest of applications (like in Schick’s $7.59 Hydro 5 Power Select manual razor), as well as in systems that demand much more computational horsepower.
Microchip’s DM164134 evaluation board uses their 18LF46K22 8-bit MCU. Like all of these processors, the 18LF46K22 has a Harvard architecture (separate data and instruction buses) and operates on 8-bit data words. However, the PIC18 series uses 16-bit instructions (compared to 12 and 14 for other 8-bit PICs). With 64 KB of flash and 3.9 KB of RAM, 16 MHz operation, and a wealth of on-board peripherals, this MCU is suitable for sophisticated applications such as those requiring graphical displays and touch sensing.

Figure 1: Microchip’s DM164134 board (Courtesy of Microchip).
The board is flashed with what is probably the smallest Pong game ever, played on the tiny OLED display, but comes with essentially no information, though you can find documentation, sample code, and a schematic on Microchip’s site.
Four jumpers disconnect various portions of the board from the power supply to enable precise measurement of the current used by the MCU. The 18LF46K22 is a member of Microchip’s XLP (eXtreme Low Power) series of microcontrollers. It has a large number of power-down and power-reducing modes of operation, and in full sleep consumes only 20 nA. While running the device consumes a tiny 30 µA/MHz. Microchip claims the device can run for 20 years from a single CR2032 button cell.
The MCU’s pulse width modulator output is fed to a pair of op amps configured as a filter. The circuit is intriguing and obviously tuned for a particular, though undocumented, application. In the other direction, a microphone input goes through filters and amplifiers to the A/D input; a demo program computes and graphically displays the discrete Fourier transform of the signal, which gives an idea of the complex applications for which this part is suited.
To develop code for the board you will need one of Microchip’s many debugging tools, such as the MPLAB® REAL ICE, which works with the MPLAB X IDE, a relatively new release and a complete rewrite from earlier versions.
While the full version of MPLAB X is available for a fee, the free version is identical with a single exception: it only supports the lowest level of optimization. Actually, Microchip is a bit more generous than that. At any time, the user has a one-shot option to enable full optimizations, but after 60 days the IDE reverts permanently back to the lowest level. It is based on Oracle’s Netbeans Java architecture and runs under Windows®, Linux® and the Mac®.
One’s first thought is that an IDE for an 8-bit processor (though MPLAB covers Microchips entire line from 8 to 32 bits) would be rudimentary. Instead, it has far more capability than most embedded environments, and seems close to Visual Studio® in its vast range of capabilities. For example, one can right-click on a variable and “go to declaration” or select a macro and, with one click, see its expansion. In other ways, it exceeds Visual Studio in its ability to watch variables change in real time without stopping the code.
Version control is integrated: the IDE supports Subversion, Mecurial, and CVS.
A “dashboard” window (see Figure 2) gives a complete view of the current project’s status, including the tools being used, the memory consumed by the program being developed, resources used, and even which debugger is selected.
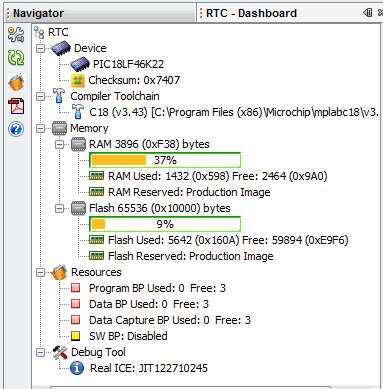
Figure 2: MPLAB’s dashboard.
Access to the special function registers (SFRs, the registers that control on-board peripherals) is better than in almost any other IDE. One view (see Figure 3) shows all of the registers in a list. Hover over one and the bits are displayed.

Figure 3: MPLAB’s SFR display.
Another view (see Figure 4) dissects the registers’ contents to show the meaning of each bit.

Figure 4: MPLAB shows the meaning of each bit in the SFRs.
The development environment made possible by the DM164134 board, and MPLAB is suited to building simple systems – and the most complex.
MSP430
The MSP430 is a family of very popular processors from Texas Instruments. While many embedded processors today tout their low-power credentials, the MSP430, like Microchip’s XLP parts, is specifically targeted at applications that require very high power efficiencies.
TI’s EZ430-F2013 development kit is a complete development environment in a tiny USB stick. It has an MSP430-F2013 microcontroller, which is one of TI’s hundreds of MSP430 variants. It is a 16-bit processor that includes 2 KB of flash and 128 bytes of RAM, which targets the device at very simple applications. The MSP430-F2013 is available in 14-pin TSSOP and DIP packages and a 16-pin QFN, so it can fit in extremely space-constrained environments. A RISC design, it requires just one clock per instruction and can run as fast as 16 MHz.

Figure 5: EZ430-F2013 development kit (Courtesy of Texas Instruments).
Figure 5 shows the entire development kit, which is comprised of two boards. The larger board, on the left, is actually a more generic platform TI produces that supports a number of different MSP430 microcontrollers. On the right, a small circuit board contains the microcontroller.
IAR’s development tools support the EZ430-F2013. Since the latter simply plugs into a USB port on a PC, no hardware debuggers are required.
Though a CD, which supposedly contains the tools and examples, is shipped with the kit, none of IAR’s tools are included and the examples are undocumented and rather baffling. Do not bother loading the CD. Instead, go to TI’s site, where you can get a very good booklet about the EZ430-F2013 kit and download IAR’s KickStart tools. The directions in the booklet make installation a breeze.
Two free versions of the tools are offered. One is a complete version of the tool chain with no limitations. That will run for 30 days before expiring. The second is limited to programs 4 KB in length or less, but it has no use-by date. Since the MSP430-F2013 has only 2 KB of flash, that is not much of a limitation.
Figure 6 is a screenshot of IAR’s IDE in action on this board. It is a full-featured development environment that should be familiar to any embedded engineer.
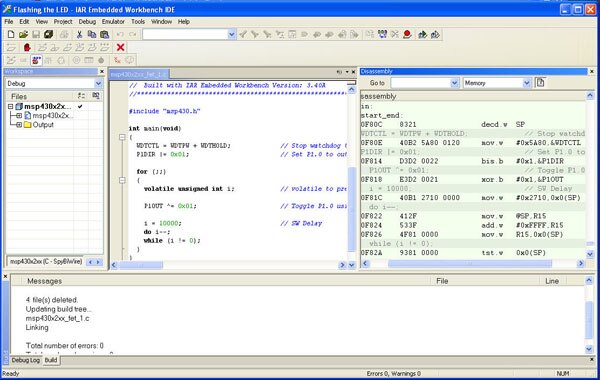
Figure 6: IAR’s IDE.
Figure 7 shows disassembled binary intertwined with the C source. Note how few instructions are needed to implement the C. Given that this is a single-cycle machine, it is clear that very respectable performance will be achieved even in a small 16-bit processor.

Figure 7: IAR disassembly window.
Mbed
Now for something completely different.
The mbed.org group (yes, the name is all lower case) has released two small processor boards. One sports an NXP LPC11U24 processor, an ARM® Cortex™-M0 – pretty much the entry point into the 32-bit CPU market. The other board uses an NXP LPC1768, which is based on the more powerful ARM Cortex-M3 core. In the spirit of looking at the smaller CPUs in these families, here is a deeper dive into the former, ARM Cortex-M0 version.
NXP Semiconductor’s mbed LPC11U24 evaluation board is the size of a 40-pin DIP package. Indeed the pins come out in exactly the same fashion, the thinking being that one can use this device to rapidly spin prototypes and play with ideas. Plug this into 3M’s solderless breadboard and you can start building a system in minutes.
The board has a USB connector, powered from the host computer. There really is not much to it: the microcontroller itself, some power conditioning circuits, five LEDs, and what appears to be a custom FPGA. As Figure 8 shows, many of the pins are shared between several functions.
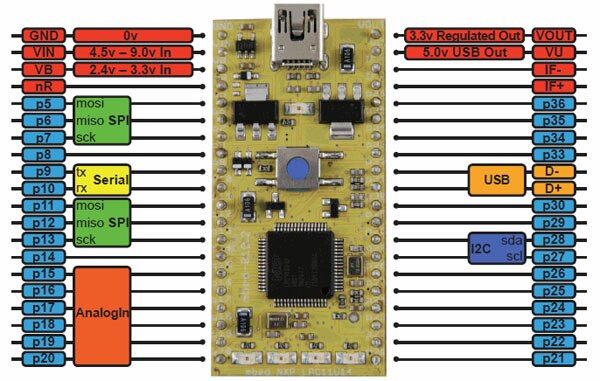
Figure 8: NXP ‘s LPC11U24 evaluation board (Courtesy of NXP Semiconductors).
Peripherals include 30 digital I/O lines, five analog channels, a pair of SPIs, serial, I²C and a USB connection. The board is supplied with a USB cable, so for the small acquisition price, one has a complete development system.
That price includes an IDE – sort of. Unlike most other evaluation boards, the compiler is not some stripped-down or time-limited device. Here is the weird and interesting part – the tools are all web hosted. There is quite literally nothing to install on your PC. Access to the IDE is all via a web front-end to the full ARM tool chain. That means any computer with a browser and USB connection can run the tool chain. Linux, PCs, Macs – they are all equally supported. This is a novel twist that greatly simplifies getting started.
How long does it take to get the tools and board up and running? Ten minutes after I opened the box, I had my first C program running on the mbed board.
In keeping with the on-line theme, the board comes with one partial page of documentation and without a CD. Plug the board into your host computer and it will be recognized as a USB thumb drive. Click on the file MBED.HTM and it will direct your browser to their web site. A simple registration process then gives you your own local file system on mbed’s server, which is where your programs will be stored.
It is incredibly easy to create a program. Type in some code into the IDE’s compiler window (or better yet, cut and paste some from the many examples they provide), hit the “compile” button, and the tool will make a binary and pop up a download window. Save the binary to the mbed pseudo flash drive. Hit reset on the board, and the code starts running. That is it.
Since the board looks like a flash drive to your host computer, many different programs can be stored on it. After a reset, the board runs the most recently changed binary. Use “touch” on Linux and Mac boxes if you are trying to handle multiple binaries at the same time. On Windows that is a bit harder, but the FAQ explains the procedure. Figure 9 is a view of the IDE.

Figure 9: mbed IDE.
Post-compile the IDE shows how much RAM and flash the program required. Figure 10 is an example. As the figures show, the entire IDE is extremely clean and uncluttered.
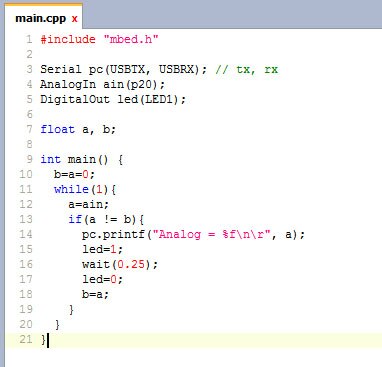
Figure 10: Memory use after a compile.
Debugging is somewhat primitive. Four of the LEDs are available to the user; it is quite easy to flash those to signal messages to the programmer. Alternatively, one can rely on the traditional method of seeding the code with printfs.
Printf connects to the host computer over the same USB link that is used to download code to the board. Output from printfs will appear in a terminal window on the host computer. That is something like HyperTerminal, not a window included in the IDE. Linux and Mac users will find there is no configuring needed; Windows people will have to install a driver, which is the only bit of installing ever needed with the mbed board. However, that USB-to-terminal (and reverse, if desired) link is both an important debugging resource and a great way to exchange data between the systems.
The web site also hosts a software development kit (SDK), which includes drivers for all of the peripherals. These, too, are uniquely implemented. Want to use the pins for digital outputs? The SDK uses standard C
structs to do the work. For instance, to use the digital output features, apply typedef DigitalOut to the “variable” of your choice. For instance: DigitalOut signal(p5); // Use pin 5 as a digital output
int i;
void main(){ signal.write=1; // write to pin 5
i=signal.read; // read from pin 5
} (Note that the tools are smart enough that the “write” and “read” suffixes can be left out.)
This organization means it is absolutely trivial to manage the signal in and out of the board. There is no setting up of registers, and the user does not need to know anything about the board or CPU design. It is all handled automatically. The SDK includes everything needed for serial, USB, I²C, Ethernet, timers, pulse width modulation, and a file system. Want TCP/IP? Add an RJ-45 connector with magnetics, such as the Bel Fuse S811-1X1T-A4-F. The TCP/IP code is in the SDK.
Confusingly, the mbed “cookbook” also contains lots of drivers and the like. There are hundreds – all free. These, though, were contributed by the community rather than by mbed themselves, so they presumably come unsupported and with no guarantees. The cookbook has hardware and software for an astonishing number of applications, including audio, wireless, motors, sensors (including various MEMS devices), filters, and linkages to other languages, including Javascript®, Matlab, .NET, and the increasingly popular Python.
The program in Figure 11 uses the SDK to read from the analog inputs and, if the current reading differs from the previous one, flash an LED and send the analog voltage to the host computer’s terminal. Note that the
typedef “AnalogIn” allows one to read the A/D simply by referring to “ain.” Toggling LEDs is just as easy. The “wait()” function invokes a timer to suspend execution; the SDK has numerous timing functions of this sort. 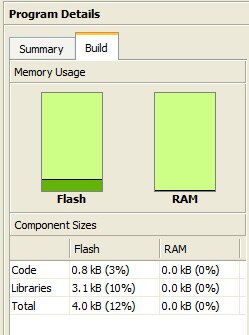
Figure 11: A program that uses the SDK to do analog I/O.
Other features of the IDE include support for the document generator Doxygen, a revision control system; diffs; and a pretty printer. For those who wish to migrate to a conventional IDE that runs on their own PCs, there is an export utility that supports GCC and tool chains such as Keil’s ULINK2 debugger. There is probably no simpler way to get an embedded system up and running than the mbed board.

免责声明:各个作者和/或论坛参与者在本网站发表的观点、看法和意见不代表 DigiKey 的观点、看法和意见,也不代表 DigiKey 官方政策。


