制造商零件编号 C503C-WAN-CBBDB152
LED COOL WHITE CLR 5MM ROUND T/H
Cree LED
License: Attribution Logic Probe / Analyzer Arduino
We're back with Part 3 of Detector Building! In the last installment, we talked a lot about the strides we made with the ORP or Oxidation Redox Probe sensor. Moving into the next stages, we're heading towards not just a fully functional sensor, but a consistent and accurate one.
Fixing Previous Issues
First, we dealt with the previous issues that we mentioned before. Before we ventured into the more complex parts, it was important to resolve these issues so they don't cascade into bigger problems later on.
The first thing that we dealt with was the LCD issues.
This was something that would appear over and over again through our sketches, to the point where the LCD ended up just being stuck with it. We made sure to clear the LCD every time the code ran through the loop and essentially had a blank slate, but this ended up not working. What I found was that the students were not closing or reloading the Arduino IDE sketch--they just kept the same one open the entire time (throughout multiple days). I checked the serial monitor, and the values weren't even updating there. After closing and re-opening the sketch with a blank serial monitor, the LCD ended up working again. I chalked it up to some memory problem of some sort and used it to explain why it's important to clear your caches.
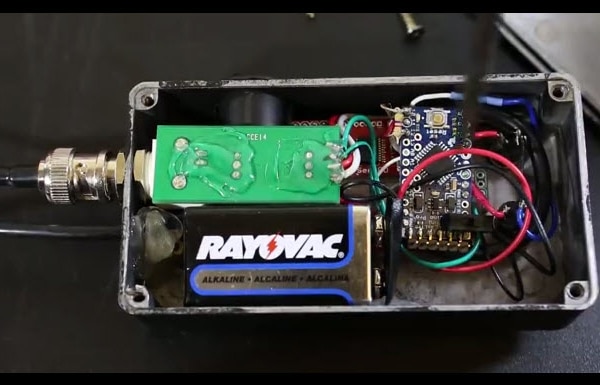
The other issue ended up being with the LEDs. In the previous blog, I showed three LEDs of different types being used. It ended up being pretty hard to calibrate these, especially for relative brightness because they were all different types, so we standardized them with one brand type (but still three different colors!)
The clear LEDs proved to be perfect as they let us see even the faintest light, whereas the colored LEDs made it a little harder to see.
Now that we had all those issues fixed, and the values starting to be stabilized, we moved on to the crux of it all: building an electrochemical cell.
Electrochemical Cells!
A big part of the rules was to build it to be a sort of electrochemical cell--including a salt bridge and probes in two different containers.
In the graphic, you can kind of see what's going on. Up until now, we've been working with just placing the probes in a single solution. For the competition, the probes will need to be in separate solutions connected by a salt bridge. Let's break it down and how it'll work.
In our case, we're essentially creating the voltmeter and finding the ppm of the solutions with the measured values. In order to facilitate this reaction though, we need to work on the electrolytic cell itself. How it'll work is that electrons would enter the left half-cell via the cathode (the probe that we use). A salt bridge is used here to move the electrons to the right while maintaining electrical neutrality and preventing electrolytes from mixing (hence why we must use a salt bridge and can't just put another wire between them). The anode would then receive the electrons and move them back up, thus facilitating the flow.
What to use as the Anode and the Cathode?
We'll need to use specific metals for the cathode and the anode, owing up to their electrode potential. Higher electrode potentials are likely to be cathodes since they can undergo reduction, whereas lower electrode potentials are to be the anodes and undergo oxidation. Choosing the appropriate cathode/anode here is essential, and with NaCl solutions, we'll either opt for something graphite or platinum. This is because they are inert electrodes and won't have any external reactions, allowing the voltage to solely be from the flow of electrons. We've since ordered probes and, although I won't be there to help the students test them, are confident that they should work well.
The Salt Bridge
The next thing to do was to make an effective salt bridge. The salt bridge here needs to maintain neutrality while also moving electrons efficiently. We had three options to choose from:
- Traditional Filter Paper was their first option as it was cheap and widely used, especially in chemistry classes. The students soaked it in a KNO3 solution, which would allow it to move electrons efficiently. This worked for a while and had a reading of around 300-400 for the sensor, but over time had salt crystals formed on it, showing that it could not be reliable.
- Gelatin was next up, providing a more permanent and robust approach. The students used a PVC pipe with some right-angle connectors in order to keep the gelatin in one place when allowing it to solidify. It had lower readings though, around 200-350, but kept still. It was, however, quite bulky.
- Dialysis Tubing with KNO3 solution was the final and chosen option. Essentially, the tubing was permeable and would let electrons through while keeping the liquids on the outside separate, facilitating the reactions without deteriorating or being very bulky. Best of all, it kept up the highest reading of roughly 500-600, meaning that it was also the most efficient.
Future Plans
Getting the Dialysis Tubing and the salt bridge up and going was the last thing that I did before leaving--finally getting good values and establishing a salt bridge. The students will need to work on adding in the new probes, and of course, getting the numbers that the sensor receives to actually mean something. The biggest part will be calibrating it through a series of solutions, but after working with them over a couple of weeks, I'm confident that they have the skills and knowledge to go off on their own. I advised on almost all of the work mentioned here, but I remained hands-off during the process. For now, this is the last update until I meet with them again to check their progress in person!
Check out the previous parts here, or the sister project--Robot Tour!
Robotics Education: The Basics