制造商零件编号 SC0022
SBC 1.2GHZ 4 CORE 1GB RAM
Raspberry Pi
License: See Original Project Raspberry Pi SBC
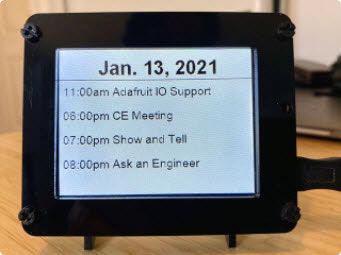
Digital signage is fantastic for drawing people’s attention to whatever is on display. These animated signs are versatile and ideal for many situations, such as fairs and expos. They are also helpful for advertising products or services, for example, in a store window. This article discusses a simple, beginner-friendly project that turns a Raspberry Pi and any compatible display into a lively digital sign that can play animations and slideshows – perfect for making a bold impression.
Project Goals
Users of a digital kiosk display should not have to spend much time setting up the device, for example, when relocating a stall from one event to a new location. Instead, the digital signage should turn on automatically when plugged in and display previously defined slides and videos. However, users should still be able to adjust some settings without disassembling the device or editing source code or configuration files. Thus, the Pi must operate headless without an external keyboard and mouse.
The final unit should be self-contained and have one potentiometer for adjusting the delay between slides. Further, the device should have a single push button to safely power down the Raspberry Pi before unplugging the device.
Required Components
Qty Part
1 HDMI Cable
1 HDMI Monitor
1 10K Potentiometer
1 10µF Electrolytic Capacitor
1 Pushbutton
Building the Hardware
The Raspberry Pi GPIO does not have analog input pins that would allow obtaining precise readings of a potentiometer’s turn angle. Instead, you will have to get more creative when hooking up a variable resistor without using an external analog-to-digital converter (ADC). As an alternative, you can utilize a capacitor with known capacitance. Together with the potentiometer – which is nothing more than a variable resistor – you can build a simple RC circuit to determine the resistor value and, thus, the potentiometer’s turn angle. This approach is not as precise as using an analog input, but it helps cut down the project’s complexity. As the potentiometer is only used to switch between three modes, the limited accuracy is no problem. Besides the potentiometer, the project also contains a single push button for shutting down the Raspberry Pi:
This image shows the project’s schematic diagram. Scheme-It link
Note that this project uses a Raspberry Pi Model 3B as that version of the SBC has a single full-sized HDMI port, which further helps reduce the number of components in the final build. However, you can replace it with newer models if you need more processing power or want to utilize multiple displays.
Prerequisites and Installing the Required Programs
When setting up the Raspberry Pi for a digital kiosk display, ensure that you choose the complete Raspbian installation that includes a desktop environment, as the slideshow program, responsible for displaying the digital signage content, relies on a graphical UI. Further, the operating system should be configured to automatically boot into the desktop environment and automatically login as the Pi user after startup. Both settings can be found in the raspi-config program.
Choosing the desktop autologin boot option ensures that the computer can automatically start displaying the slideshow after a reboot.
Once the Pi is up and running, the following command can be used to install the MPV media player:
sudo apt install mpv
Configuring the Raspberry Pi Shutdown Overlay
The Raspbian OS has several overlays for controlling hardware functions, and one is particularly handy for this project. By adding a single line to a configuration file, you can easily add a shutdown button to any RPi-based project. The configuration file can be edited in any text editor, for example, using the following command:
sudo nano /boot/firmware/config.txt
Note that older versions of Raspbian used a different file to configure this feature:
sudo nano /boot/config.txt
Once you find the correct file, you need to append the following line to the configuration file:
dtoverlay=gpio-shutdown,gpio_pin=3
After adding the line, the system needs to reboot to enable the additional overlay:
sudo reboot now
Doing so instructs the system to load the relevant dtoverlay on startup, which tells the system to listen for the specified GPIO pin being pulled low. In this case, the system monitors pin three, which is directly shorted to GND when the push button is pressed, thus triggering the OS shutdown procedure.
Writing the Slideshow Management Program
The Raspberry Pi needs to monitor whether the kiosk display program is still running and restart the software if it has crashed or stopped. The monitor must also detect changes in the potentiometer turn angle and adjust the slideshow timing if necessary. The Pi runs a Python application that detects potentiometer value changes and restarts the slideshow program if required.
The script begins by importing some necessary modules and initializing a few variables that control the program behavior:
import RPi.GPIO as GPIO
import subprocess
import time

potWiper = 17

# Adjust these as needed
minVal = 25000
midVal = 37500
maxVal = 50000

slideshowDelay = {
    "MIN": 5,
    "MED": 15,
    "MAX": 30
}
slideshowFolder = '/home/pi/slides'

currentPotAngle = "MIN"
mpvProcess = None
The potWiper variable holds the GPIO number of the pin connected to the potentiometer's wiper. The minVal, midVal, and maxVal variables store the threshold values for choosing one of the three delay options in the slideshowDelay map. The program determines the potentiometer's angle by first discharging the capacitor and then allowing the voltage to rise again. It runs a loop during this process, counting the iterations until the voltage increases enough to pull the GPIO pin high. This count reflects the potentiometer's angle.
Next, the program contains two helper functions for initializing the potentiometer and for determining its turn angle:
def initPotentiometer():
    GPIO.setmode(GPIO.BCM)

def readPotentiometer():
    reading = 0
    GPIO.setup(potWiper, GPIO.OUT)
    GPIO.output(potWiper, GPIO.LOW)
    time.sleep(0.1)
    GPIO.setup(potWiper, GPIO.IN)
    while GPIO.input(potWiper) is GPIO.LOW and reading <= maxVal:
        reading += 1
    reading = maxVal - reading
    # Return one of three states, according to the turn angle
    if (reading <= minVal):
        return "MIN"
    elif (reading > minVal and reading < midVal):
        return "MED"
    else:
        return "MAX"
The readPotentiometer helper resets the counter with each call. It then pulls the potWiper pin low to discharge the capacitor during the 100-millisecond wait period. The function then changes the pin to an input and counts how many cycles the capacitor takes to recharge. As the capacitance and voltage remain fixed, the duration depends solely on the potentiometer’s turn angle, which changes the resistance. The longer it takes to charge up, the higher the resistance. The function continues when the pin is pulled high, or the counter exceeds a particular value. This additional check prevents stalling the application. Finally, the function returns one of three strings, depending on the counter value.
The main part of the script calls these helper functions in an endless loop:
try:
    initPotentiometer()
    while True:
        potAngle = readPotentiometer()
        time.sleep(0.25)
        if (potAngle is not currentPotAngle or mpvProcess is None or mpvProcess.poll() is not None):
            print("Detected delay change")
            startMPV(slideshowDelay[potAngle])
            currentPotAngle = potAngle
        else:
            time.sleep(5)
except KeyboardInterrupt:
    print("Program ended by user!")
finally:
    GPIO.cleanup()
    if mpvProcess:
        endMPV()
    print("Monitor program shutdown complete!")
The try-except-finally construct checks whether a user hits CTRL + C on the keyboard to stop the program. If it detects the key combination, the script shuts down the media player and frees the GPIO resource. The application reads the potentiometer value within the endless while loop using the function described above. It then checks whether the new reading differs from the previous value. The program calls the startMPV helper function when it detects a change or notices that the media player program is inactive. Otherwise, the application sleeps for five seconds before repeating the checks.
The following two helper functions manage the external media player:
def endMPV():
    global mpvProcess
    mpvProcess.kill()
    mpvProcess = None

def startMPV(delay):
    global mpvProcess, slideshowFolder
    if mpvProcess:
        endMPV()
    mpvProcess = subprocess.Popen([
        'mpv',
        '--image-display-duration={}'.format(int(delay)),
        '--loop-playlist=inf',
        '-fs',
        '--ontop',
        '--no-border',
        slideshowFolder
    ])
The endMPV helper method stops a previously started MPV process, and the startMPV can spawn a new child process using the subprocess library. When starting a new MPV instance, the program passes in some command-line arguments to ensure the slideshow is always displayed on top of all other applications in fullscreen mode. The parameters also instruct MPV to repeat the slides infinitely. They also pass the potentiometer-controller delay value to the MPV media player.
Adding a Startup Service
Finally, the operating system must start the custom Python script after booting up and loading the desktop environment. For that purpose, the script must be executable using the following command:
chmod +x /path/to/the_script.py
Next, create a new system service using the following command:
sudo nano /etc/systemd/system/kiosk_script.service
The following code snippet defines what the service does and when it should run. In this case, the service instructs the system to run the Python program after loading the desktop environment and to restart the program whenever it crashes:
[Unit]
Description=Run the kiosk Python application
After=graphical.target
Requires=graphical.target

[Service]
Type=simple
ExecStart=/usr/bin/python3 /home/pi/digital_kiosk.py
Restart=always
User=pi
Environment=DISPLAY=:0
Environment=XAUTHORITY=/home/pi/.Xauthority

[Install]
WantedBy=default.target
After saving the file, the system service daemon needs to be restarted to pick up the new service:
sudo systemctl daemon-reload
The service can then be enabled and started using the following commands:
sudo systemctl enable kiosk_script.service

sudo systemctl start kiosk_script.service
Finally, it’s worth checking whether the service is running by typing the following command:
sudo systemctl status kiosk_script.service
The system should report that the service is active. If it instead reports an error or the service is stopped, go back, and double-check the service file for typos. Adjusting the path to the Python script may be necessary if the file has a different name or is stored in a directory other than the pi user’s home folder.
This screenshot demonstrates that following the outlined steps results in the system picking up the service and starting it as expected.
Summary
Digital signage can be a stunning centerpiece of convention booths or a point of sale. The animated display helps draw attention to highlights by flipping through predetermined slides and videos to showcase products and services.
Building a kiosk display using a Raspberry Pi and an HDMI monitor is a breeze. It requires only the SBC, an HDMI monitor, and a few cables. An additional push-button and a small RC circuit, built using a potentiometer and a capacitor, can further enhance the user experience by allowing operators to change settings on the fly.
The custom Python script is the heart of this project. It regularly checks if the MPV media player is still running and restarts it if necessary. It also monitors whether a user requested to change the slideshow delay using the potentiometer.
As the Pi doesn’t have analog inputs, the script determines the potentiometer’s angle by measuring how long it takes to charge the capacitor. Whenever the script detects a change, it restarts the media player with the selected delay value. The OS monitors the push button and powers off the computer when pressed.